Σελίδα 10 από 11 ΠρώτηΠρώτη ... 891011 ΤελευταίαΤελευταία
Εμφάνιση αποτελεσμάτων : 91 έως 100 από 104

Θέμα: Πίσω πάτωμα Ε46 Μ3 + Ε46

  1. #91
    Εγγραφή
    23-12-09
    Περιοχή
    salonica
    Μηνύματα
    13.324
    Thanked
    18605
    Rides
    1

    Προεπιλογή

    Τα σινεμπλοκ των πίσω ψαλιδιων φαγωνονται εύκολα λόγο της θέσης τους. Σκεφτητε ότι στην θέση που βρίσκονται και με τη γωνια που έχουν, προσπαθούν να συγκρατησουν τις μετατοπησεις βάρους.

    Μέσα έξω πάνε όλη την ώρα. Πέραν του κακού σχεδιασμού, εγώ επιμένω και στον τρόπο που ειν κατασκευασμενα τα σινεμπλοκ.

    Στο δικό μου τη δεύτερη φορά, ανοίξαμε και από πάνω αν θυμάμαι καλά.
    sympether with chiefτης

    _________________________________________________

    /
    //Μ3 BORN ON THE RACETRACK TO LIVE IN THE STREETS

  2. #92
    Εγγραφή
    09-01-10
    Περιοχή
    Σε τσαντηρι (ΝΟ ΦΟΡΟΣ)
    Μηνύματα
    1.636
    Thanked
    4857
    Rides
    0

    Προεπιλογή

    Ο αφρος δεν ειναι η καλυτερη λυση. Ενα μπαλωμα ειναι για την μ@λακια που εκαναν κατα τον σχεδιασμο.

    Η BMW σαν επισημη εταιρεια επρεπε να βρει μια μη επεμβατικη λυση, οχι κατ αναγκη την καλυτερη, και ετσι πιστευω κατεληξαν στον αφρο, καθως δεν μπορει να κοβει θολους η να κολαει λαμακια σαν official λυση στο προβλημα.

    Η αποψη μου ειναι οτι πρεπει να γινει και δουλεια απο πανω για να εχουμε τα καλυτερα δυνατα αποτελεσμα. Μονο λαμακια απο κατω δεν νομιζω να μας δωσουν μονιμη λυση στο προβλημα
    Καταλαβαινω ομως και αυτους που δεν θελουν να κοψουν απο πανω για οποιους λογους, κυριως ψυχολογιας και εμφανισης.

    Οσοι βαζουν αφρο να εχουν υποψιν οτι σε περιπτωση που αποφασισουν να κολλησουν λαμακια απο κατω μεταγενεστερα, οι θερμοκρασιες που θα αναπτυχθουν κατα την διαρκεια της συγκολησης θα επηρεασουν τον αφρο που θα βρισκεται ηδη μεσα.

    Η σωστη οδηγηση ειναι ενας ακομα παραγοντας που θα βοηθησει στο να μην ξαναεχουμε προβλημα με το πατωμα ακομη και μετα την επισκευη. Αμα ο αλλος ειναι σιδεροφαγος και σε καθε φαναρι φευγει ταπα με μονιμο wheel hoping, το πατωμα θα ξαναανοιξει.

  3. The Following 4 Users Say Thank You to turbodog For This Useful Post:

    aimiliosbmw (07-01-16), BILL007 (06-01-16), chrisgiapz3 (07-01-16), VanVIC (09-02-16)

  4. #93
    Εγγραφή
    19-05-10
    Περιοχή
    ATHENS-GREECE
    Μηνύματα
    1.855
    Thanked
    3074
    Rides
    1

    Προεπιλογή

    Υπαρχουνε Μ3 Ε46 με πανω απο 200.000χλμ που δεν εχει κανει κιχ το πατωμα,βεβαια τα οδηγανε κυριως μεγαλοι ανθρωποι και γυναικες (τα 2 που ξερω).
    insane in the ///Midbrain

  5. #94
    Εγγραφή
    23-12-09
    Περιοχή
    Αθήνα
    Μηνύματα
    11.179
    Thanked
    14070
    Rides
    1

    Talking

    Παράθεση Αρχικό μήνυμα απο turbodog Εμφάνιση μηνυμάτων
    Αμα ο αλλος ειναι σιδεροφαγος και σε καθε φαναρι φευγει ταπα με μονιμο wheel hoping, το πατωμα θα ξαναανοιξει.

    LET'S GOOOO!!!!!


  6. The Following User Says Thank You to BILL007 For This Useful Post:

    chrisgiapz3 (07-01-16)

  7. #95
    Εγγραφή
    20-12-10
    Περιοχή
    ATHENS
    Ηλικία
    43
    Μηνύματα
    212
    Thanked
    178
    Rides
    1

    Προεπιλογή

    Ο κωδικός της BMW είναι ο Structured Foam - 83190445721 άλλα όπως θα διαπιστώσετε τον προμηθευεται από τη Henkel που είναι ο
    TEROSON Terocore-1401CA-25 άλλα δεν τον φέρνει η Henkel Ελλάς.
    Attached Images Attached Images
    Συνημμένα αρχεία Συνημμένα αρχεία

  8. The Following 6 Users Say Thank You to aimiliosbmw For This Useful Post:

    BILL007 (09-02-16), chrisgiapz3 (09-02-16), ghost-rider (09-02-16), Vasilis M3 (10-02-16), wheelman (09-02-16), zaharias (09-02-16)

  9. #96
    Εγγραφή
    25-11-11
    Περιοχή
    Piraeus
    Μηνύματα
    2.939
    Thanked
    8023
    Rides
    3

    Προεπιλογή

    Παράθεση Αρχικό μήνυμα απο aimiliosbmw Εμφάνιση μηνυμάτων
    Ο κωδικός της BMW είναι ο Structured Foam - 83190445721 άλλα όπως θα διαπιστώσετε τον προμηθευεται από τη Henkel που είναι ο
    TEROSON Terocore-1401CA-25 άλλα δεν τον φέρνει η Henkel Ελλάς.
    Great find!!!

  10. #97
    Εγγραφή
    23-12-09
    Περιοχή
    Αθήνα
    Μηνύματα
    11.179
    Thanked
    14070
    Rides
    1

    Προεπιλογή

    Παράθεση Αρχικό μήνυμα απο aimiliosbmw Εμφάνιση μηνυμάτων
    Ο κωδικός της BMW είναι ο Structured Foam - 83190445721 άλλα όπως θα διαπιστώσετε τον προμηθευεται από τη Henkel που είναι ο
    TEROSON Terocore-1401CA-25 άλλα δεν τον φέρνει η Henkel Ελλάς.
    TΡΟΜΕΡΗ ΑΝΑΚΑΛΥΨΗ!!! for sharing!!!!!


    Technical Data Sheet Terocore 1401 CA-25

    Two-component structural foam to increase the stiffness, strength, fatigue strength and improving the vibration behavior pumped, room temperature curing

    Product Description Terocore 1401 CA-25 is a two component, low expanding, high-strength structural epoxy resin-based foam having high compressive strength and low density. Terocore 1401 CA-25 is free from solvents, isocyanates and PVC. Curing takes place at room temperature by the reaction of A and B component. The reaction can be heated by the Components are accelerated up to 50 ° C. Depending on the geometry and Amount of material, the foam can vary degree. Applications Terocore 1401 CA 25 containing hollow microspheres, reducing its stiffness, strength and duration be increased vibration resistance. Applications include voids, sheets and Structural parts. Terocore 1401 CA-25 can be used for prototypes or as a repair solution of cartridges for the large-scale operation to be processed out of barrels.

    Specifications Terocore 1401 AA-25 Component A Terocore 1401 AA-25 Component B Color: dark gray white / light gray Odor: characteristic by amine Density: about 0.8 g / cm 3 about 0.6 g / cm 3 Flow meter at 20 ° C: 30 s/20 g 26 s/20 g Nozzle: 4 mm Pressure: 2 bar Mixing ratio by Volume: 2 1 Mixture (component A + B) Terocore 1401 CA-25 Color: gray Odor: after curing neutral Pot life (according to Bohlin, oscilutf8g) at 20 ° C: 90 minutes at 30 ° C: 60 minutes Density (cured): about 0.7 g / cm 3 Pressure resistance: 15 - 20 MPa Modulus of elasticity: 700 ± 50 MPa Poisson's ratio: 0.22 to 0.26 Volume change: 0-30% (depending on the hardening) Water absorption: <0.5% weight gain Test conditions: 24 hours at 98% RH, 40 ° C Service temperature: -40 ° C to 90 ° C. short-term (up to 1 h): 110 ° C

    Processing
    Terocore 1401 CA-25 is located in the cartridges in the ratio 2:1 before (by volume). To Processing is the safety pin from the plug. Subsequently, the unscrew top cap, the stopper removed and attached to the mixer before remote cap screwed back on the thread. (Note: Use only original mixer since otherwise can be assumed for the mixing no warranty!) For applications in cavities or parts of the structure to be reinforced parts are quite or partially filled with Terocore 1401 CA 25th (Note: Terocore 1401 CA-25 is expanding by about 0 - 30%) Where appropriate, a hole with a diameter of 7 - 14 mm are drilled, through which the material may then be introduced. The openings are then simply sealed with tape. Functional openings after filling with Terocore 1401 CA-25 must still be used, by prior introduction of Terocore 1401 CA-25 kept free appropriate action. Optionally it is possible, while the openings expose the curing process before the final curing of the foam. If after removing the required amount Terocore 1401 CA-25 nor material in the cartridges is present, the mixer is removed, cleaned thoroughly and the MaterialauslassΓΆffnungen Safety plug and the cap put back. The remaining material is then possible to are processed by a new mixer is placed.

    Curing
    The curing process takes place without additional heat from the outside only by chemical Reactions take place at room temperature after the mixing of components A and B. Warning: This reaction can be carried large quantities Terocore 1401 CA-25 to excessive heat lead. The heat generation and thus the curing time and degree of expansion are determined by the Application temperature, and the geometry of the filling body, and the material quantity determined. When surface application in thin layers of heat and degree of expansion are small. When filling large volume of voids in the material to temperatures up to 160 ° C be achieved. The increase in volume is then about 30%. The parts have to be filled may be handled or transported with protective gloves. After about 8 to 24 hours (depending on Temperature, application, and amount of introduced free surface) has cured the material.

    Cleaning
    Fresh, uncured material should immediately with a dry cloth of the substrates or the cartridge and gun tips are wiped. Remains of Terocore 1401 CA-25 can be removed (eg, benzene) with solvents. In barrel processing systems The filled with mixed material parts are cleaned by rinsing with the A-component. Cured material can only be mechanically removed.
    Τελευταία επεξεργασία από το χρήστη BILL007 : 09-02-16 στις 21:13


  11. #98
    Εγγραφή
    23-12-09
    Περιοχή
    Αθήνα
    Μηνύματα
    11.179
    Thanked
    14070
    Rides
    1

    Προεπιλογή

    Παράθεση Αρχικό μήνυμα απο aimiliosbmw Εμφάνιση μηνυμάτων
    άλλα όπως θα διαπιστώσετε τον προμηθευεται από τη Henkel που είναι ο
    TEROSON Terocore-1401CA-25 άλλα δεν τον φέρνει η Henkel Ελλάς.
    Mάλλον γενικά δεν μπορείς να τον παραγγείλεις απ'οτι διάβασα Αιμίλιε...Εκτός και είναι batch ποσότητα που δεν θα σε συμφέρει
    Το έχεις βρει πουθενά αλλού μεμονομένα προς παραγγελία?

    Batches are only made for OEM and Suppliers unless you're looking at spend a few thousand on a batch of the stuff. I've already done all the research you just did.

    Sigh... wish there was an easier way to get this foam or even fix the sub frame.
    Κάποιος τελικά λέει πως κατάφερε αλλά και πάλι η τιμή της BMW ήταν φθηνότερη!

    This might not be the deal I was hoping for.

    BMW structural foam ¤127.20 for 840 ml (2 x 420ml tubes) = ¤0,151 / ml
    Terocore 1401 ¤38 for 175 ml = ¤0,217¤ / ml (+43% compared to BMW)

    You need 1700 ml of structural foam in total for rear right and left mounting points.
    I did not find the thread for the front mounting points foam method though ? I remember seeing it and can't find the DIY anymore. How much structural foam is needed for that ?

    Total cost for rear mounting points (with my prices) :
    BMW : 255¤ inc. VAT
    Teroson : 380¤ inc. VAT

    BMW prices don't sound that bad anymore ! That thing is expensive !
    https://www.m3forum.net/m3forum/showthread.php?t=421501
    Τελευταία επεξεργασία από το χρήστη BILL007 : 09-02-16 στις 21:32


  12. #99
    Εγγραφή
    23-12-09
    Περιοχή
    Αθήνα
    Μηνύματα
    11.179
    Thanked
    14070
    Rides
    1

    Exclamation

    Eπίσης ΠΡΟΣΟΧΗ! Το υλικό έχει ημερομηνία λήξης!!!!!
    Product shelf life is 12 months

    Κατά καιρούς εμφανίζονται σετ σε πολύ πιο χαμηλή τιμή και ο λόγος είναι οτι είναι ληξούρια!


    Τελευταία επεξεργασία από το χρήστη BILL007 : 09-02-16 στις 21:23


  13. The Following User Says Thank You to BILL007 For This Useful Post:

    aimiliosbmw (09-02-16)

  14. #100
    Εγγραφή
    23-12-09
    Περιοχή
    Αθήνα
    Μηνύματα
    11.179
    Thanked
    14070
    Rides
    1

    Προεπιλογή

    https://www.m3forum.net/m3forum/show...post1066085604


    Και επίσης epic posts!

    A lot of the discussion in this thread has been about how many tubes of foam to inject, which holes to inject it into, which layers to inject it into, whether cavity foam is required and if so, where it should be injected. Some of uncertainty arose when people started to look closely at BMW's original procedure and question it. Also, conflicting information has been posted in various forums.

    Since there's so much conflicting information and injecting foam is irreversible, I decided to take a look at this to satisfy myself how it should be done before I do it. I wish I had an uninstalled RACP to inspect, but since I don't, I looked for photos. There are a lot of photos, but unfortunately, most are of the rear mounts. There aren't very many useful photos of the front mounts. I used images from M3F (here and here), as well as from posts on www.vrperformance.com, www.e46zone.com, m3cutters.co.uk and aussieexotics.com. Thanks to those who posted the photos, especially maruscmn and thomn8r.

    Since there are so many good photos of the rear mounts, I started there.

    Below is a photo of an "original" coupe RACP. I've highlighted some notable areas.
    In the red, you can clearly see that at least in this view, the driver and passenger side rear mounts appear to be mirror images of each other. Without cutting an RACP open, I have no way to confirm if they are mirror images inside, but I'd be surprised if they aren't. I think it's safe to say that the claim that the passenger side mount is different can be disregarded. Based on this photo, the procedure for injecting foam into the rear mounts should be the same for both sides, at least for the original design RACP.

    In the yellow, you can see that if there is a passage from the cavity between the rear mounts to the cavity between the front and rear mounts (the blue area and the corresponding area on the passenger side), it's quite small. Again, there's no way to confirm how big the passage is without cutting an RACP open.
    Based on this photo, in my opinion, the best places to inject foam in the rear mounts are the smaller outer openings on the driver and passenger sides (highlighted in green). My reasons for this are because the areas to the far left and far right are small volume, closed off (the foam has nowhere to go) and the two openings are very close to the mounts. If all of the foam is injected into these openings and allowed to flow inward from either side, the mounts will be completely encapsulated and any air pockets will be pushed in one direction, inward. It would be useful to know what the volume of the cavity is to confirm the amount of foam required. When / if I inject foam into the RACP on my car, I will probably close off the larger openings (highlighted in purple) to force the foam to stay within the internal cavity. I think this makes sense, because the load on the rear mounts is tension (particularly on the driver side), so putting foam above the structure doesn't serve any purpose, whereas filling the entire lower cavity with foam will distribute the load all the way across the RACP instead of only toward the sides.


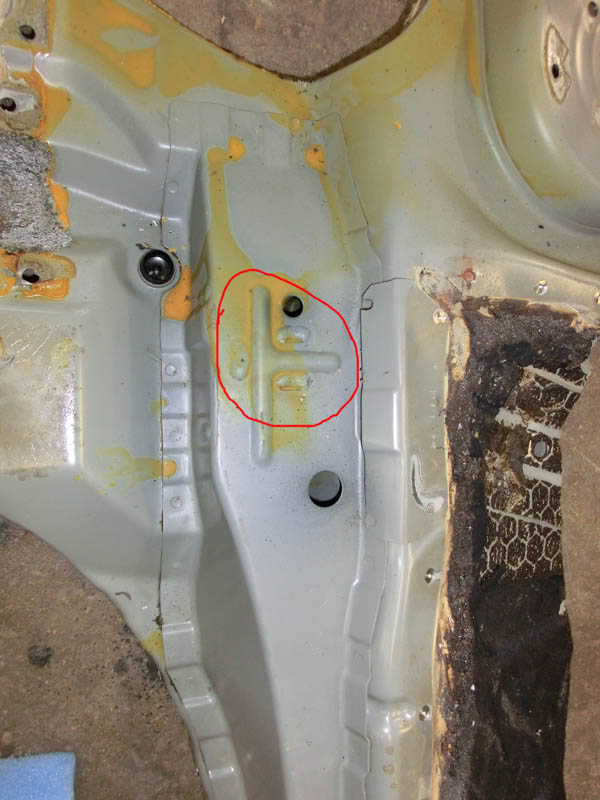
    Here is a close-up of the driver side rear mount. The highlighted area is on the original, but note the area where the passage to the front mounts is located. If there is an opening between the internal cavity of the rear mounts, it's small.


    Below is a photo of a new RACP. I highlighted the major difference, which is what appears to be a barrier inside the rear cavity on the driver side.


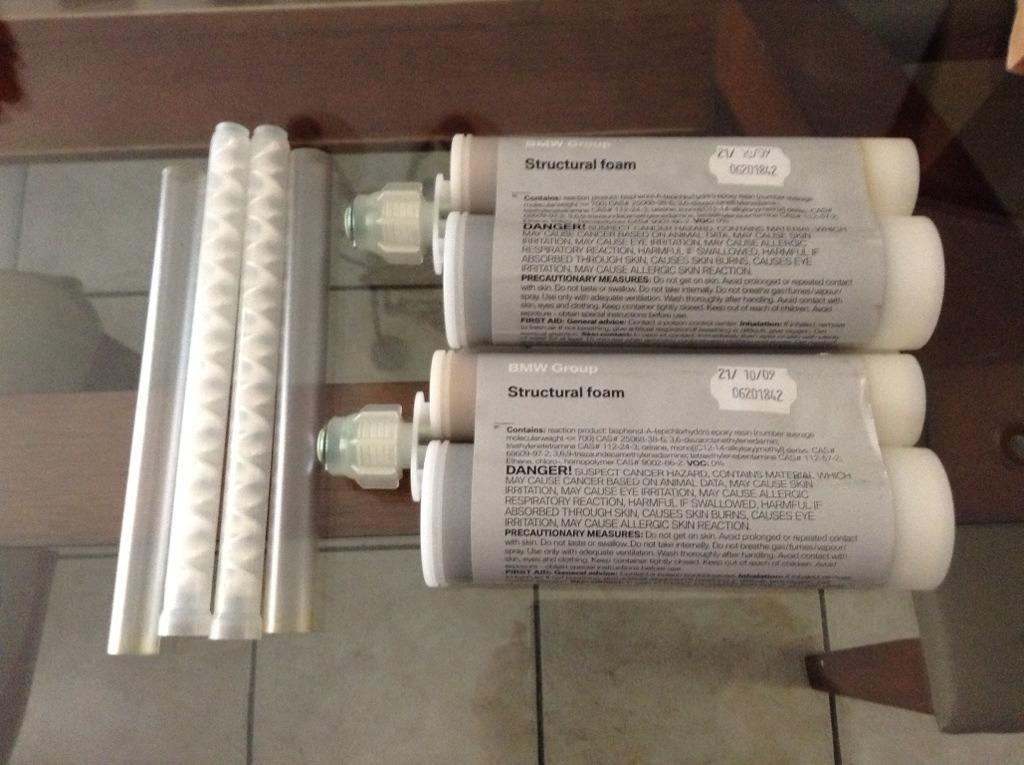
    Here are a couple of close-up photos showing the difference. If it's a barrier, as suspected, then it will prevent foam from flowing toward the inner part of the rear mount structure. Perhaps the additional spot-welds noted by Redish are an improvement, but I don't think this barrier (if that's what it is) is an improvement. Since most people are injecting 2 x 420 ML into this cavity, it would be useful to know what the volume is. It would also be useful to know where excess foam would try to exit the cavity if too much is injected. If someone wanted to completely fill the rear cavity all the way across, it would might have to be done from the passenger side, depending on how tightly the barrier seals the cavity (assuming it is a barrier).


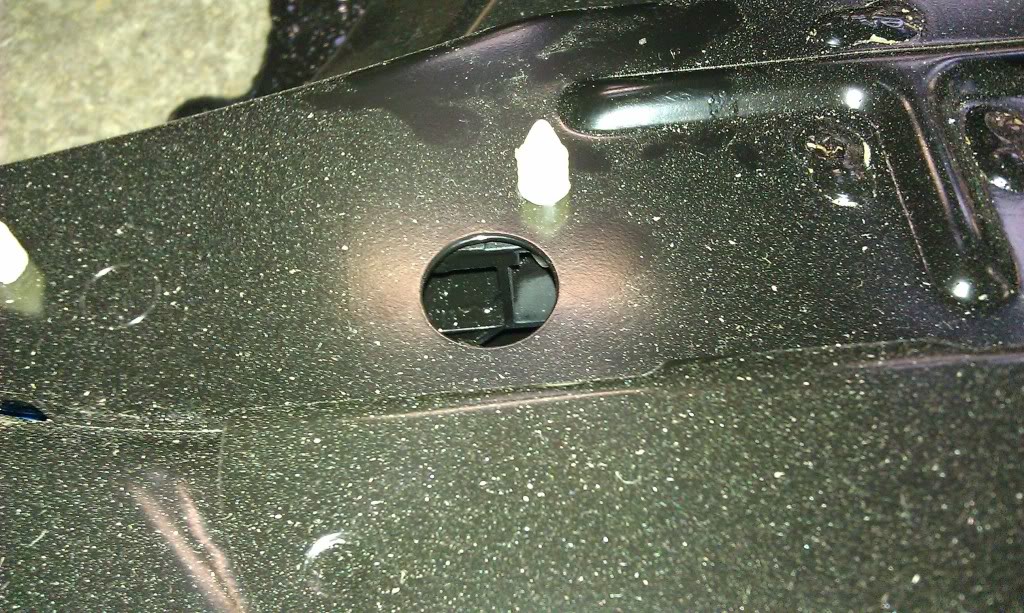
    Below is a photo of the driver side rear mount inner cavity. You can clearly see that if foam is injected to the left of the mount, it will easily flow through the mount, fully encapsuutf8g it.


    Below is the only photo I've found that shows the entire front of the RACP from above. If anyone knows of a better photo, please let me know. Unfortunately, the quality isn't very good, but you can see the layer that forms a cavity around the front mounts. It's not completely clear from the photo, but it appears that the passenger side and driver side cavities are not connected. It also appears that there is no barrier between the area under the rear seat and the cavities to the left and right where the RTABs are located. Those cavities are quite large and it would be wasteful if foam migrated into them, so it makes sense that a substantial amount of cavity foam should be injected into the openings on the outer sides of the seat.


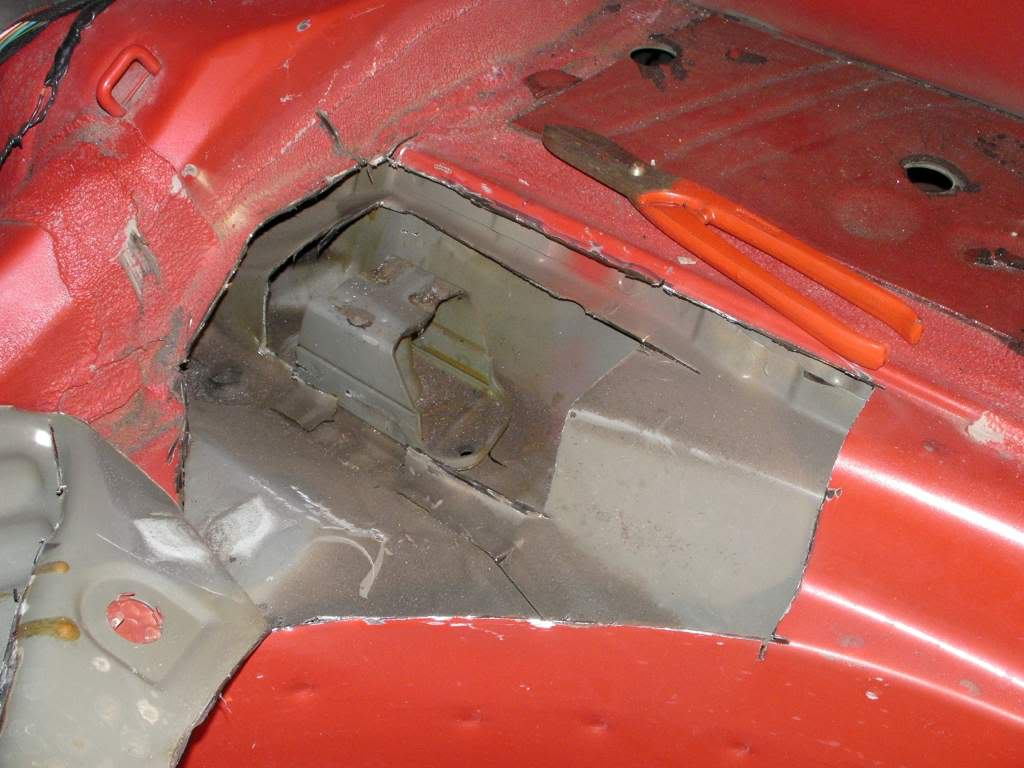
    Below are photos of the front passenger side mount. The red area is the passage from the cavity above the front mount to the cavity between the front and rear mounts. The yellow area is the seatbelt bolt hole. The blue area is an internal hole that is not externally accessible, which is unfortunate, because it otherwise would be an ideal place to inject foam directly into the mount. Since the load on both sides is compression, I think it's beneficial to completely fill the front mount cavity.

    Below is a photo of the front passenger side mount looking front to back.


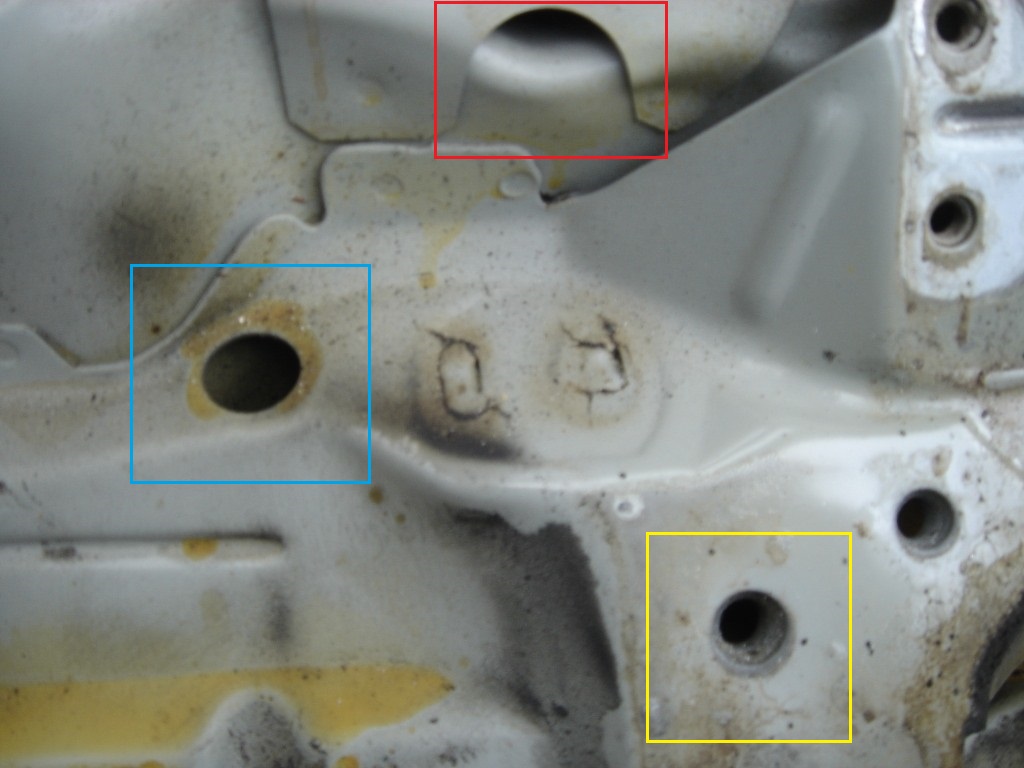
    Below is a photo of the front passenger side mount looking down from above. The red highlight around the mount is from the original photo.


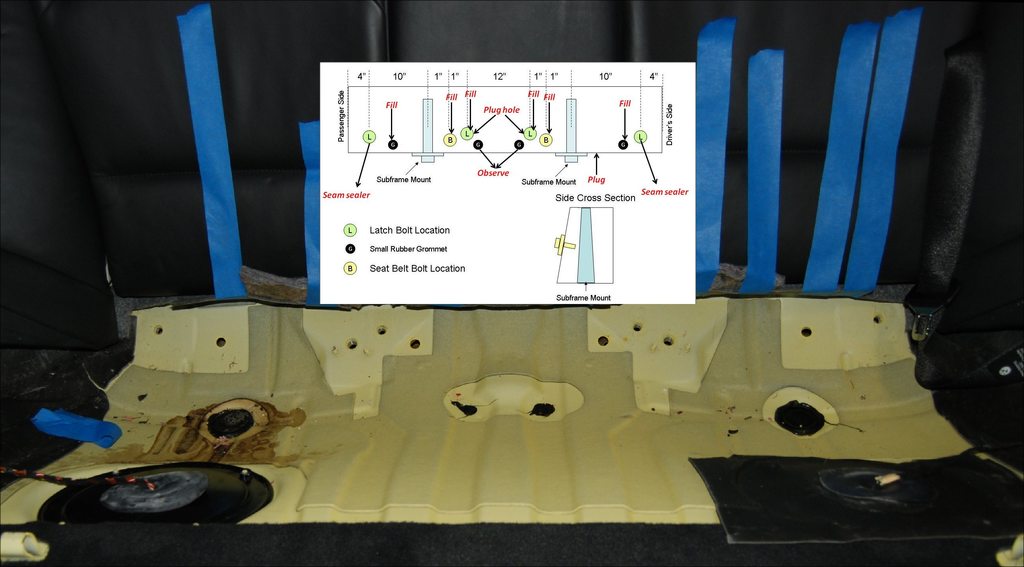
    Here is a photo of the seat area looking back to show the openings where foam can be injected. Based on what I said above, I agree that the far left and right latch bolt holes should be injected with cavity foam to prevent the structural foam from migrating into the cavities where the RTABs are located. I also agree that structural foam should be injected into the next inner most holes until it appears at the seat belt bolt hole. After that, I think foam should be injected into the seat belt bolt holes until it starts to leak out of the latch bolt hole, at which point the latch bolts should be replaced and foam injected until it appears at the middle holes. I don't see any point to also inject into the latch bolt hole because it's so close to the seat belt hole.


    Quite a lot can be determined from photos, but the only way to determine the volumes of the various cavities is to take measurements from an RACP that is still fastened to the surrounding panels. Unfortunately, due to the way the RACP fastens to the surrounding panels, a lot of the metal would have to cut out. Basically, from the front edge rear seat where it joins the floor, across to either side, all the way back around the wheel wells and back across the trunk through the middle of the "spare tire well'. When I first asked an autowrecker how much they would charge for the labour to remove an RACP they said $300, but I suspect it would be more based on how much of the surrounding panels would have to be removed to preserve the volumes of the cavities. If anyone would like to see this done and you are willing to share the cost, send me a PM. I'm willing to do the work, but not to part with $400 or more.
    No, please stop. Who has come up with the idea of trying to fill the upper cavity? This is madness as you would need a lot more than one extra cartridge of epoxy!
    If one really believes in the "foam" (it's really a structural resin, or epoxy) just stick with the BMW application instructions. But double for both sides if that's what you want to do.

    The idea is to stiffen/reinforce the "beam" which is made up of the sheetmetal components that form the lower cavity. Like this:


    Inside 2 & 3, embedding 4


    Completely filling the cavity is key to the reinforcement. If it's not filled there really isn't much benefit from injecting the epoxy.

    The upper cavity has a much larger volume than the lower cavity. Just look at these pics


    And it continues in the chassis leg both towards the rear of the car AND upwards and forwards from the pic above.

    So trying to fill the upper cavity would certainly take a lot more than one extra cartridge.

    Having explained this I should say I'm among those who believe the "foam fix" is something that BMW came up with as the least expensive way of a "good enough fix" for the time being. A band aid fix if you will.
    If anyone is interested in why I say so please read the beginning of post #2 in this thread (post #3 also has additional info): https://www.m3forum.net/m3forum/showt...p?p=1067164063


    Sent from my iPhone using Tapatalk
    https://www.m3forum.net/m3forum/showthread.php?t=421501


  15. The Following 3 Users Say Thank You to BILL007 For This Useful Post:

    aimiliosbmw (09-02-16), ghost-rider (10-02-16), Vassilis ///M (10-02-16)

Σελίδα 10 από 11 ΠρώτηΠρώτη ... 891011 ΤελευταίαΤελευταία

Ετικέτες Θέματος

Δικαιώματα - Επιλογές

  • Δεν μπορείτε να δημοσιεύετε νέα θέματα
  • Δεν μπορείτε να απαντάτε σε θέματα
  • Δεν μπορείτε να δημοσιεύετε συνημμένα
  • Δεν μπορείτε να επεξεργάζεστε τις δημοσιεύσεις σας
  •  
BACK TO TOP