Before I begin, I would like to thank everyone on the forum who has performed this swap before me. In particular, thank you to wrxnoob (the original!), RAZ M3, Performance Technic, M3SMITHNWESSEN, and especially beomoua, see.m3.go, and Abad46 for answering my specific questions and making themselves available to me whenever needed! I would also like to thank the few people who's pictures I have "borrowed" for the steps at which I was either too frustrated or too short on extra hands to take pictures

So, how difficult is this to take on by yourself on jackstands? Well, looking back at it now that it’s done, it is hard to claim that it is all that much more challenging than doing a clutch replacement. Sure, there are a few extra steps- however, if you are capable of doing everything that leads up to the point where the projects differ, then you are capable of getting through the whole thing.
The Parts List:
There is a fair amount of hardware included in the list that will not absolutely be needed, but is nice to have in case of damage to existing hardware during the disassembly process. There are kits available, but I chose to source the parts myself. Doing so built confidence, as I became very familiar with the OEM parts diagrams and how everything is intended to fit together. Again, sourcing the parts yourself will allow you to truly tailor your job and guarantee that you can replace anything you deem necessary, rather than the bare minimum to get it done.
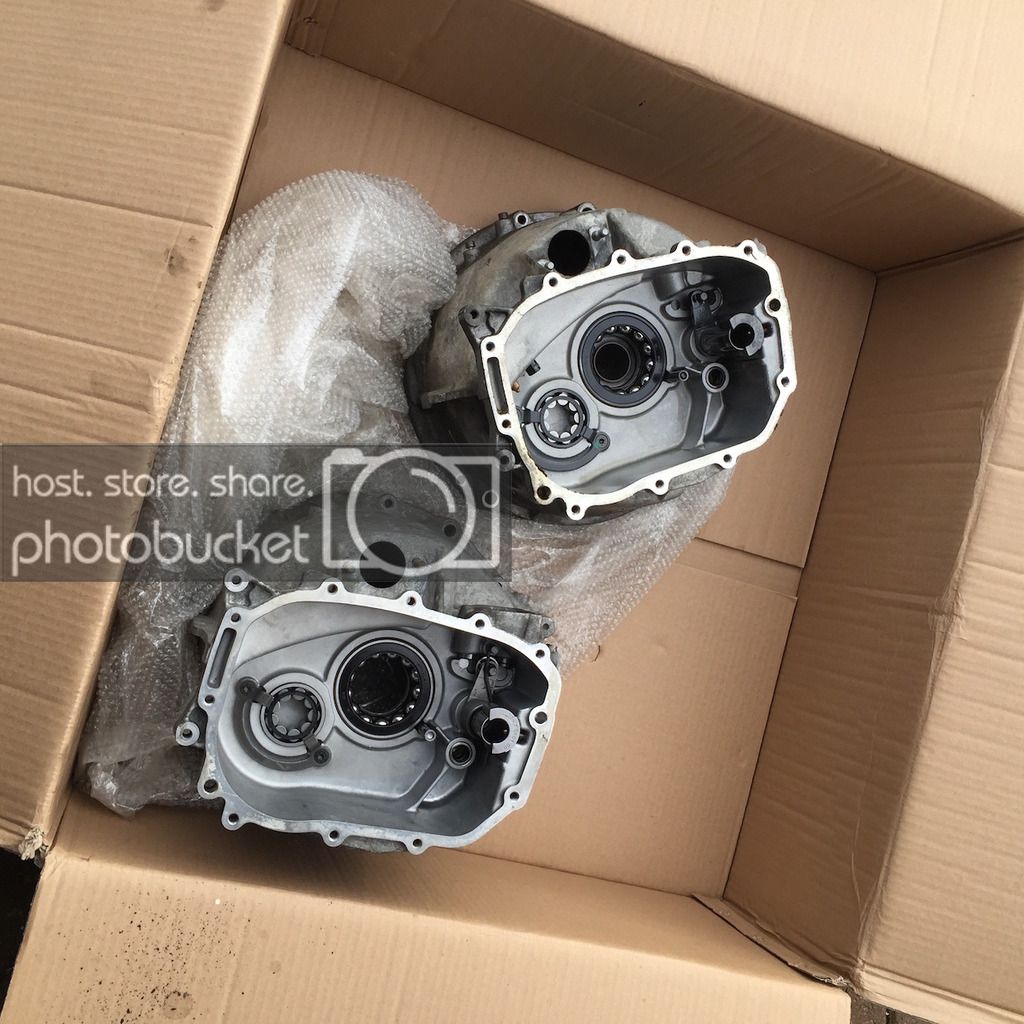
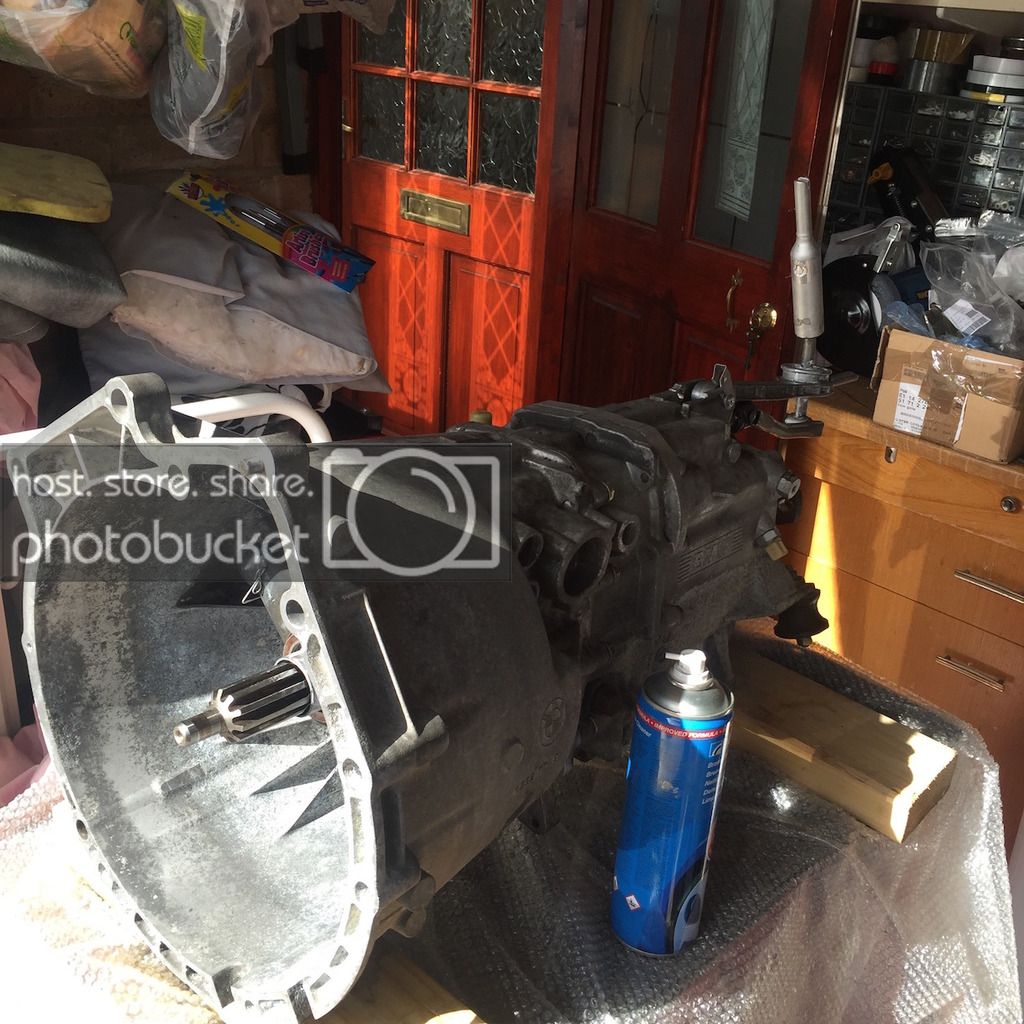
It is common knowledge that one of the physical differences between the SMG and manual transmissions is the bellhousing. Specifically, the SMG bellhousing is missing the spring and detents that give the self centering function to the manual version. Although it can take quite a long time, I would recommend making an effort to find a factory manual transmission bellhousing. It not only allows you to immediately make the swap when you get to that point, but also guarantees OEM functionality and eliminates the possibility of human error during modification of the SMG BH at a machine shop. If you can find one, it will also probably save a fair amount of money versus paying a shop to modify yours.
| Bellhousing and Transmission Parts |
|
|
|
|
|
|
|
| List # |
Part |
Source |
Source P/N |
BMW P/N |
QTY |
Price |
Ext. Price |
| 1 |
6MT Transmission Bellhousing |
Forums |
NA |
NA |
1 |
$200.00 |
$200.00 |
| 2 |
Locking Pin |
GetBMWParts |
|
23111222979 |
1 |
$12.88 |
$12.88 |
| 3 |
Compression Spring |
GetBMWParts |
|
23311228393 |
1 |
$4.32 |
$4.32 |
| 4 |
Sealing Cover |
GetBMWParts |
|
23127527439 |
2 |
$4.59 |
$9.18 |
| 5 |
Lock Ring |
GetBMWParts |
|
#07119934624 |
2 |
$1.69 |
$3.38 |
| 6 |
Locking Pin |
GetBMWParts |
|
23311224130 |
1 |
$11.10 |
$11.10 |
| 7 |
Compression Spring |
GetBMWParts |
|
23111222720 |
1 |
$8.99 |
$8.99 |
| 8 |
Torx Screw, micro-encapsulated M8x25 |
GetBMWParts |
|
23317586637 |
1 |
$2.57 |
$2.57 |
| 9 |
Comrpession Spring |
GetBMWParts |
|
23317511337 |
1 |
$5.88 |
$5.88 |
| 10 |
Compression Spring |
GetBMWParts |
|
23311228405 |
1 |
$5.75 |
$5.75 |
| 11 |
Gear Identification Switch |
GetBMWParts |
|
23142229113 |
1 |
$78.02 |
$78.02 |
| 12 |
Cable Clamp |
GetBMWParts |
|
11787547213 |
1 |
$0.30 |
$0.30 |
| 13 |
Cable Clip |
GetBMWParts |
|
34521164653 |
1 |
$0.30 |
$0.30 |
| 14 |
Pentosin MTF2 (OEM Fluid) |
ECS Tuning |
|
*83220309031 |
2 |
$22.50 |
$45.00 |
| 15 |
Locking Pin |
GetBMWParts |
|
23317501584 |
1 |
$20.83 |
$20.83 |
| 16 |
Thrust Pin |
GetBMWParts |
|
23311282444 |
1 |
$11.49 |
$11.49 |
|
|
|
|
|
Trans. Parts Total: |
|
$419.99 |
| Optional Short Shifter Parts |
|
|
|
|
|
|
|
| List # |
Part |
Source |
Source P/N |
BMW P/N |
QTY |
Price |
Ext. Price |
| 1 |
Shift Knob |
ECS TUNING |
ES#:47396 |
25117896884 |
1 |
$60.55 |
$60.55 |
| 2 |
Shift Boot Alcantara |
ECS TUNING |
ES#47399 |
25117919219 |
1 |
$55.00 |
$55.00 |
| 3 |
BMW Performance Shift Lever |
ECS TUNING |
ES#:1895170 |
25117527259 |
1 |
$66.44 |
$66.44 |
| 4 |
Shifter Ball Bushing |
ECS TUNING |
ES#:2574768 |
25111469397 |
1 |
$8.00 |
$8.00 |
| 5 |
Circlip |
ECS TUNING |
ES#:254614 |
25117571899 |
1 |
$1.00 |
$1.00 |
| *** |
ECS Kit |
ECS TUNING |
ES#46511 |
NA |
Shifter Parts Total: |
|
$180.80 |
| Remaining Gearshift Parts (minus shift rod, ball bushing, shift knob, shift boot) |
|
|
|
|
|
|
|
| List # |
Part |
Source |
Source P/N |
BMW P/N |
QTY |
Price |
Ext. Price |
| 1 |
Shifting Arm |
GetBMWParts |
|
25112228710 |
1 |
$23.39 |
$23.39 |
| 2 |
Bush Bearing Oval |
GetBMWParts |
|
25117507695 |
1 |
$3.54 |
$3.54 |
| 3 |
Bearing Bolt |
GetBMWParts |
|
25117529079 |
1 |
$4.24 |
$4.24 |
| 4 |
Bearing Shifting Arm |
GetBMWParts |
|
25111222015 |
1 |
$18.86 |
$18.86 |
| 5 |
Shifting Arm Bearing Bracket |
GetBMWParts |
|
41128246251 |
1 |
$21.43 |
$21.43 |
| 6 |
Rubber Boot |
GetBMWParts |
|
25117522149 |
1 |
$13.37 |
$13.37 |
| 7 |
Selector Rod |
GetBMWParts |
|
25112228711 |
1 |
$40.30 |
$40.30 |
| 8 |
Plastic Washer |
GetBMWParts |
|
25111220439 |
8 |
$0.48 |
$3.84 |
| 9 |
Securing Clip (Shift Lever AND Selector) |
GetBMWParts |
|
25117571899 |
4 |
$0.84 |
$3.36 |
| 10 |
Gearshift Rod Joint |
GetBMWParts |
|
25111222688 |
1 |
$16.35 |
$16.35 |
| 11 |
Lock Ring |
GetBMWParts |
|
25111222451 |
1 |
$0.62 |
$0.62 |
| 12 |
Plastic Washer Type 2 |
GetBMWParts |
|
25111434194 |
1 |
$2.06 |
$2.06 |
| 13 |
Dowel Pin |
GetBMWParts |
|
23411466134 |
1 |
$1.08 |
$1.08 |
| 14 |
Insert Shifter Covering |
ECS TUNING |
|
25111434100 |
1 |
$16.82 |
$16.82 |
|
|
|
|
|
Gearshift Parts Total: |
|
$169.26 |
| Clutch Assembly (Pedals, Clutch Control Parts and Hydraulics, Electrical) |
|
|
|
|
|
|
|
| List # |
Part |
Source |
Source P/N |
BMW P/N |
QTY |
Price |
Ext. Price |
| 1 |
Circlip |
GetBMWParts |
|
#07129904567 |
3 |
$0.28 |
$0.84 |
| 2 |
Bush Bearing |
GetBMWParts |
|
35211158290 |
2 |
$1.50 |
$3.00 |
| 3 |
Return Spring |
GetBMWParts |
|
35301165321 |
1 |
$1.43 |
$1.43 |
| 4 |
Grommet |
GetBMWParts |
|
35411113728 |
3 |
$1.37 |
$4.11 |
| 5 |
Module, Clutch Switch |
GetBMWParts |
|
61319122700 |
1 |
$48.86 |
$48.86 |
| 6 |
Clutch Pedal |
GetBMWParts |
|
35311163870 |
1 |
$30.98 |
$30.98 |
| 7 |
Pin, Master Cyclinder |
GetBMWParts |
|
35316854283 |
1 |
$2.96 |
$2.96 |
| 8 |
Rubber Pad, Clutch |
GetBMWParts |
|
35211108634 |
1 |
$3.58 |
$3.58 |
| 9 |
Clutch Pedal Stop Buffer |
GetBMWParts |
|
35316750569 |
1 |
$0.88 |
$0.88 |
| 10 |
CLUTCH STOP- Clip |
GetBMWParts |
|
51488245867 |
1 |
$0.49 |
$0.49 |
| 11 |
CLUTCH STOP |
GetBMWParts |
|
|
1 |
|
$0.00 |
|
|
|
|
|
|
|
|
| 12 |
Input Cylinder Clutch (Master Cylinder) |
GetBMWParts |
|
21526773670 |
1 |
$122.70 |
$122.70 |
| 13 |
Hex Bolt |
GetBMWParts |
|
#07119902997 |
1 |
$0.77 |
$0.77 |
| 14 |
Hex Bolt |
GetBMWParts |
|
#07119902976 |
1 |
$0.58 |
$0.58 |
| 15 |
Hex Nut |
GetBMWParts |
|
#07129904876 |
1 |
$0.43 |
$0.43 |
| 16 |
Repair Kit Clutch Plug-in Connector |
GetBMWParts |
|
21521165451 |
1 |
$7.08 |
$7.08 |
| 17 |
Grommet |
GetBMWParts |
|
21526863043 |
1 |
|
$0.00 |
| 18 |
Hose |
GetBMWParts |
|
21521163714 |
1 |
$7.70 |
$7.70 |
| 19 |
Pipe |
GetBMWParts |
|
21526774274 |
1 |
$42.90 |
$42.90 |
| 20 |
Pressure Hose Assembly |
GetBMWParts |
|
21526774267 |
1 |
$24.18 |
$24.18 |
| 21 |
Support Pressure Hose Assembly |
GetBMWParts |
|
21522229699 |
1 |
$1.90 |
$1.90 |
| 22 |
Clip |
GetBMWParts |
|
34341163565 |
1 |
$0.78 |
$0.78 |
| 23 |
Pipe |
GetBMWParts |
|
21522229675 |
1 |
$27.28 |
$27.28 |
| 24 |
Vent Screw |
GetBMWParts |
|
21521116360 |
1 |
$6.88 |
$6.88 |
| 25 |
Dust Cap |
GetBMWParts |
|
34111153198 |
1 |
$5.42 |
$5.42 |
| 26 |
Output Cylinder, Clutch (Slave Cylinder) |
GetBMWParts |
|
21526785966 |
1 |
$63.63 |
$63.63 |
| 27 |
Knurled Bolt |
GetBMWParts |
|
21511203012 |
2 |
$1.62 |
$3.24 |
| 28 |
Self Locking Hex Nut |
GetBMWParts |
|
#07129906196 |
2 |
$1.34 |
$2.68 |
| 29 |
Grommet |
GetBMWParts |
|
21521163894 |
1 |
$2.92 |
$2.92 |
| 30 |
Pipe Clip |
GetBMWParts |
|
16121176767 |
1 |
$1.44 |
$1.44 |
| 31 |
Clutch Switch Adapter Lead |
GetBMWParts |
|
61116911072 |
1 |
$7.90 |
$7.90 |
|
|
|
|
|
Clutch Control Total: |
|
$427.54 |
| Other Replacement Parts |
|
|
|
|
|
|
|
| List # |
Part |
Source |
Source P/N |
BMW P/N |
QTY |
Price |
Ext. Price |
| 1 |
Hose Clamp (Intake Manifold) |
GetBMWParts |
|
11617831745 |
6 |
$2.74 |
$16.44 |
| 2 |
Ball Pin |
GetBMWParts |
|
21511223328 |
1 |
$1.52 |
$1.52 |
| 3 |
Spring Clip |
GetBMWParts |
|
21517570284 |
1 |
$4.82 |
$4.82 |
| 4 |
Guibo Nuts (One time use) |
GetBMWParts |
|
#07129900047 |
12 |
$1.03 |
$12.36 |
|
|
|
|
|
Other Parts Total: |
|
$35.14 |
-M14x1.5 thread tap for the gear recognition switch. If you’re having a machine shop modify your bellhousing, perhaps it would be easier to have them tap this hole in the gearbox as well.
-Array of 3/8” drive extensions. You will need between 3 and 4 feet in order to reach some of the top bolts on the transmission bellhousing.
-Several universal joints. I would suggest impact rated joints, as I managed to grenade several non-impact joints trying to break bellhousing bolts loose.
-Female torx sockets.
-Lisle earless CV boot pliers for intake manifold clamps.
-Impact wrench.
-Transmission jack. Again, trannys have been dropped using a standard hydraulic jack… This job is involved enough that it is well worth the $70 for a solid low profile transmission jack. Harbor freight makes an excellent product for this.
-Oil resistant black RTV for sealing the new bellhousing to the transmission.
-White lithium grease (no, not the spray on kind) for the throwout bearing guide tube and contact points on the clutch fork.
-Either a welder or ¼” rivets and a riveting gun.
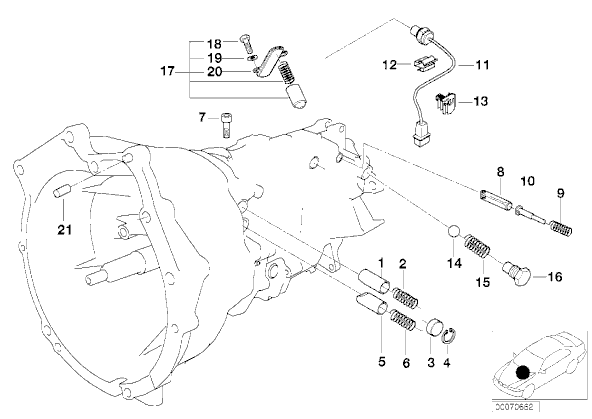
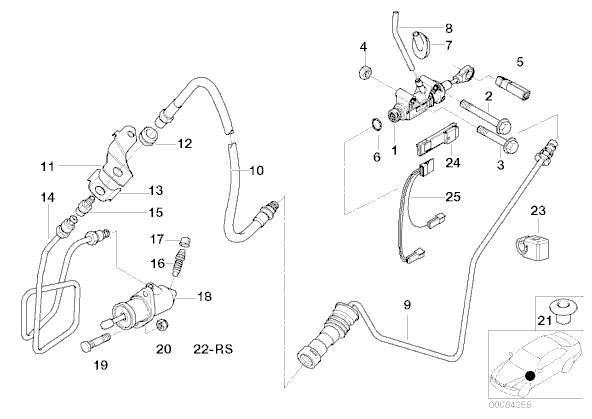
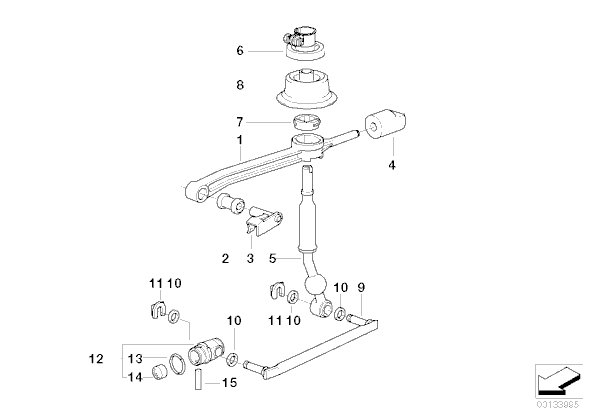
OEM Parts Diagrams:
Do yourself a favor, and study these parts diagrams! It will also be very helpful to have a printed version of each of these on hand for both assembly and disassembly. Again, it was massively helpful for me to “build” my own parts list by working my way through these exploded diagrams! The original version of these is available on realoem.com.
 Procedure (Mechanical):
1. Open the fuse box in the driver’s side corner of the engine bay, and remove the SMG salmon relay. Make sure the transmission is in neutral! Disconnect the battery from the car.
2. Remove the intake manifold. There are several DIY’s available for this. Personally, I chose to use the highly detailed starter motor replacement DIY seen in the link below. Using the Lisle earless CV clamp pliers will save a huge amount of time and effort here. Once the manifold is out, open the SMG fluid reservoir and empty it into an oil drain pan or equivalent.
http://www.m3forum.net/m3forum/showthread.php?t=310634
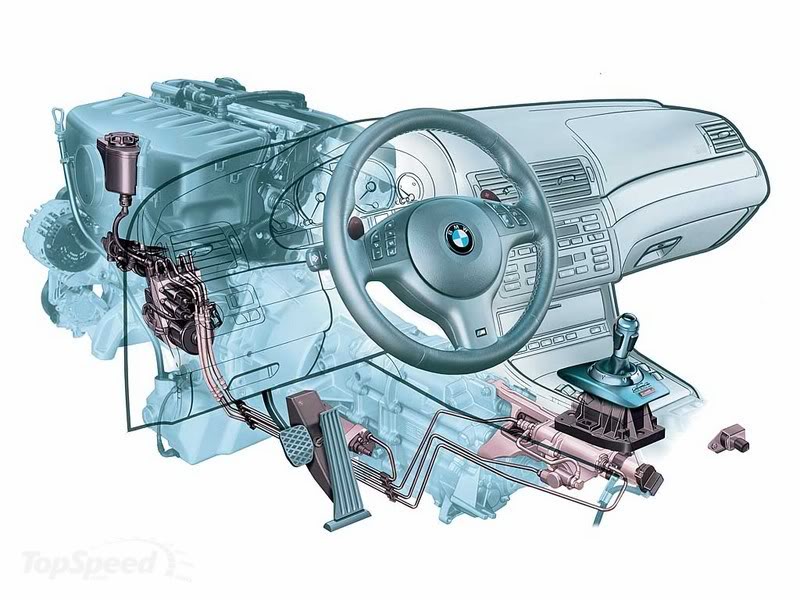
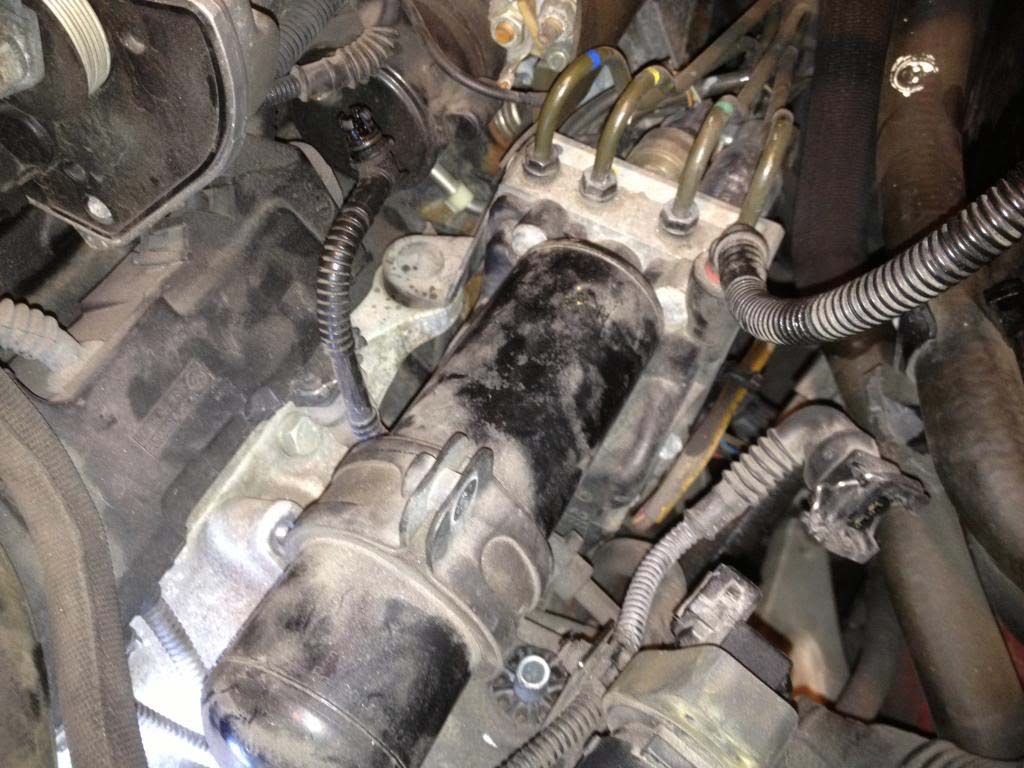
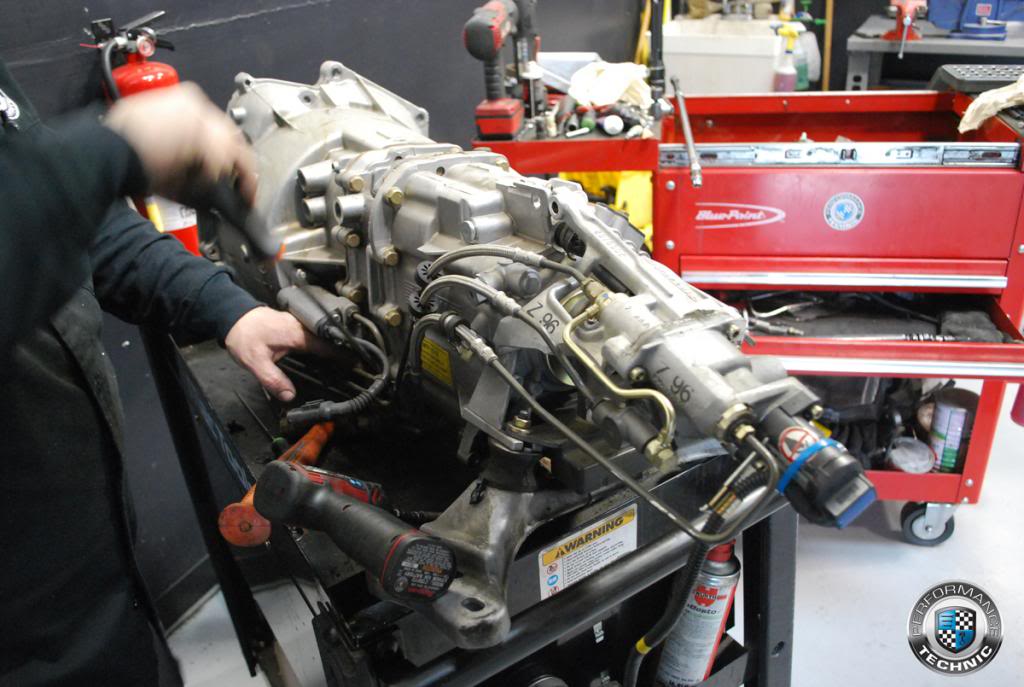
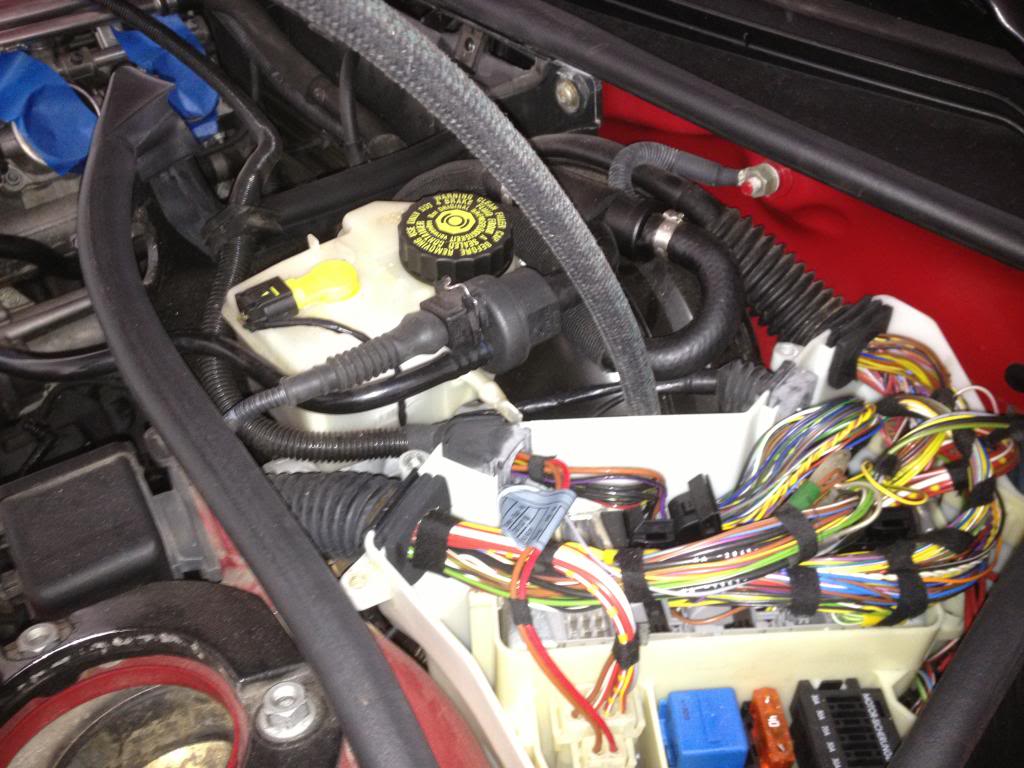
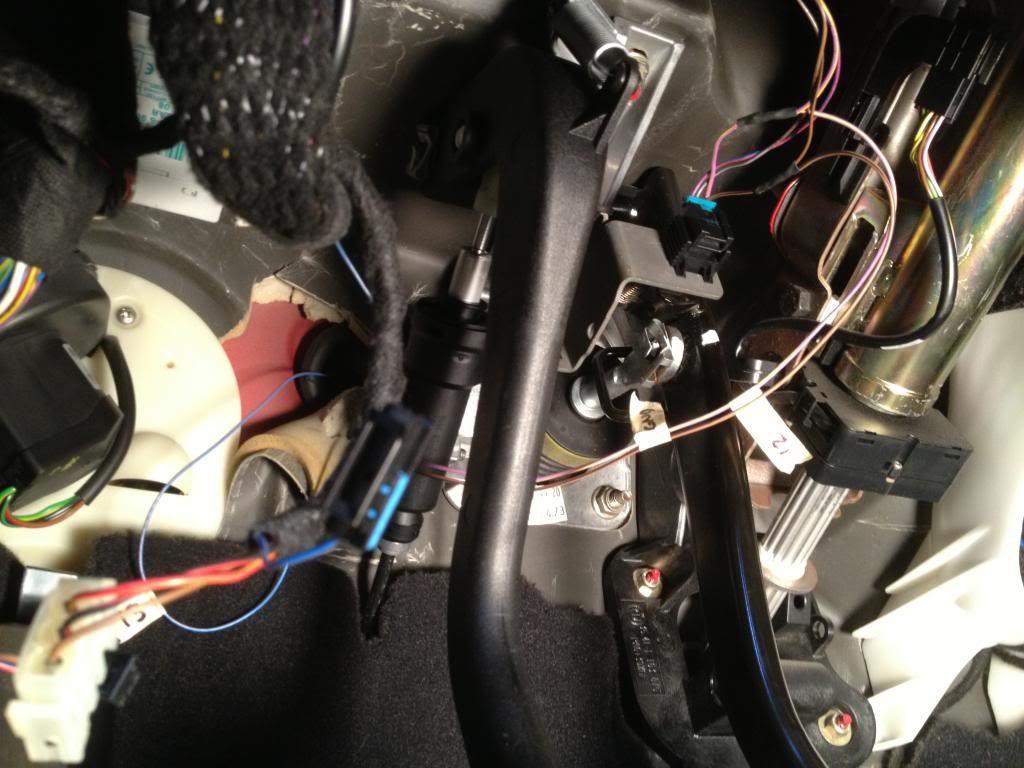
With the intake manifold removed, the SMG pump will be exposed. I chose to leave the pump connected for now to hold the hydraulic lines out of the way, and to allow the system time to depressurize as I continued to work on the other aspects of the conversion. It is suggested that you cover your intake throttle bodies with painters tape to prevent random debris from falling inside. For reference, this picture does a good job showing the full mechanical layout of the SMG system.
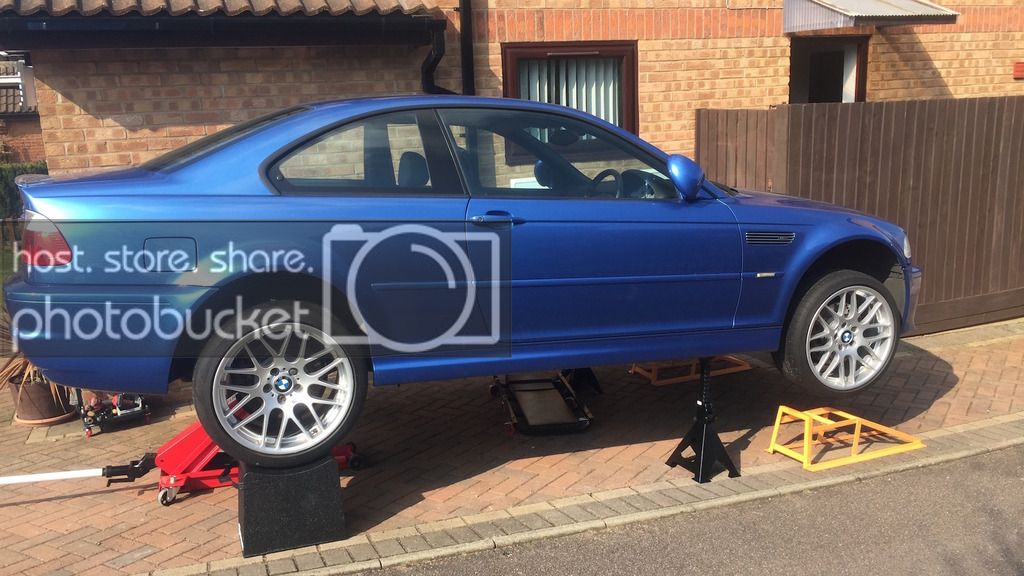
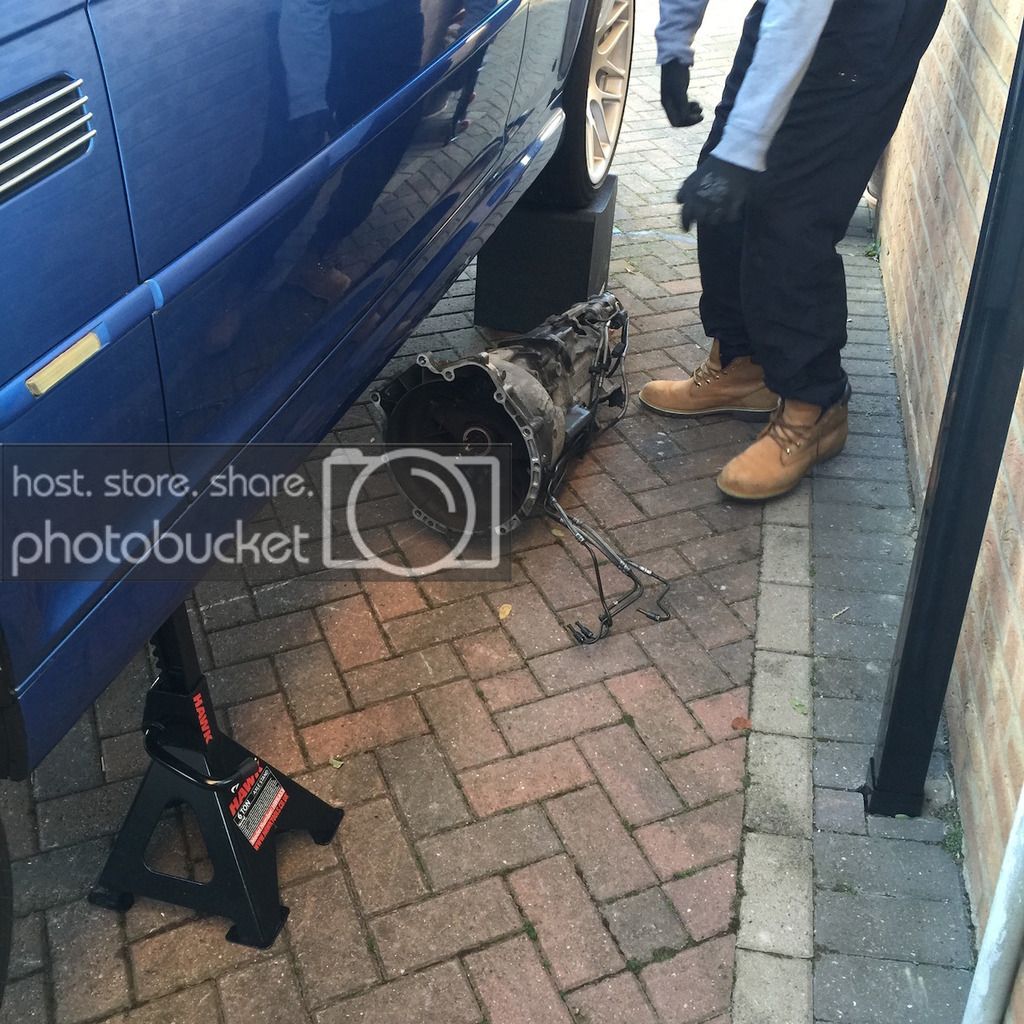
3. Put the car up on jack stands at all four corners. There are plenty of write-ups on how to do this, but just as a quick reminder: DO NOT support the rear of the car by the factory jack pad points. They will bend. Instead, use the spots just to the inside of the jack pads where the “V-shaped” chassis brace bolts in. Also remember to lift the rear of the car by the subframe, NOT by the differential! The front jack pads are fine to support the car by. My only other suggestion in lifting the car is to get it as high as safely possible. You will be eternally grateful for every bit of space available to you.
4. Remove the skid plate (17mm hex bolts), and all of the plastic splash guards you can get out of the way (combination of 10mm and 8mm hex bolts, and plastic rivets).
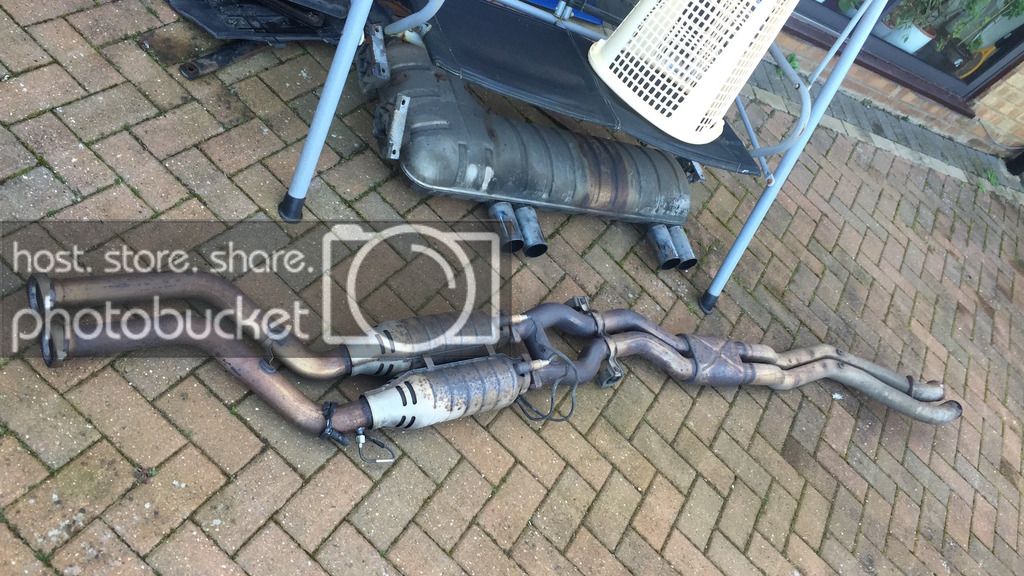
5. Remove the entire exhaust by disconnecting first at the flange where the headers mate with section 1, and then by removing the 4 copper nuts that secure the muffler to the rubber mounts under the rear bumper. Keep in mind that you will also have to remove the two rectangular exhaust braces, and the one V-shaped chassis brace. Your impact wrench will save you a huge amount of time. Use a jack to support under the muffler, and slowly lower / manipulate it so as not to put any weight on the rear bumper diffuser. It will help to keep the front of the exhaust (at the headers) supported by a jackstand so that it does not drop.
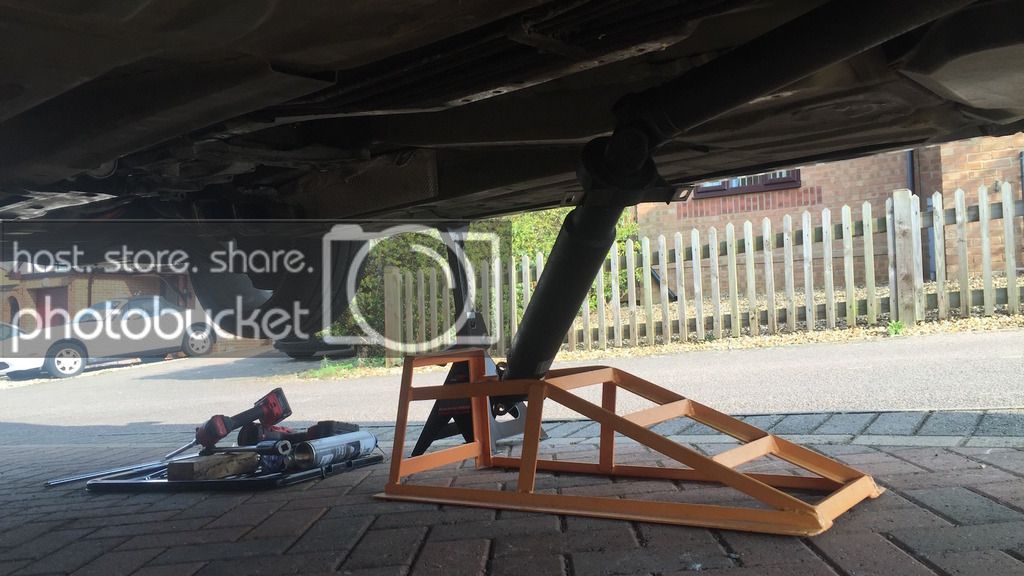
6. Remove the metallic exhaust heat shields to expose the drive shaft.
7. Support the transmission behind the drain bolt, and remove the transmission support brace.
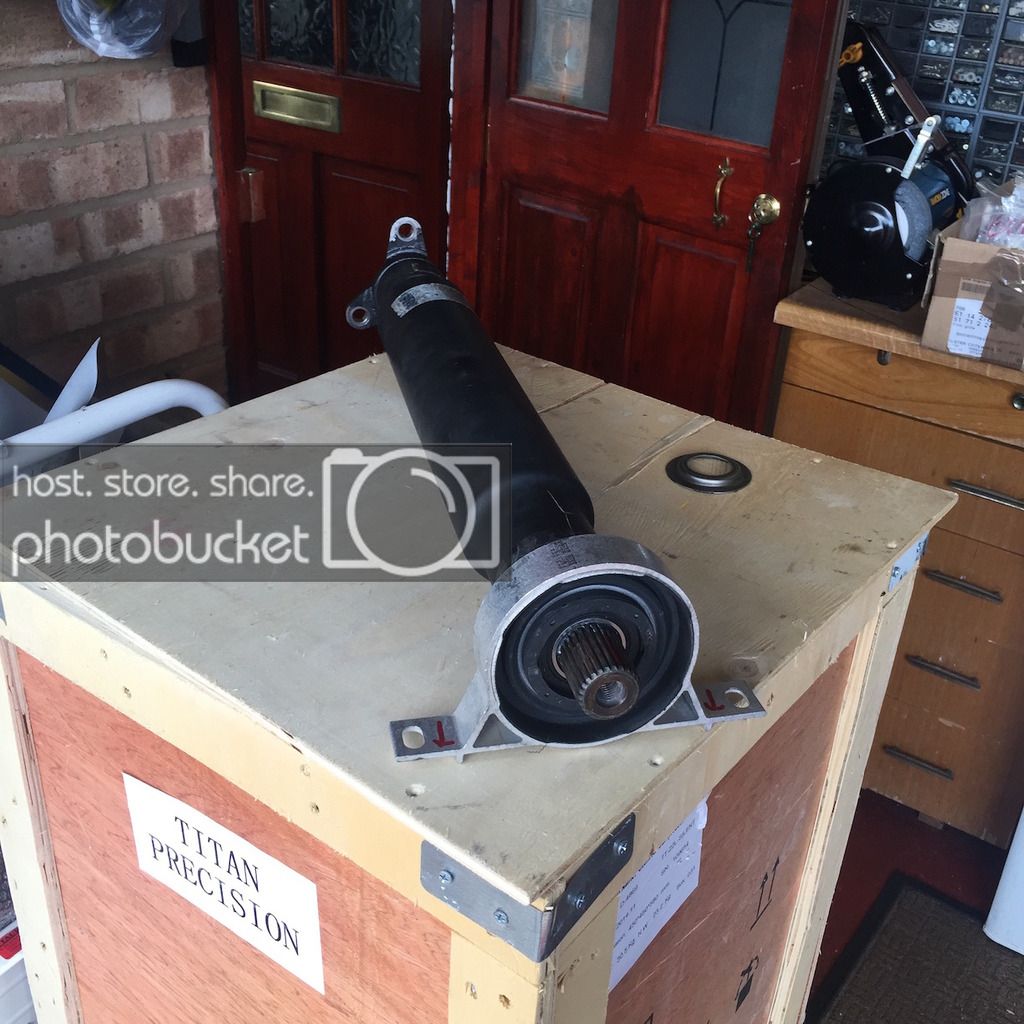
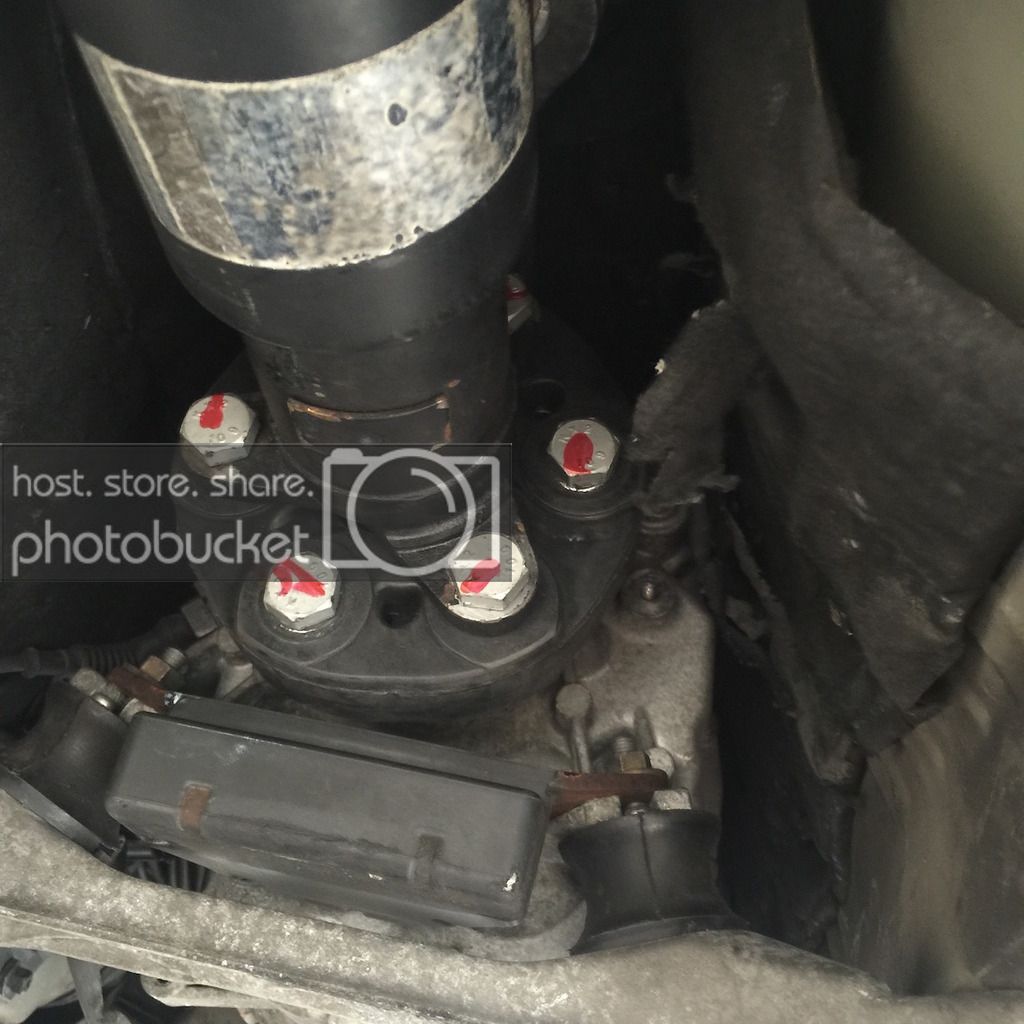
8. Mark the outline of the center support bearing mounting flange using a sharpie. The bearing is preloaded and will need to be mounted in the exact same place during reassembly to prevent premature bearing wear.
Use a 13mm socket to unbolt the center support bearing. Using an 18mm wrench and an 18mm socket, disconnect the six nuts and bolts from the guibo. Lower the driveshaft, and support it behind the universal joint with a jackstand or tie it up and out of the way with some string. Do not allow the driveshaft to hang by the CV joint at the interface with the differential. There is no need to separate the driveshaft at the universal joint or to unbolt it from the differential for this job.
9. Remove 17mm drain plug to drain transmission fluid (replace plug once empty to prevent contamination), unplug all electrical connectors, and remove the SMG hydraulic lines from their clips. Unplug each of the electrical connectors going to the transmission. Unbolt the SMG slave cylinder from the transmission with a 13mm socket on an extension.
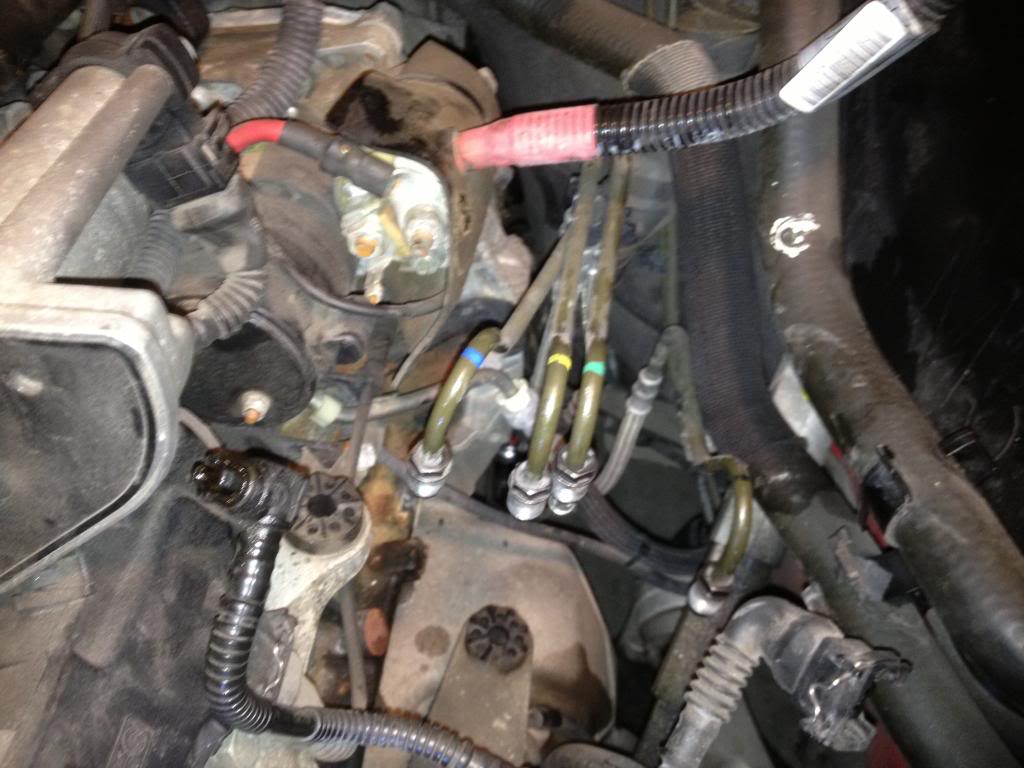
10. Disconnect the 4 hydraulic lines from the SMG pump from inside the engine bay. I was lucky and these came off with very minimal effort, though some for some people they can be seized on pretty tightly. If they are stuck, it is not a problem. The transmission can be lowered with the pump still attached, enough to remove the hydraulic lines at the shift actuator and slave cylinder. Either way, the SMG pump will be removed from the top, and now is a good time to do that. For more information on removing the SMG pump, refer to the following link:
http://www.nugadgets.com/customcontent/SmgDiyMain.html
11. Place a jack under the front of the engine (in front of the sway bar) and raise it high enough to support and prevent the motor from tipping forward once the weight of the transmission is removed from it. It is easy to see that it will rock forward and crack your fan due to the rearward location of the motor mounts.
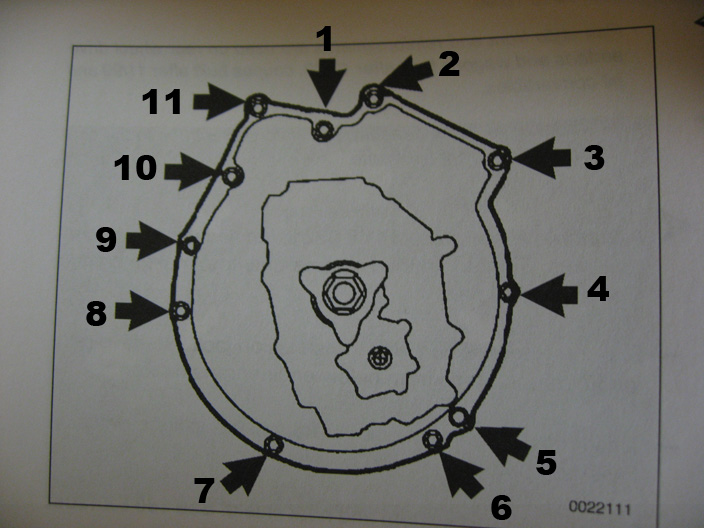
12. Now it is time to drop the transmission. Keep in mind that it IS POSSIBLE TO DROP THE TRANSMISSION WITH THE SHIFT ACTUATOR STILL INSTALLED ON THE CAR. Do not bother wasting your time removing circlips and pressing out pins with everything still mounted up. Refer to the diagram below for the location of each of the bellhousing bolts. There are three different size bolts (M8, M10, and M12) each with a different size external torx head. USE A SHARPIE TO LABEL THE HEAD OF EACH BOLT WITH THE CORRECT NUMBER AS YOU REMOVE THEM! Also note that during reinstallation, each size screw will have a unique torque spec.

This is where the female torx sockets will be used. In order to reach the bolts on top, I taped together between three and four feet of extensions with a universal joint on the end and snaked them through over the top of the transmission. This will require some serious patience, and a helper who can guide the socket onto the head of the bolt from the engine bay will be of huge help. Once the socket and extensions are in place, go to town with your impact wrench and/or breaker bar. You will likely have to adjust the angle of the transmission and engine by lowering and raising your transmission jack depending on which BH bolt you are trying to remove. After all of the bolts were removed, I had a very difficult time pulling the starter motor off because of the alignment pin that extends from the BH into the starter flange. Be patient wedging a flat blade screwdriver or similar in there, and let some PB blaster soak into the joint to help break it loose.
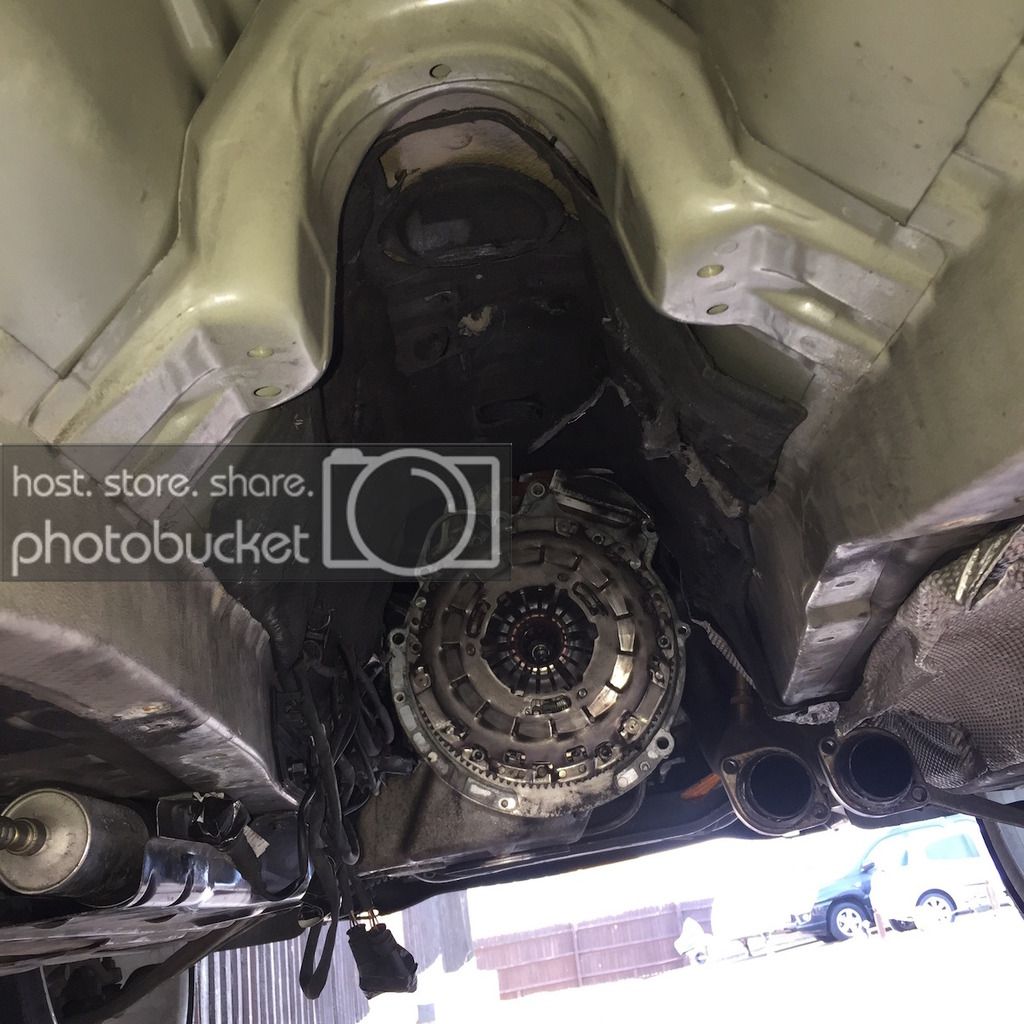
Once the starter motor is removed, pry the transmission away from the block being extremely careful not to let the input shaft hold the weight of the transmission while lowering it (make sure to pull it beyond the clutch spline!). Once the transmission was away and lowered, I had to lift it off of the tranny jack and onto a piece of cardboard to slide out from under the car.
13. Remove the SMG shift actuator from the car. There will be three bolts that the arms hard mount to. To remove the actuator the rest of the way, use a flat blade screwdriver to push the circlip on the shift rod joint out of the way, and use a thin punch to knock the pin out of the joint. Remove and inspect your throwout bearing, clutch fork, and throwout bearing guide tube.
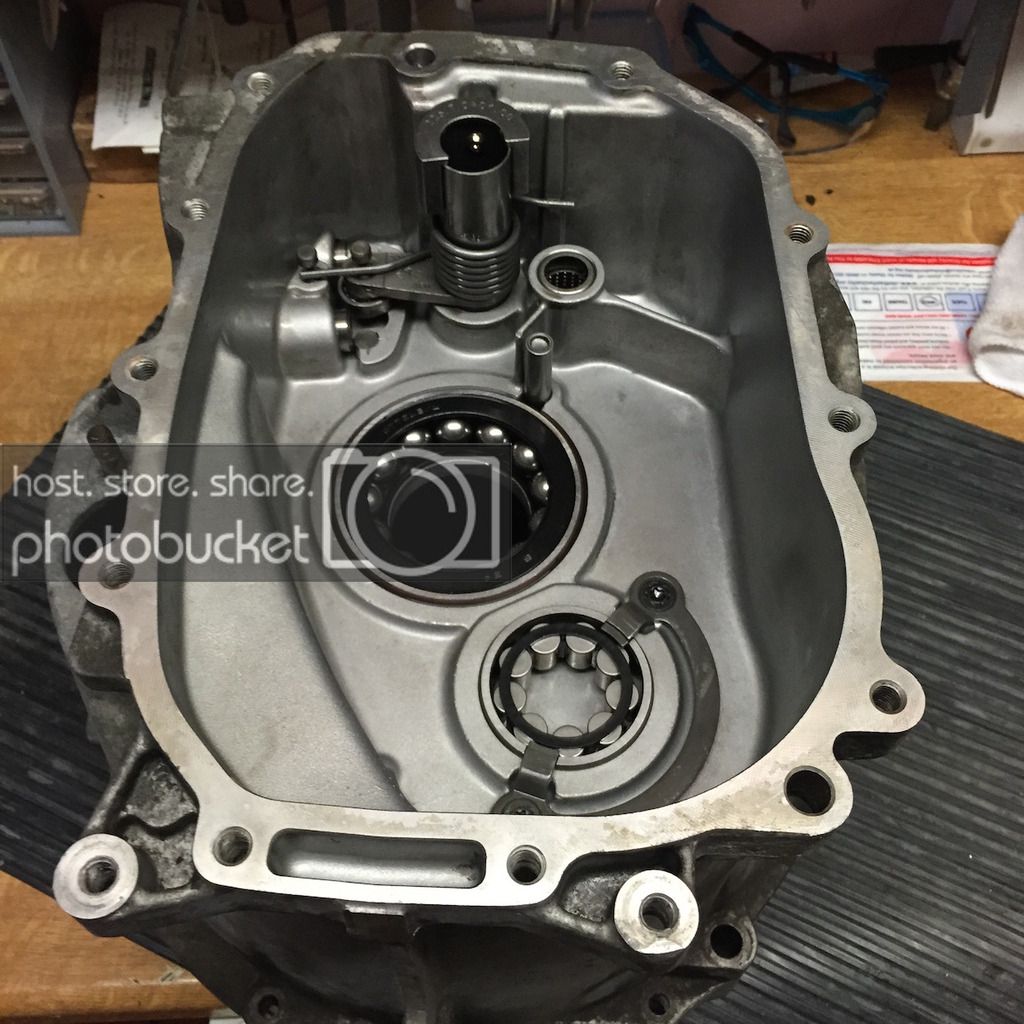
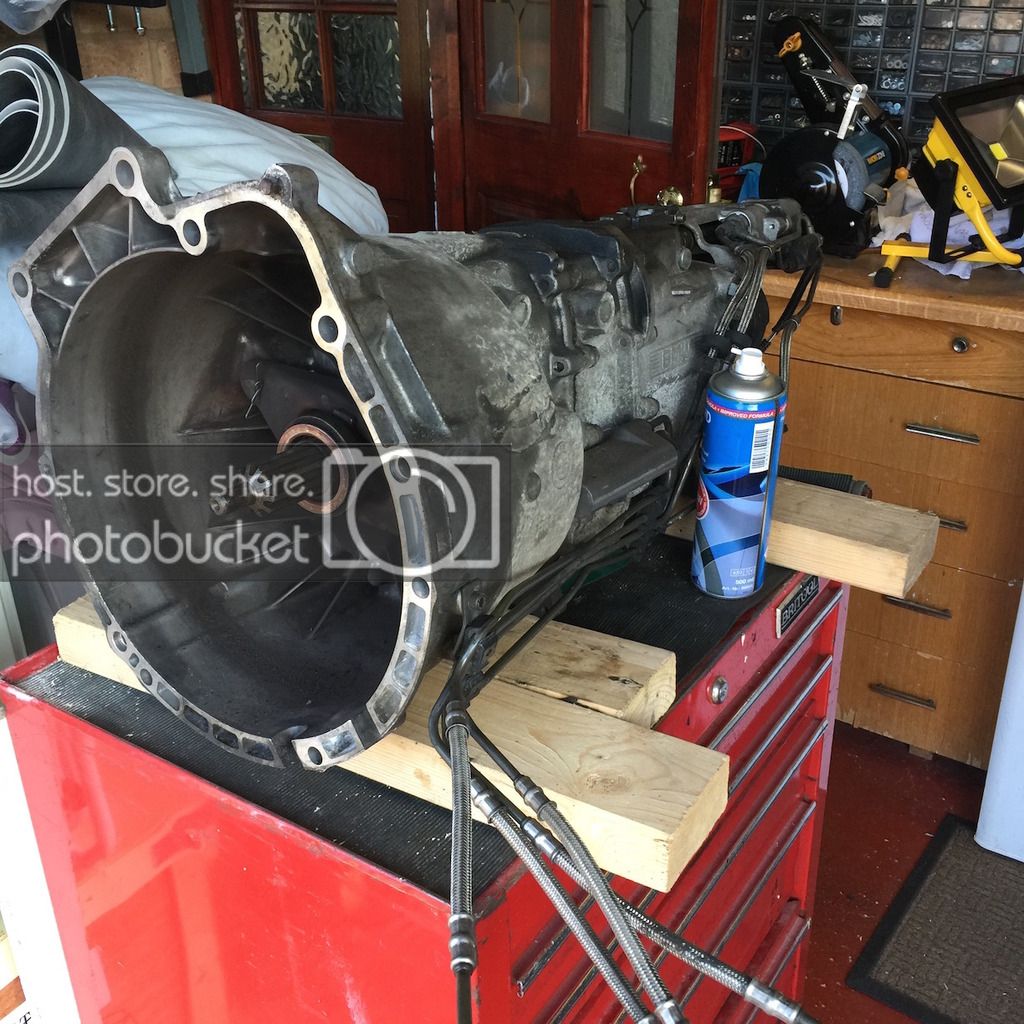
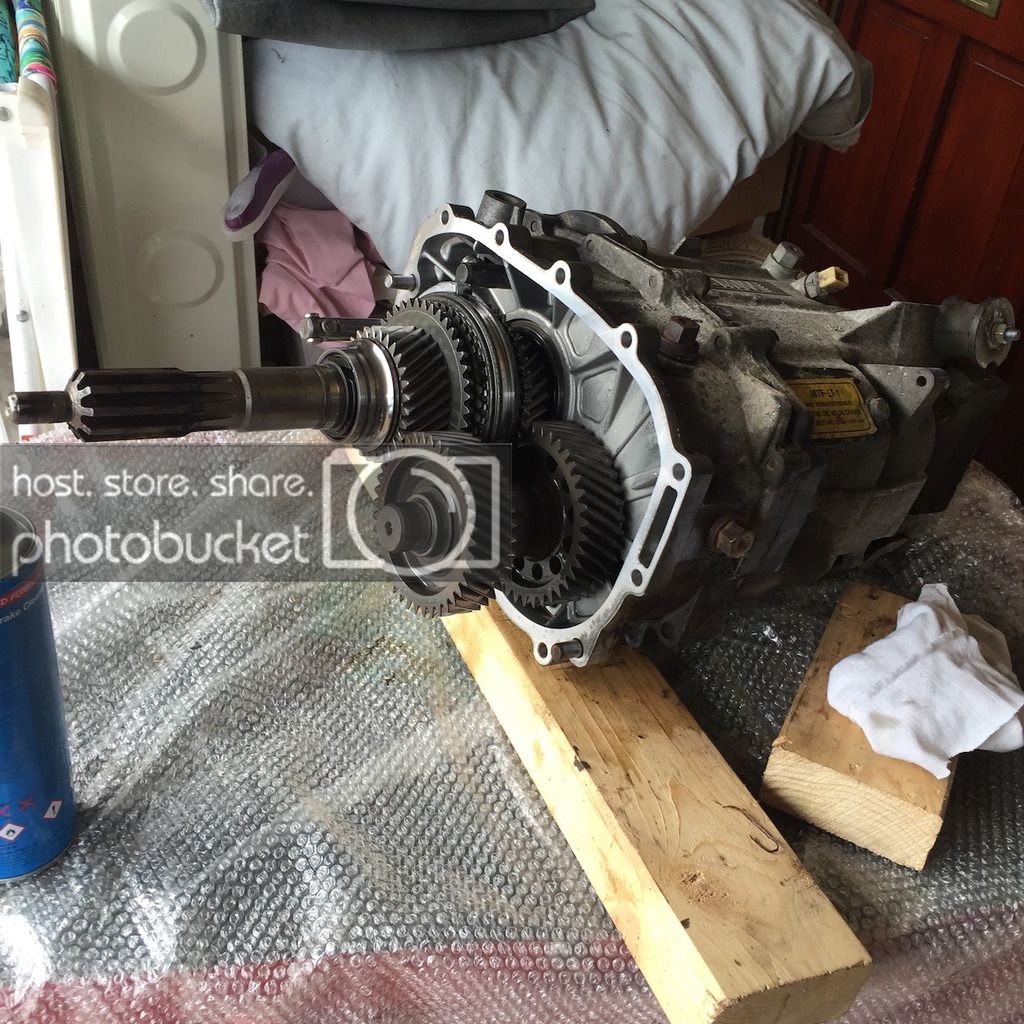
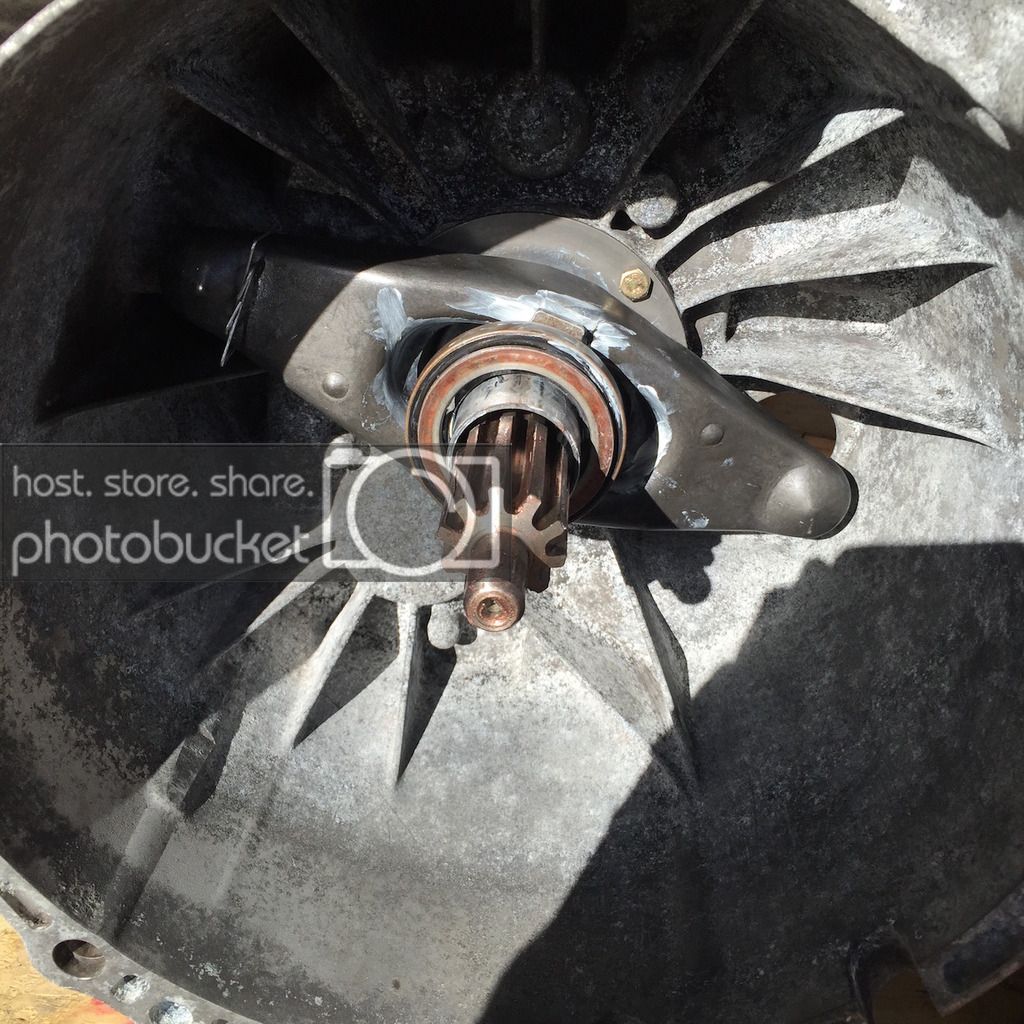
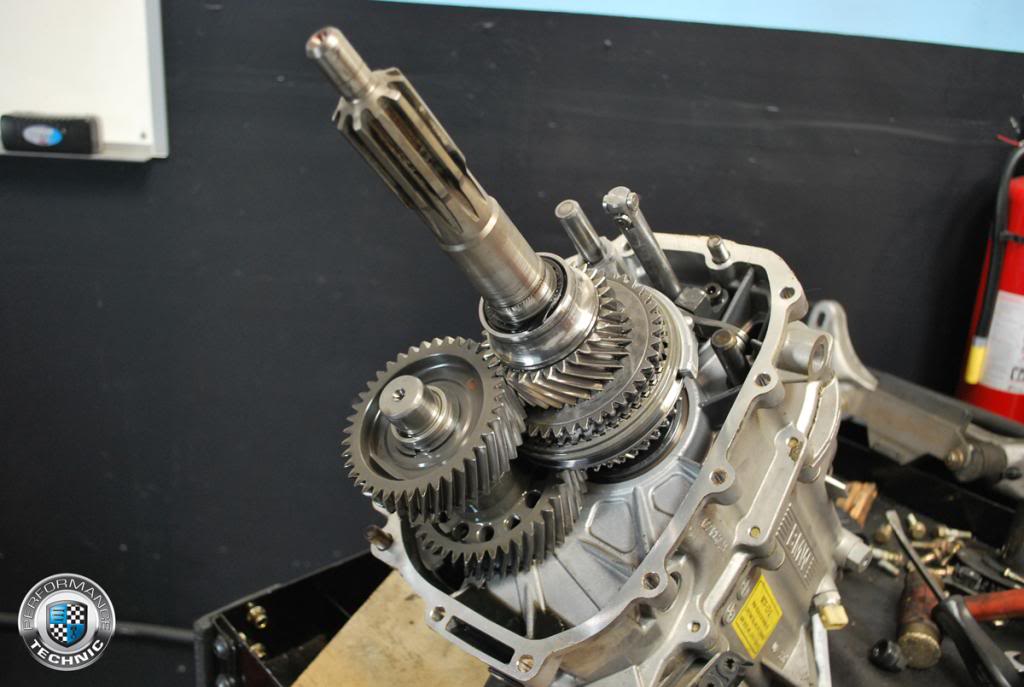
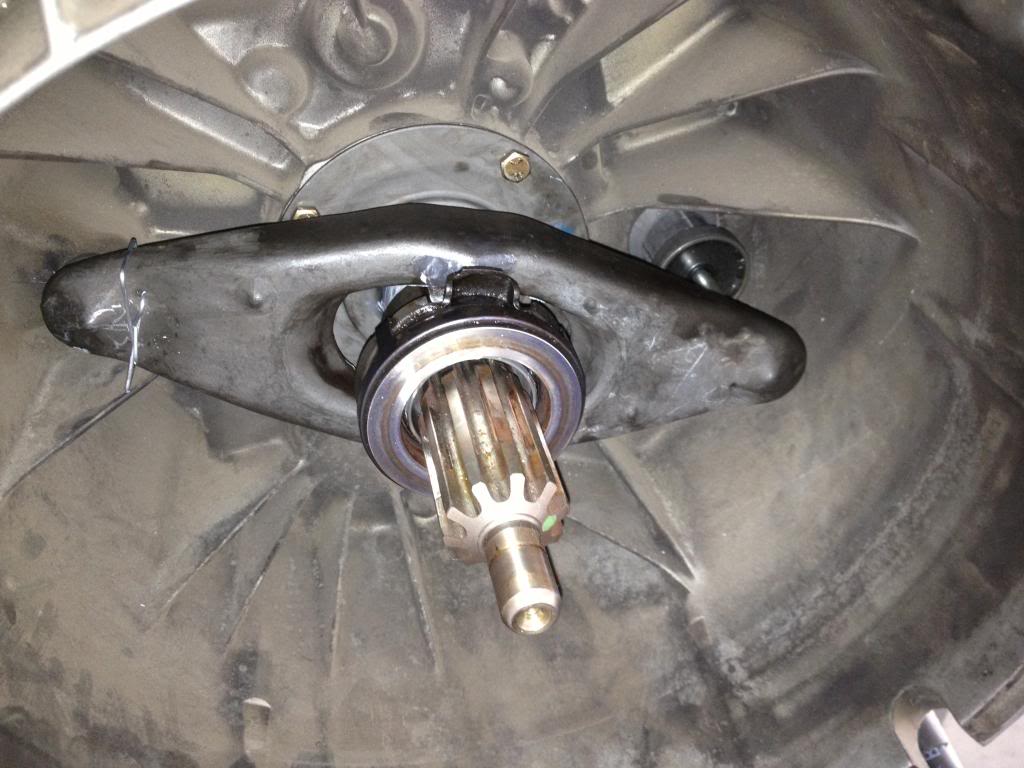
14. Remove the bolts holding the BH to the gearbox using a 13mm wrench. Once all of these are removed, lightly tap on the bellhousing with a rubber mallet until it separates from the gearbox. Do not attempt to pry the faces apart, as these faces need to maintain a good seal when reassembled. If you gouge them, you will leak transmission fluid. Pull the BH the rest of the way off,
being very careful not to pull off any loose transmission components with it (several small bearings/washers can fall off the end of one of the shifter rods). The following is a picture taken by Performance Technic, which shows the washers and pins that they ride on, which you’ll want to make sure are firmly in place before continuing. You’ll also want to be careful not to damage the input shaft seal if you are not replacing it at this time.
15. Making sure that all of the inner gearbox pieces are where they should be, install your new manual bellhousing on the SMG transmission. Remember to apply a bead of black RTV sealant all the way around the face of the flange and each bolt hole. The RTV should “dry” within an hour, and be fully cured within 24 hours. To be safe, I did not fill the transmission with new fluid until after the 24 hour period.
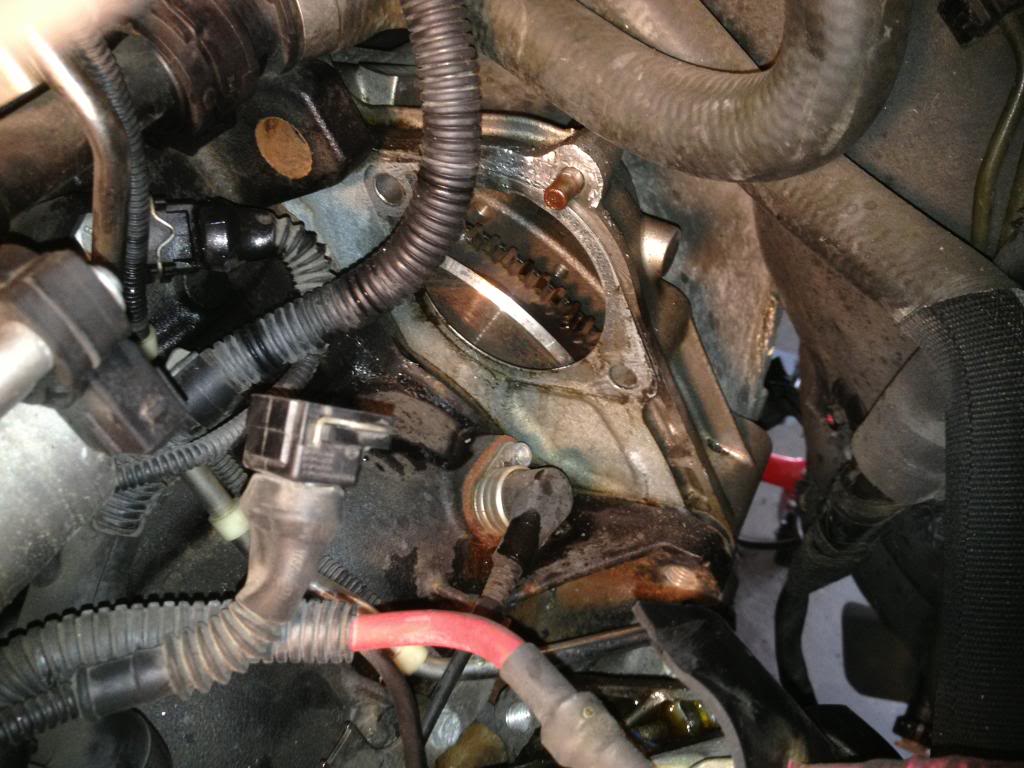
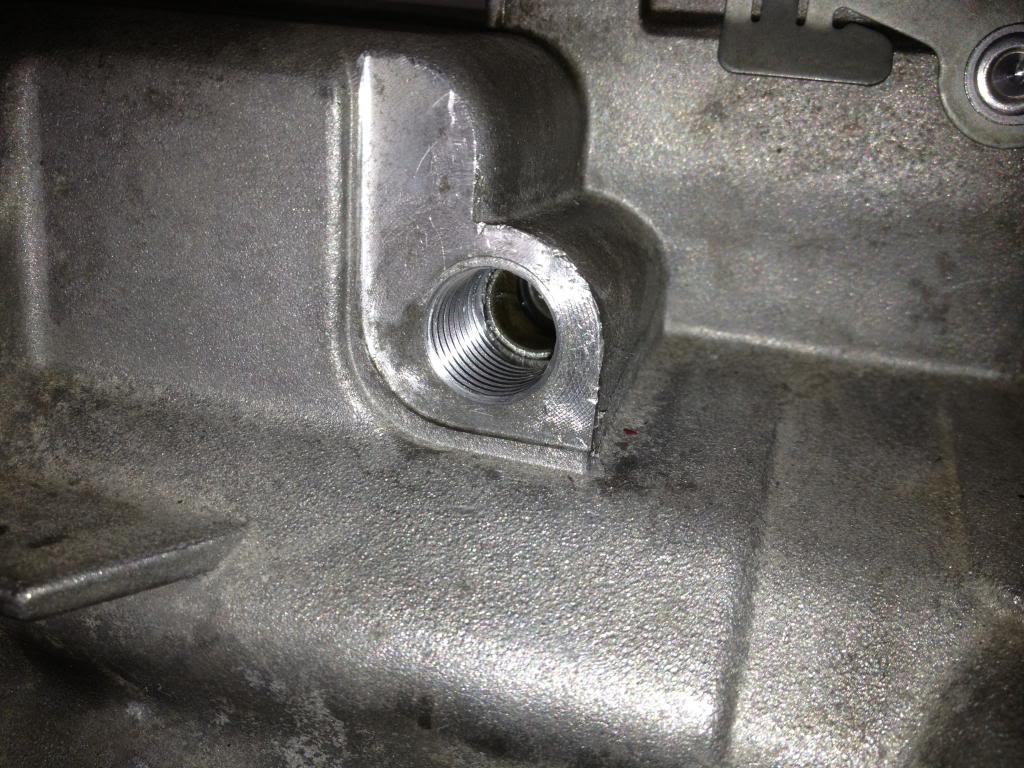
16. Remove the pressed in plug on the back of the transmission- this is where the gear recognition sensor will be installed. I was able to do this by lightly prying on it with a flat head screwdriver- it should not put up much of a fight. Be c[areful not to damage the inner diameter of the hole. Also remove the bushing and compression spring. My compression spring, as seen in the picture, was cracked!
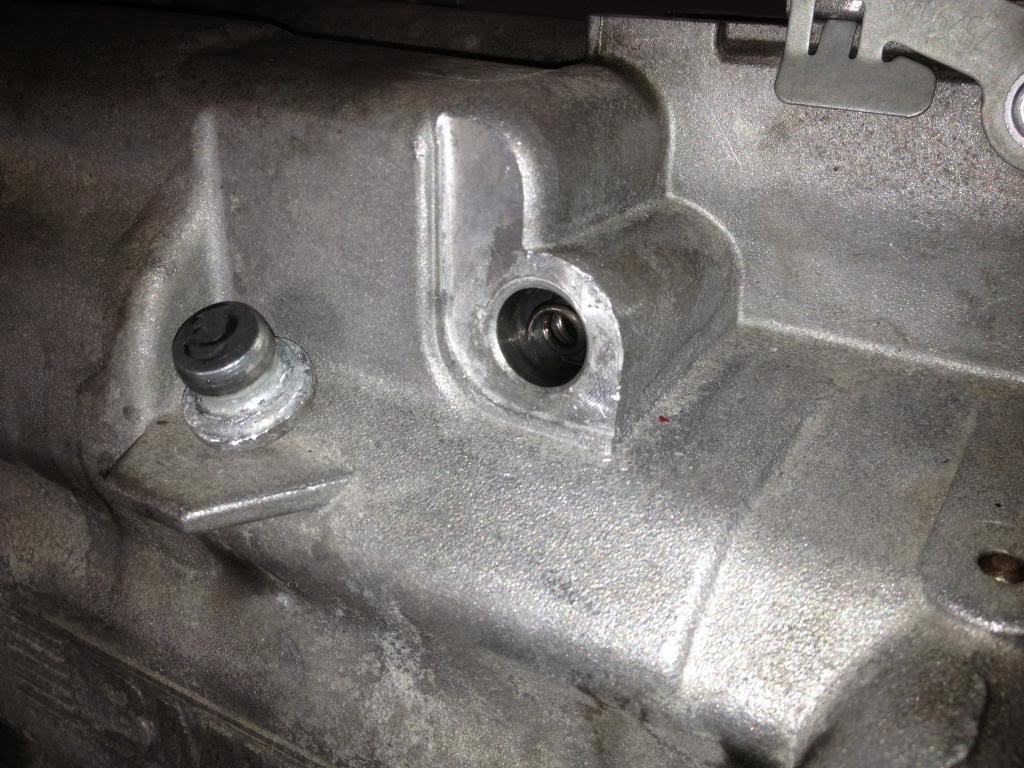
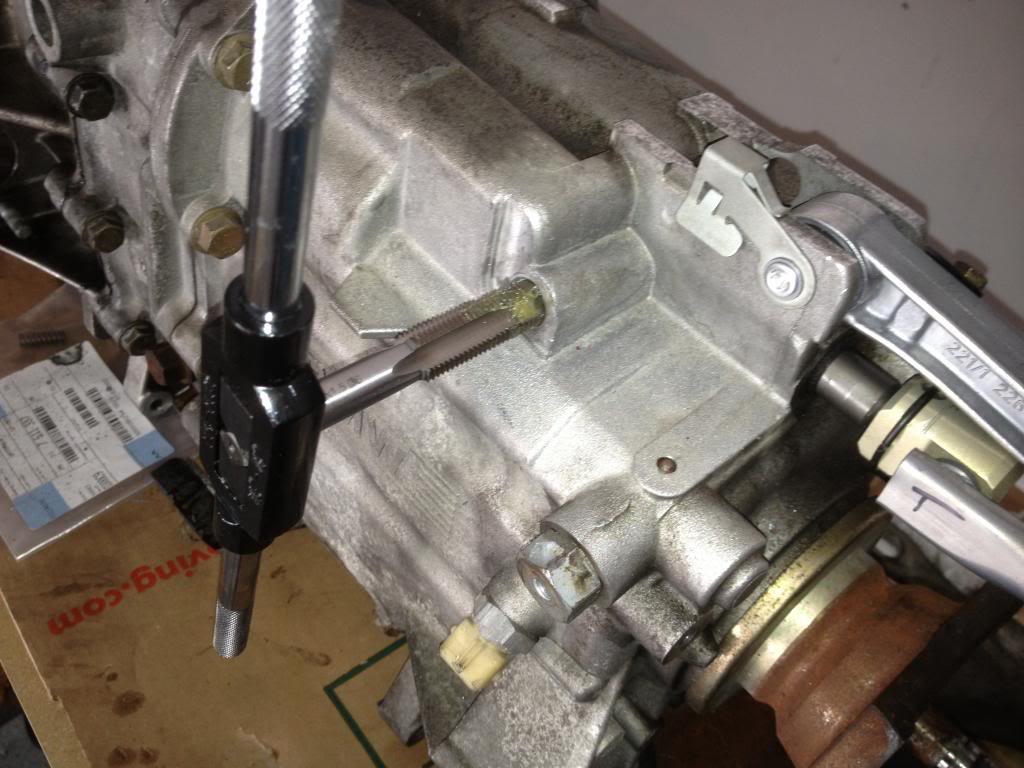
It must have only been a matter of time before the transmission was no longer capable of shifting or staying in gear. This is a perfect example of why you should go ahead and replace all of the compression springs while the transmission is off of the car. Use the M14x1.5 tap to thread the hole (the pre-drill diameter is already correct for use with this tap). I used a heavy grease on the tap in order to collect chips as I went. Besides for following the conservative “one turn in, half turn back” pattern for cutting the threads, after every two full revolutions I backed the tap completely out to clean any chips that may have not stuck in the grease with a cue tip. The key here is to TAKE YOUR TIME. The last thing you want to do is to have to fish out small metal chips from the back of the gearbox.
Once the threads are cut as deep as they will go (the tap will stop when the end contacts the pressed bushing inside), clean out any excess grease and install your new shift detent, spring guide pin, and compression spring. Yes, these parts are different between the SMG and manual cars- do not try to reuse those from the SMG. Finally, screw in your new gear recognition sensor. Once the transmission is installed in the car, a now unused SMG connector will hook up to this sensor. In order to mate these connectors, the center plastic tab on the outside of the gear recognition sensor will need to be sliced off with a razor. Again, looking at the connectors side by side, it will be very obvious what needs to be cut off in order for them to work together.
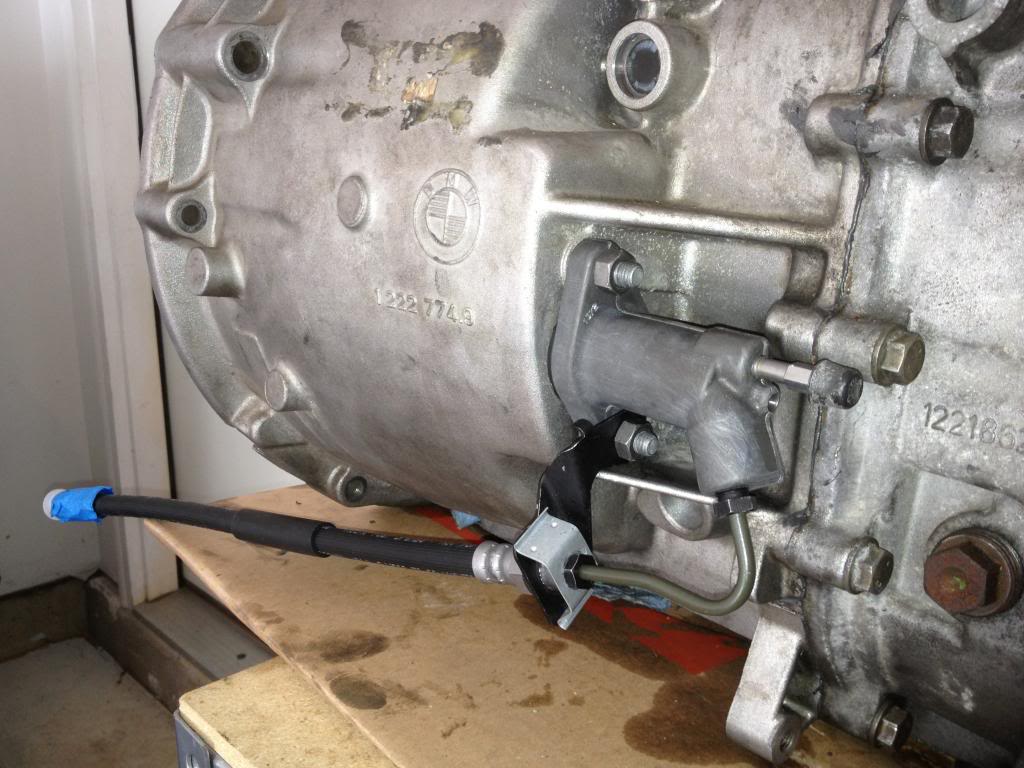
17. Reinstall your throwout bearing guide tube (lubricate with white lithium grease), clutch fork (lubricate contact areas on back side with white lithium grease), and throwout bearing.
Then go ahead and install your slave cylinder, bracket, and the soft hydraulic lines that attach to it. No need to overtighten these fittings!
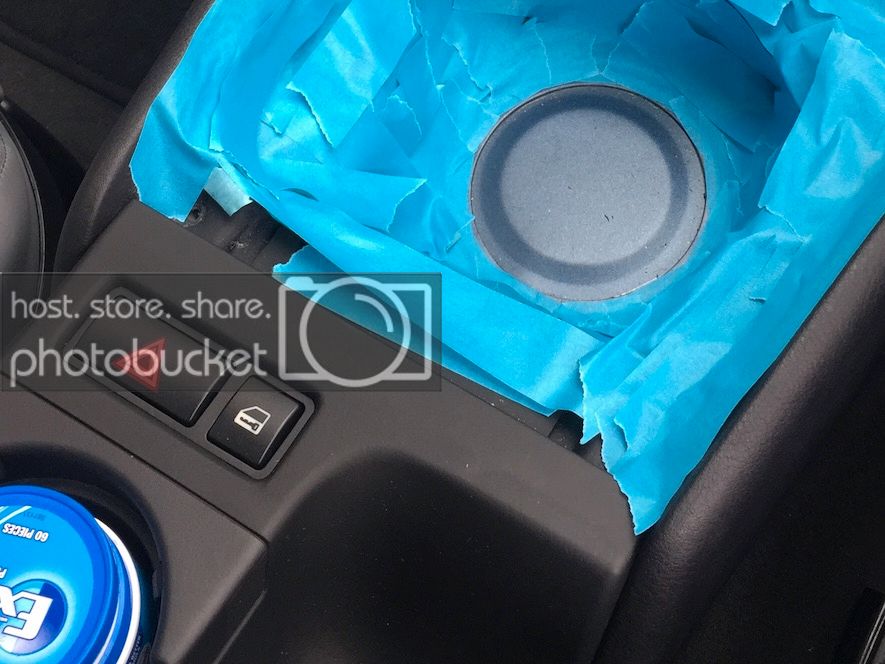
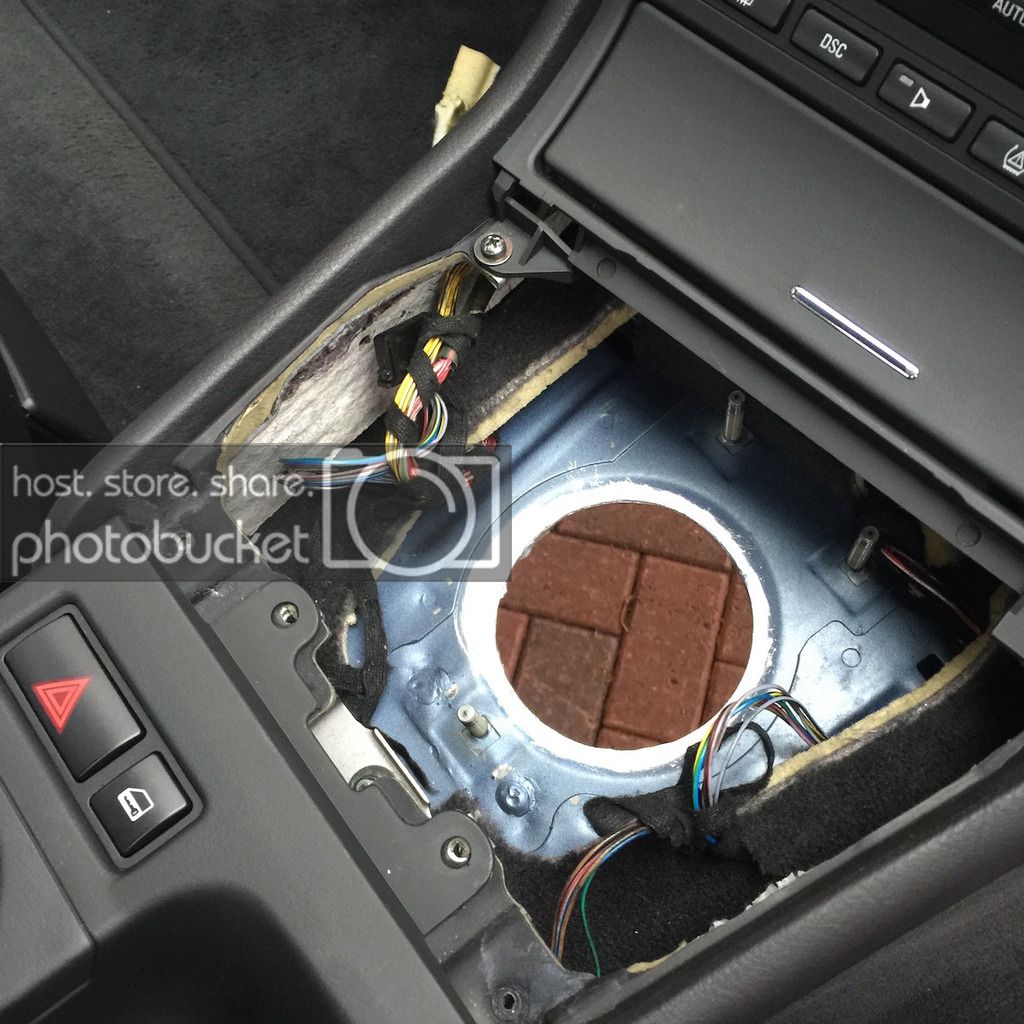
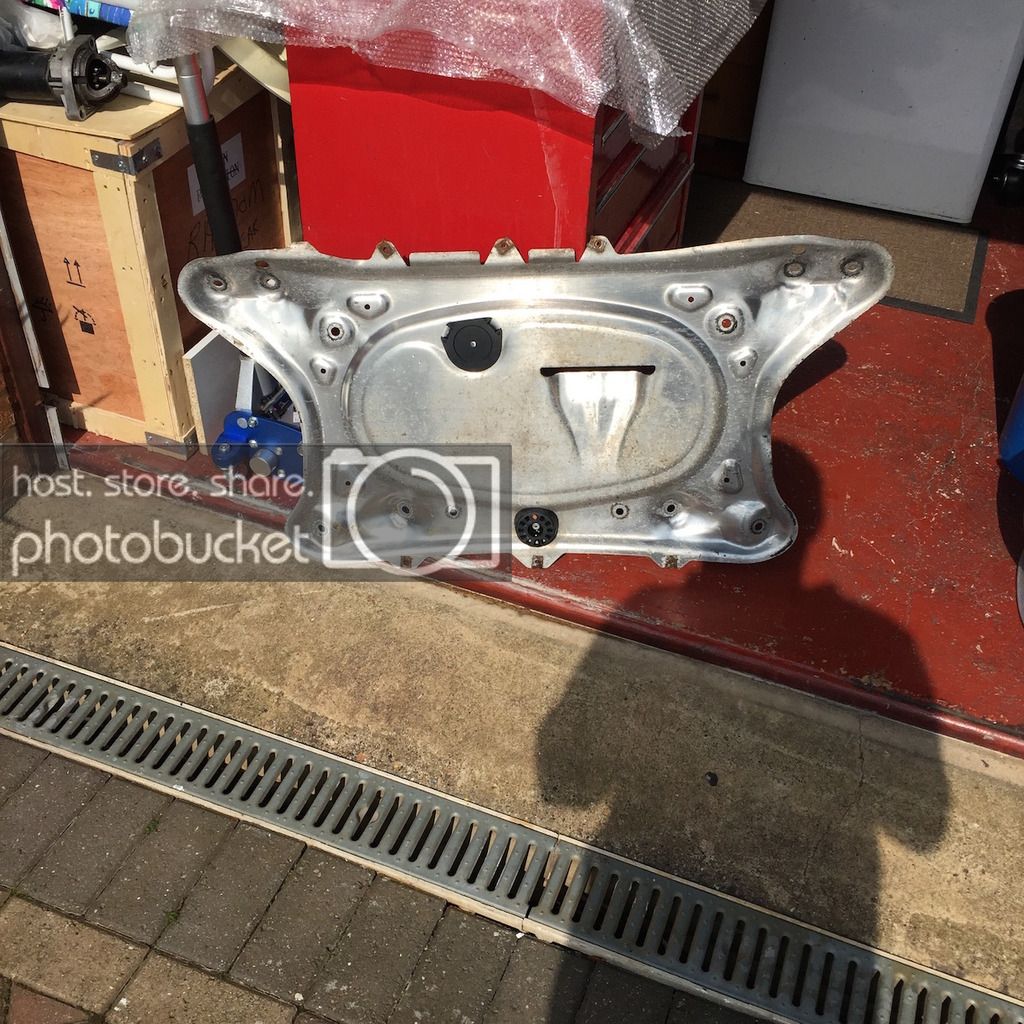
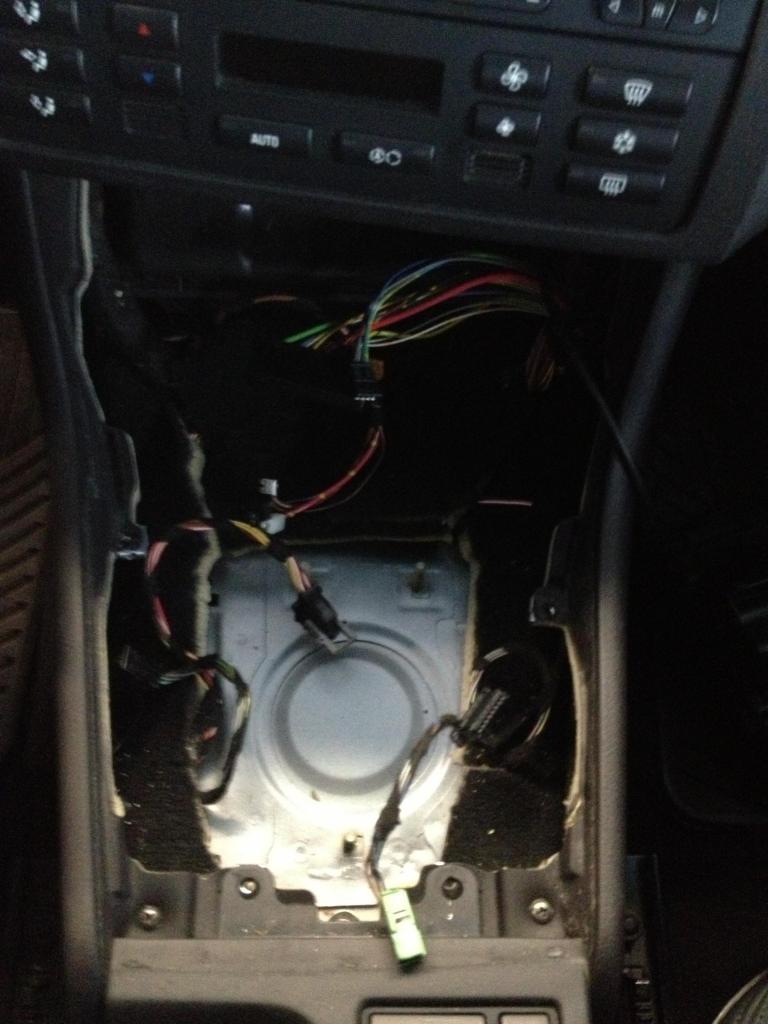
18. Get inside the car and remove the SMG shift knob (just pull straight up). Next remove the SMG shifter bezel (which simply pops out of its clips). Now that the shifter module is exposed, remove the three 10mm nuts, unplug all of the connectors, and pull the shifter off of the three studs it rides on. You can now see the top of the blockoff plate that is spot-welded underneath the car. Here is a picture borrowed from another forum member who has done the swap:
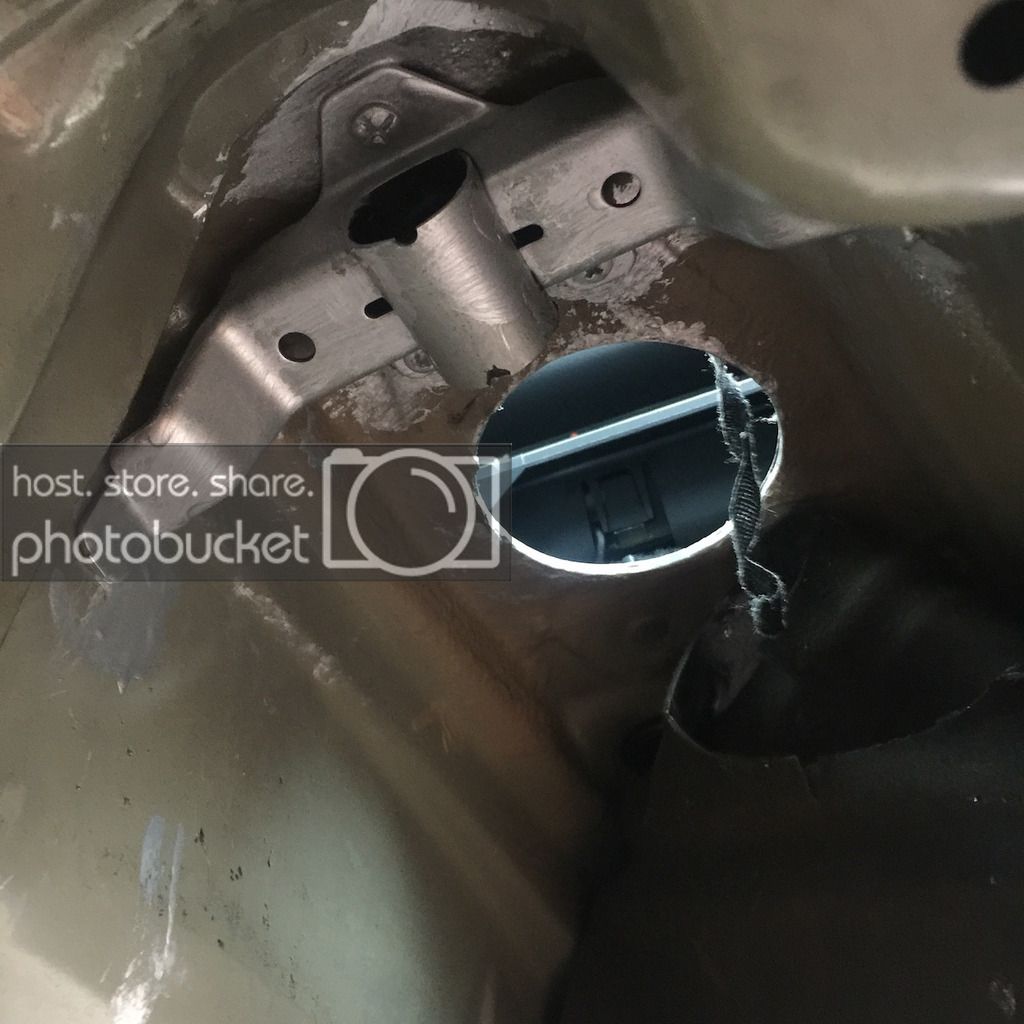
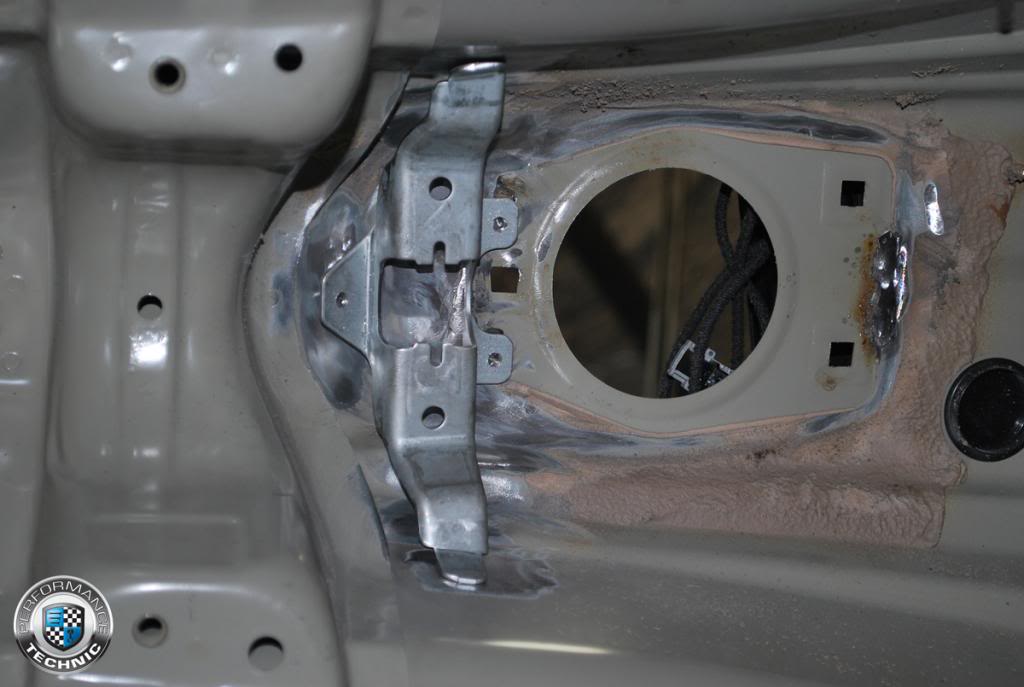
19. Now it is time to grind off the blockoff plate that the new shift lever will go through to mate with the selector rod. This was by far the dirtiest and most tedious part of the job. I used an assortment of grinders, drills, etc. to try and cut through the spot welds on the plate and remove it. What ended up working best, once I had removed the rubberized undercoating, was a Kevlar cutting wheel on my dremel due to its precision. Again, take your time and let the tools do the work- you will get through it. You may also want to tap down on the plate from the top with a wood block and mallet in order to more clearly define the edge of the plate from underneath. This will make sense when you see it. Here is another reference picture taken from Performance Technic to show where the spot welds under the plate are located. This picture also clearly depicts the proper orientation of the shift arm support bracket:
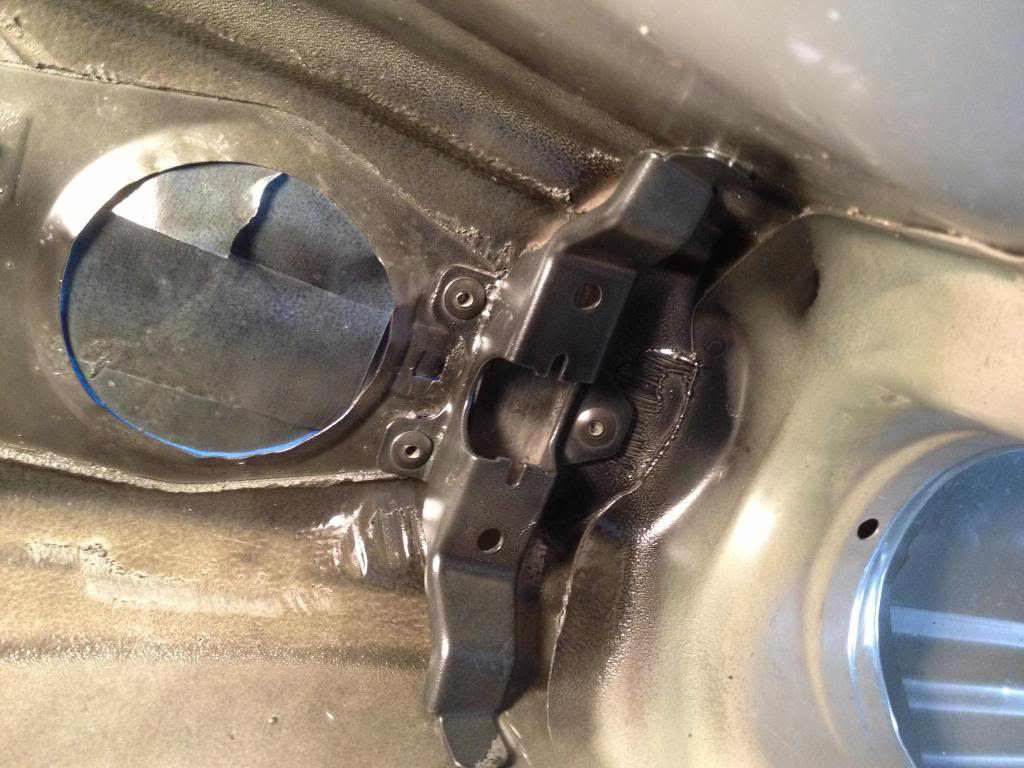
20. Now that the plate is off, you have a couple of options. Keep in mind that, regardless of which option you choose, it is very important to prime/paint/undercoat everything to prevent rust in the future since much of the protective undercoating is now ground off. Since I do not own a welder, I decided to try something a little different for attaching the shift arm support bracket. I used quarter inch rivets in tightly clearanced ¼” holes to mount it. First I drilled three ¼” holes in the mounting tabs on the bracket. Next I pushed the bracket up into place, and used a sharpie marker to mark where to drill the receiving ¼” holes. Finally, insert your rivets and attach the bracket. Each of the tabs should sit flush with the transmission tunnel where they mount. After you prime and paint, go ahead and install the cylindrical rubber mount into the bracket that will actually support the rear of the shifter arm. You’ll notice that the shifter arm will essentially float in the rubber bushing, and that this bracket is under little to no stress at any given time.
]
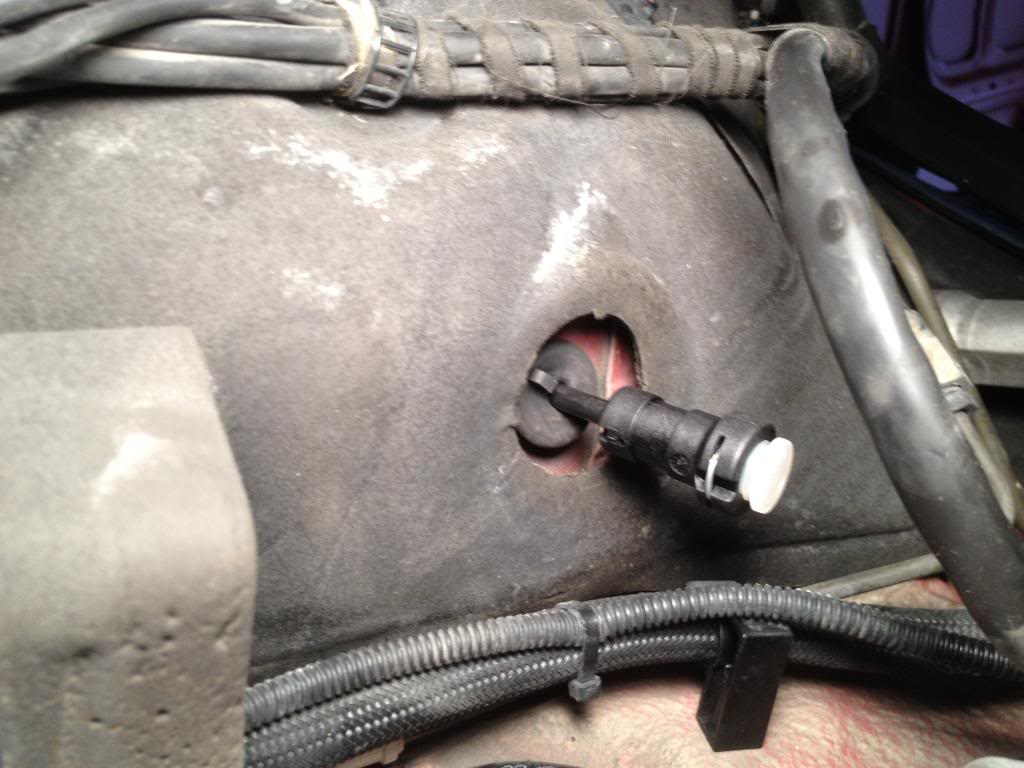
21. At this point, it’s time to work on the pedal assembly and routing the new clutch hydraulic lines. One flexible hose will run from the unused nipple on the brake master cylinder reservoir, down through a rubber grommet in the firewall, and onto the supply nipple on the clutch master cylinder. Do not cut the plastic end off of the nipple on the reservoir or try to hook up the feed hose until you are ready to bleed the clutch.
For now, simply route the hose and cut it to length. Snap the clutch module into place on the clutch master cylinder, and bolt the CMC into place on the pedal bracket. The best reference for how to do this will be to use the OEM parts diagram for the pedal assembly.
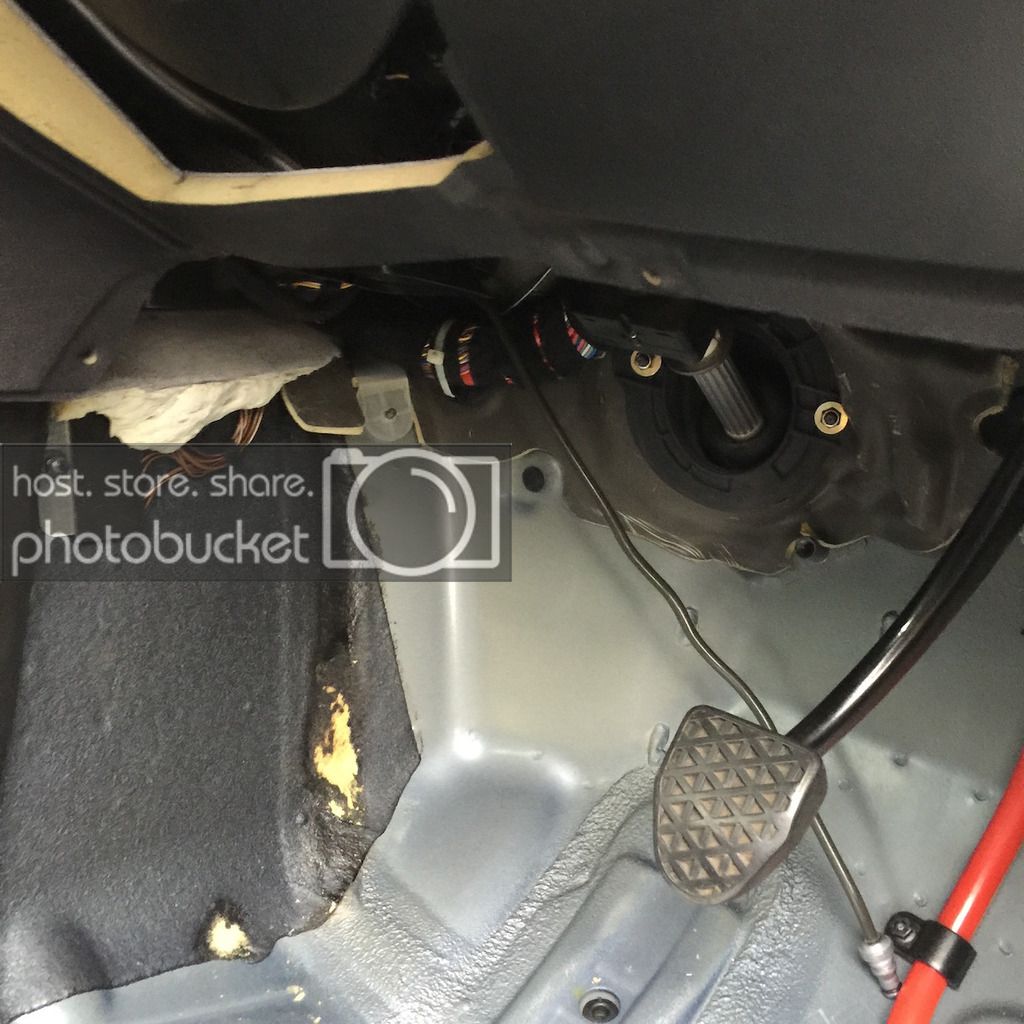
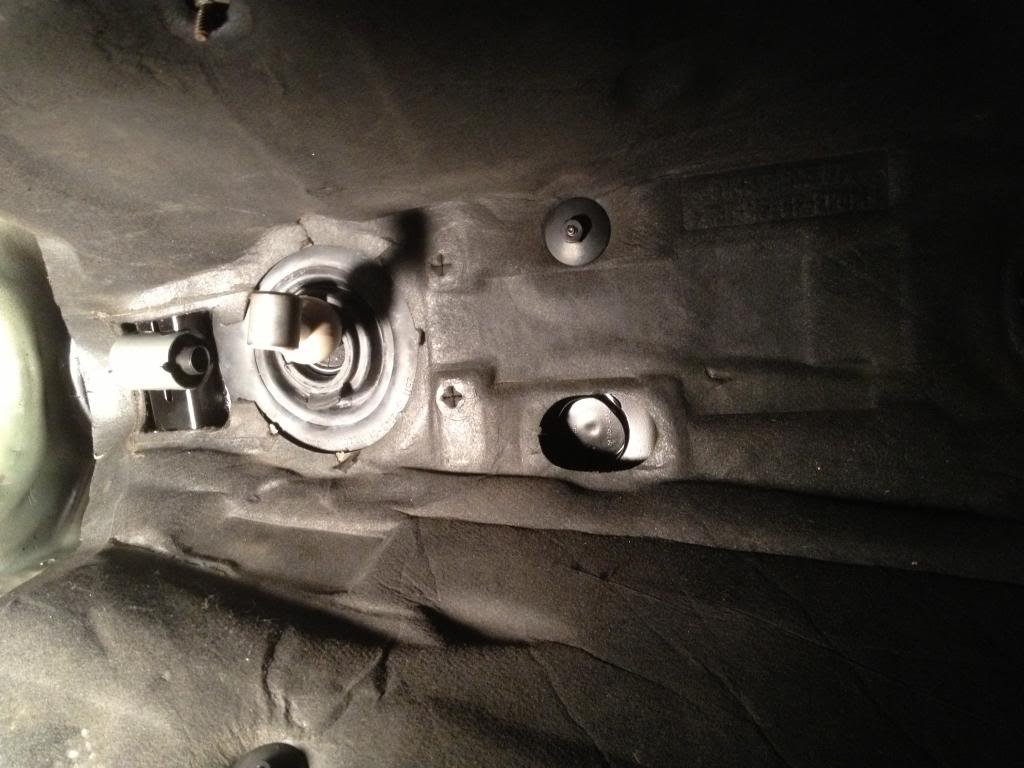
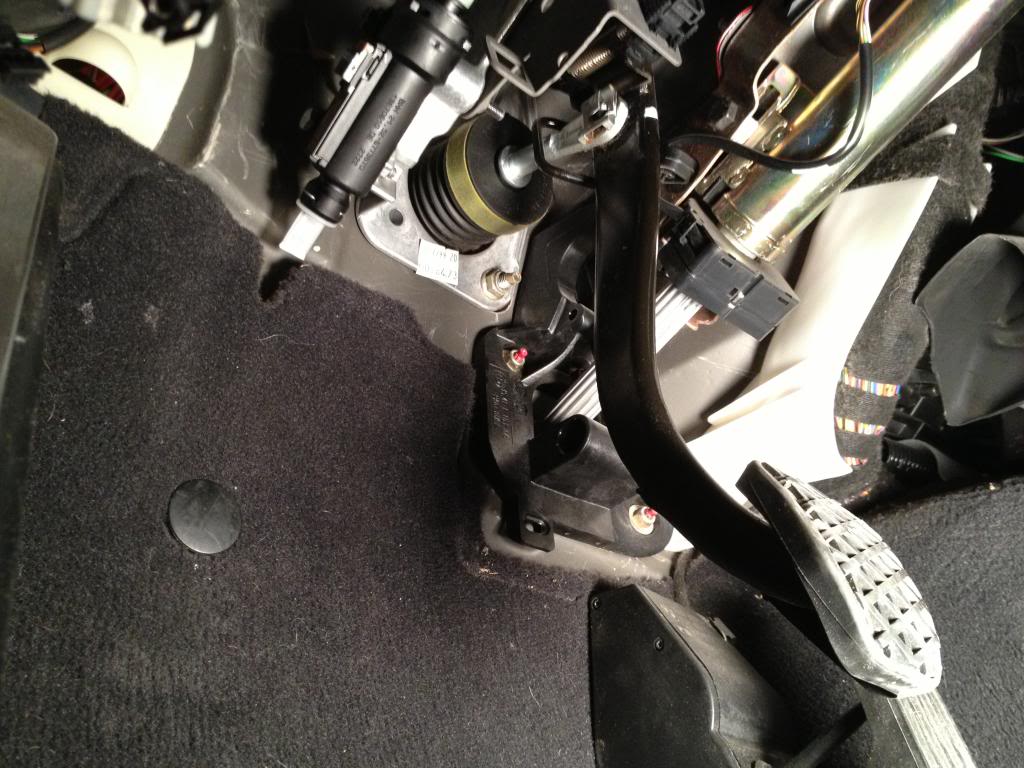
In order to route the hard hydraulic line from the CMC through the floor to the slave cylinder, remove the deal pedal trim assembly. Do this by removing the hood release latch, and then popping the trim out of its clips. Be careful not to break the plastic clips. This will allow you to peel back the carpet and foam padding enough to get the hose down and through the existing hole under the floor. There is a perforated circle in the sound deadening under the car that you can punch out to reveal the removable grommet through which the clutch line will run. I found that the best way to install the clutch line was from under the car, and to snake it up through the carpet and to the bottom of the CMC that way. The clutch line then simply plugs into the bottom of the CMC with a quick connect.
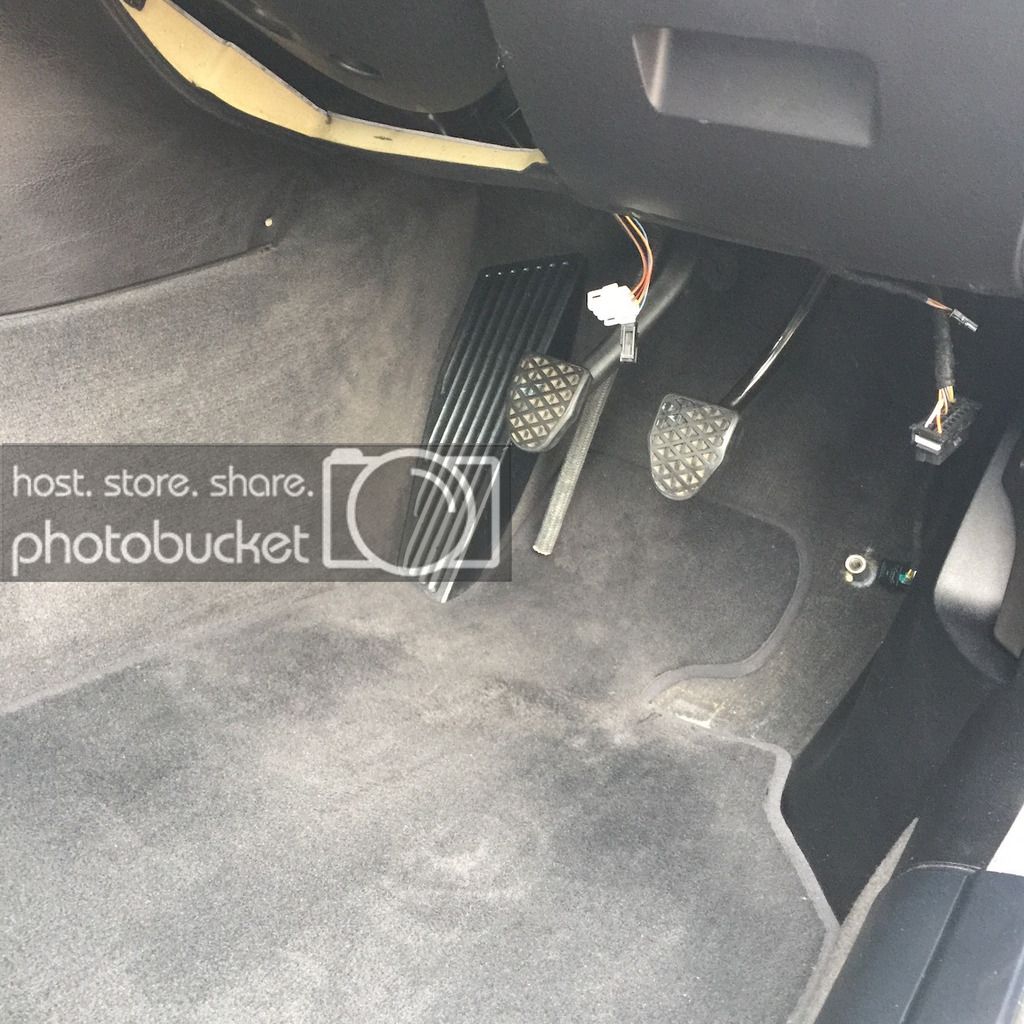
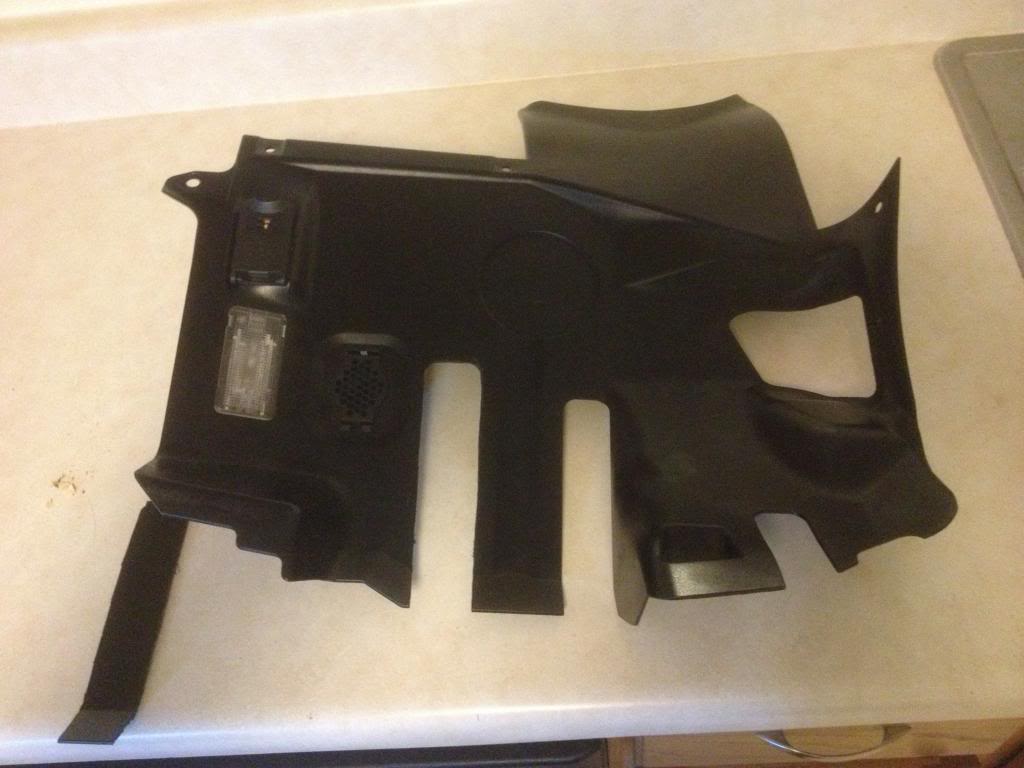
22. Modify the plastic panel under the dash to work with your new third pedal. There is already an outline of the exact profile molded into the plastic, so just follow that path with a cutting tool on a dremel or similar tool in order to cut the slot.
23. It’s time for reassembly! Everything goes back together exactly the opposite of how it came apart. I waited until the transmission was bolted back up to the motor before installing the shift linkage components. Remember to torque each bolt to spec (remember that there is a different torque spec for each bellhousing mounting bolt), use Loctite on your new flex disc nuts (which should always be replaced after they are removed), and to properly preload your center support bearing. Here are some of the important torque specs, per the TIS Manual:
Bellhousing M8 Bolts: 28 Nm
Bellhousing M10 Bolts: 56 Nm
Bellhousing M12 Bolts: 98 Nm
Flex Disc Nuts: 100 Nm (Remember to only physically turn the part that is in contact with the flange, NOT the rubber guibo!)
CSB to body: 21 Nm
24. Cut off the tip of the plastic barbed nipple from the brake fluid reservoir. Before doing this, it is advisable to siphon out the brake fluid to below the level of nipple to prevent brake fluid from running out and down any painted surfaces. Attach the clutch master cylinder supply hose to the reservoir, and proceed to bleed your clutch. Because the lines will be dry all the way through, the manual pump method probably will not get you very far in the beginning. I used a MityVac vacuum bleeder to help draw fluid through the system from the bleeder screw on the slave cylinder. Remember to keep the reservoir full as you do this, or you will be starting from scratch when air is drawn in. Once there is a relatively constant flow of fluid, I was able to finish bleeding the clutch the old fashioned way. Open the bleeder screw, push and hold the clutch pedal down to the floor, close the bleeder screw, and release the clutch pedal. Repeat until each pump produces a steady stream of fluid without air bubbles. You will feel the clutch pedal build up more and more pressure as you eliminate the air from the system.
Procedure (Electrical):
I decided to tackle the wiring completely separately from the mechanical side of the swap. In my mind, this made it a little bit easier to process mentally. Honestly, if you can follow directions and know how to solder there is very little difficulty in the wiring side of this project.
Begin by cut off the two small connectors (blue and red) on the end of the clutch module lead adapter. These will not be needed. The black connector will plug directly into the clutch module mounted on the clutch master cylinder.
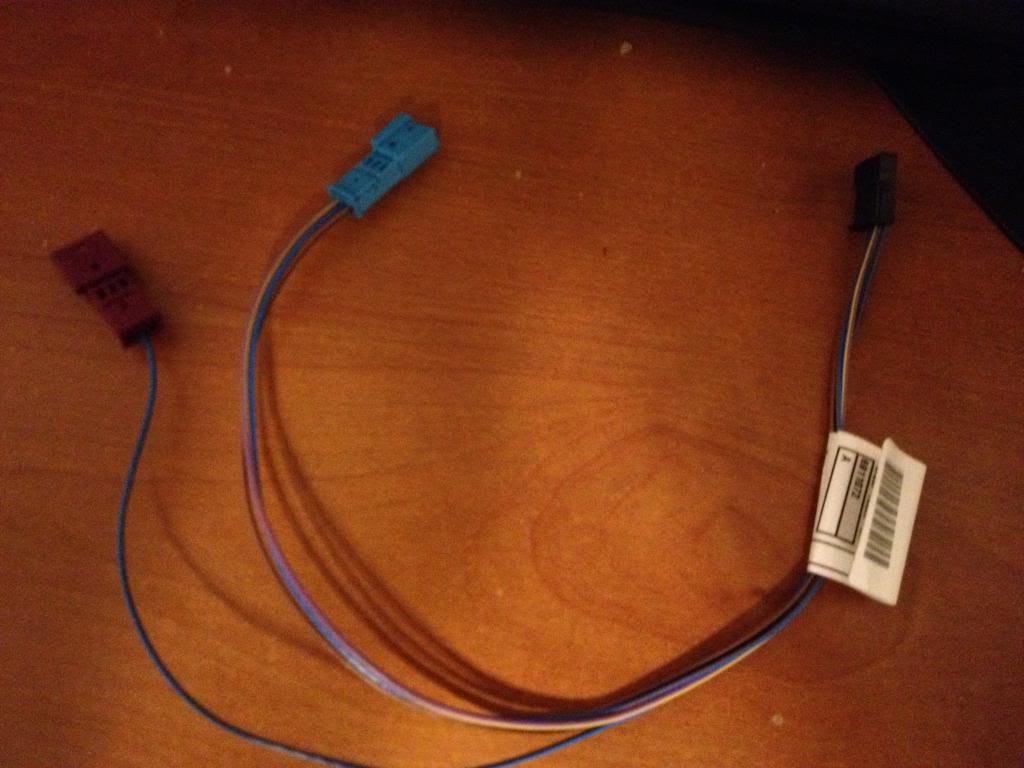
Note the male pins that are inserted into these connectors. In order to make the connection to the EWS (pin 3 on the lead adapter), a female pin corresponding to that male pin size will need to be soldered on as pin 8 in the EWS is blank on SMG cars. The same size female pin will also be used in pin 20 on the DME connector in the connection box under the hood, as this is also a blank slot on SMG cars. Note that in order to install the female pins in these connectors, the connectors themselves need to be disassembled. Otherwise, the pins will not “click” into place. Anyway, on to the adapter lead connections:
Pin 1: Br/Sw (Brown w/Black stripe): Ground (tap into the brake light switch on pedal box that has the same wiring colors)
Pin 2: Bl/Br (Blue w/Brown Stripe) -> Pin 1 gear switch -> Pin 2 Gear Switch -> Pin 20 Gr/Bl @ DME x60002.
Connect pin 2 from the clutch switch to the pin 13 wire from the SMG ECU connector (grey 40 pin connector). To do this, you will need to run a length of hookup wire through the same rubber grommet that the clutch master cylinder resevior hose runs through up into the DME connector box. In my case, this is seen as the white hookup wire. I was able to pass it through one of the rubber grommets that another wiring harness passes through to enter the main ECU box.
Next connect the ground connector from the SMG ECU to the DME pin 20 at connector x60002 (24 pin black connector) next to the 9 pin power connector on the engine DME. Note that pin 20 on the DME is blank, and you will need to disassemble it and insert the wire with a female pin that will click into place.
 *Note that it is NOT necessary to do anything with pin 2 on the clutch switch in order to get the car to run. This connection is purely for the function of the cruise control in conjunction with the gear recognition sensor that was installed in the tapped M14 hole in the transmission. Also note that even wired correctly, your cruise control will NOT function until the car has been recoded with the proper 6MT tune.
Pin 3:
*Note that it is NOT necessary to do anything with pin 2 on the clutch switch in order to get the car to run. This connection is purely for the function of the cruise control in conjunction with the gear recognition sensor that was installed in the tapped M14 hole in the transmission. Also note that even wired correctly, your cruise control will NOT function until the car has been recoded with the proper 6MT tune.
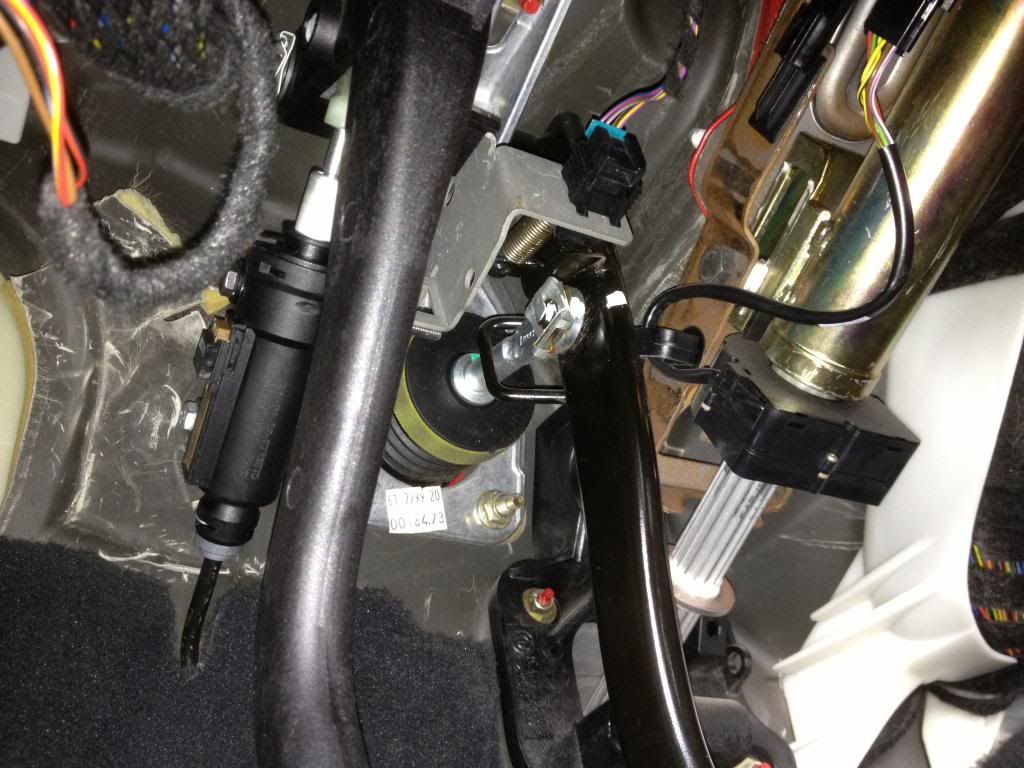
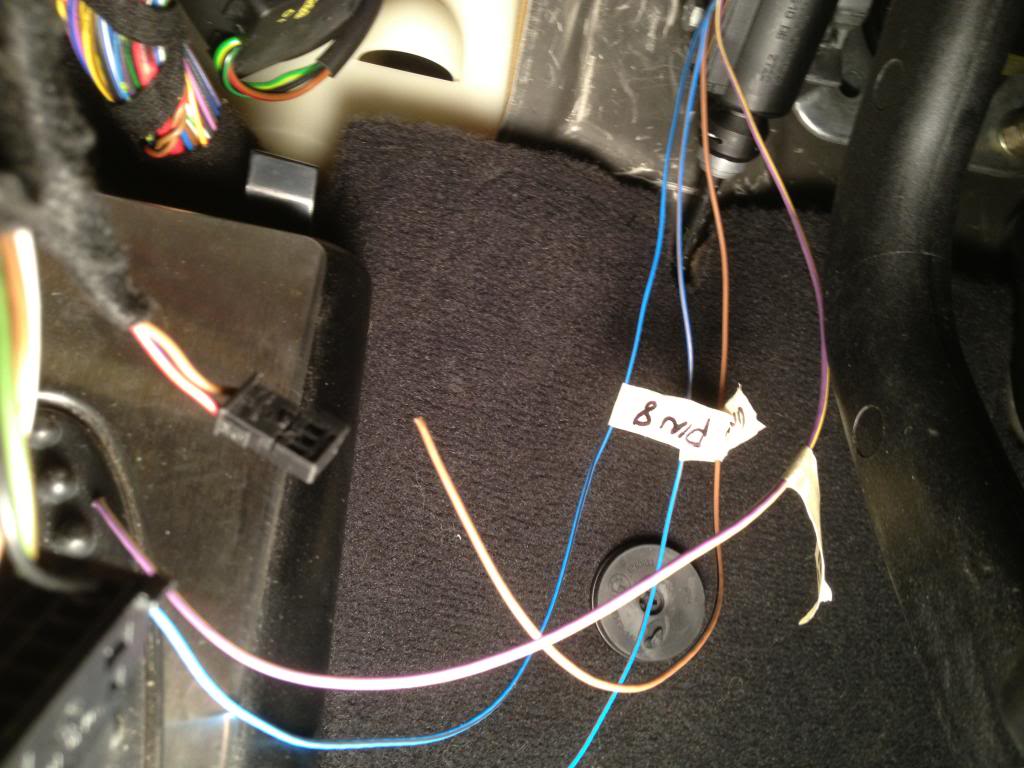
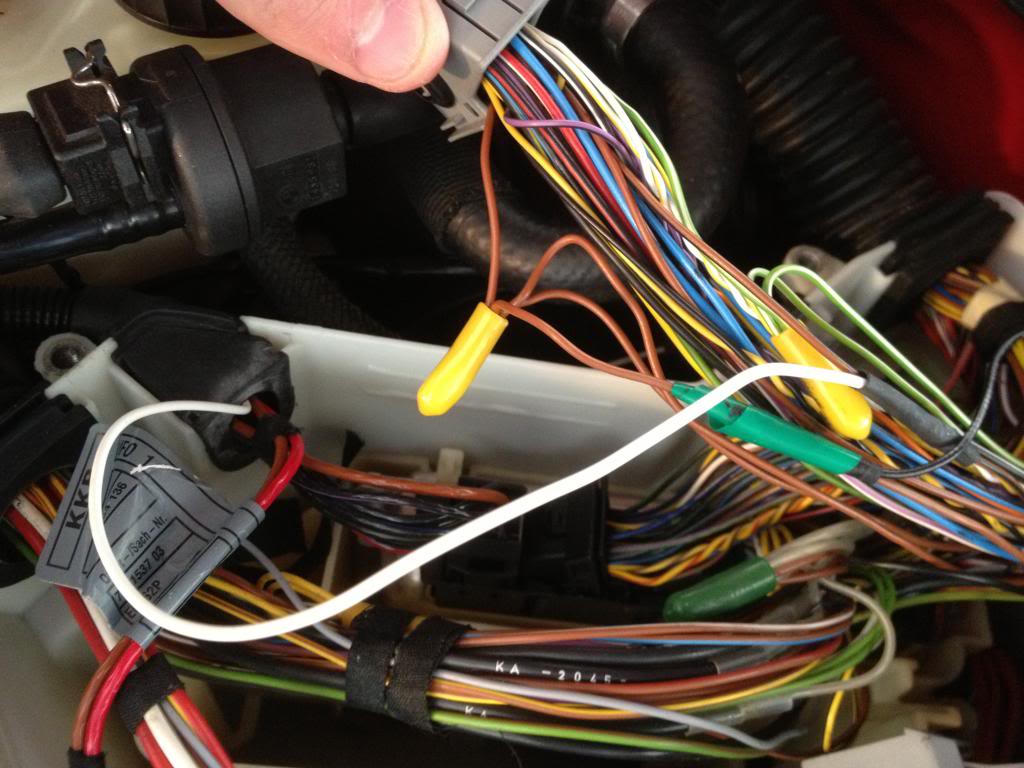
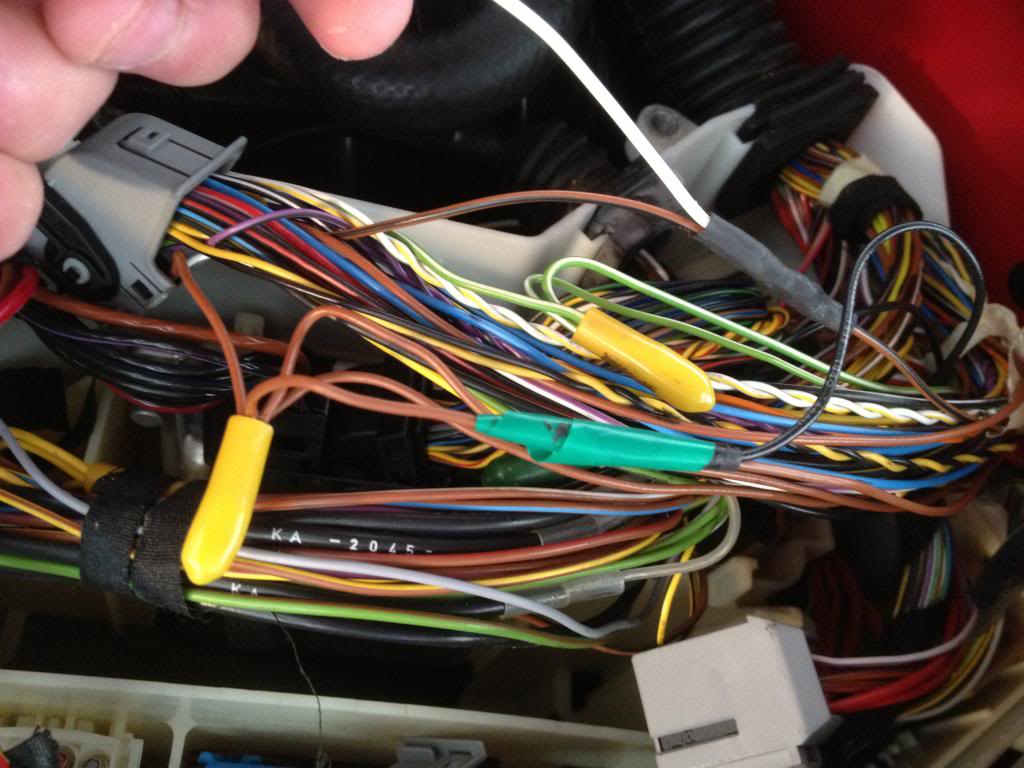
Pin 3: Vi/Ge (Violet w/Yellow Stripe): 12V (tap into the brake light switch on pedal box which has the same wire colors). The following picture shows pins 1 and 3 fully wired into the brake switch module.
 Pin 4:
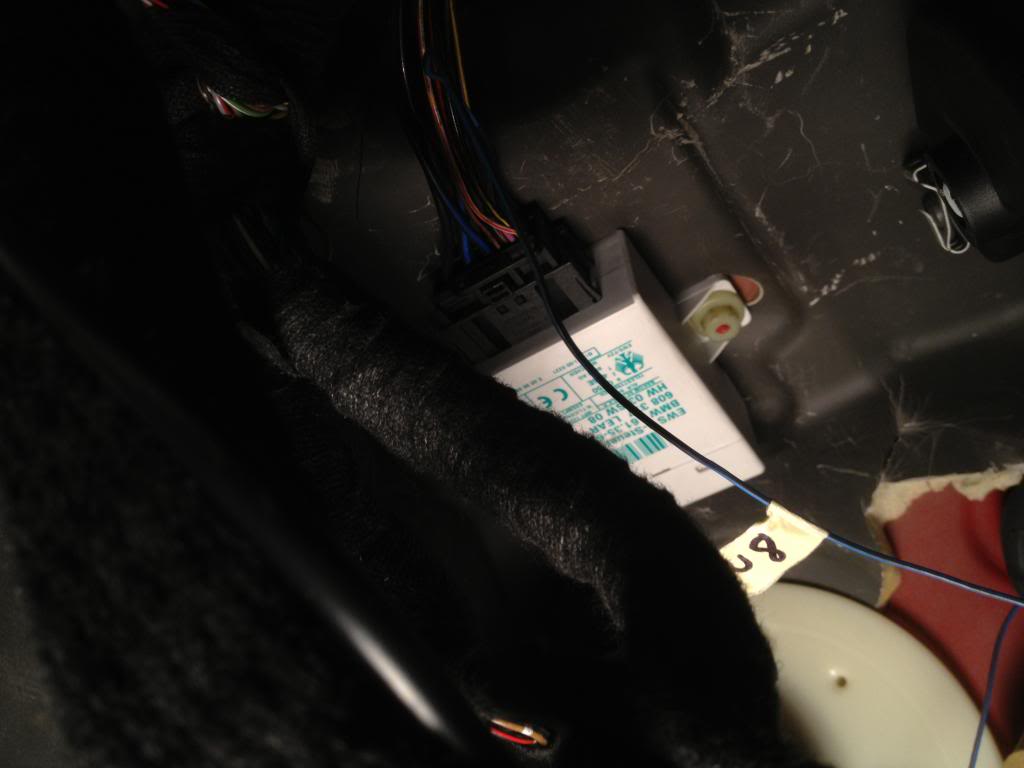
 Bl/Sw (Blue w/Black Stripe): Pin 8 in EWS (white box in upper lefthand side of driver's footwell. Pin 8 is empty). If you remove the two 10mm plastic nuts that hold the EWS module in the footwell, you will be able to see the pin numbering scheme to be sure you make the correct connection. Pin 8 is in the upper right hand corner of the small pins. Again, in order to insert the female pin into position 8 in the EWS connector, you will have to disconnect and then disassemble the connector itself.
 Coding:
Coding will be the final part of this project, and is the only part that I will not be able to answer specific questions on! The VERY good news is that, provided you completed the wiring per the instructions above, your car will start and will run. You will of course have the SES light and SMG cog light on. My car didn't run in a full-on limp mode, but it was down on power a significant amount. I checked my codes just for the fun of it with my Peake tool, and came up with table 1B, codes B1 and 44. Both of these are related to the lack of communication with the SMG module. As everyone knows, any shop with Autologic should be able to do the coding. I, however, was lucky enough to have a local BMW buddy hook me up! He used a combination of WinOLS, NCS Expert, INPA, and WinFPK (if I recall correctly) in order to read, modify, and rewrite each of the different modules. He took care of the DME, the DSC, the cluster (IKE?), and the EWS. When all was said and done, my car had no engine codes, no more cog light, no more SMG LCD display, but was able to add (retain) the SMG shift lights! He did an incredible job, so thanks again if you're reading this!
Coding FAQ's:
1. Will my car run without coding?
Yes, if you followed the wiring instruction for pins 1, 3, and 4 of the clutch module correctly, your car should run. However, you will be left down a significant amount of power and with both CEL and SMG cog warning lights.
2. Will I lose my tune (Dinan, Evolve, etc.) when I have my car reflashed?
No, it can be done without overwriting your tune.
Gear Position Sensor Delete:
If you choose to not install the Gear Position sensor, you need to short the gear position sensor wire together OR wire the clutch switch directly to the DME. Additionally, you need some software modifications
1) Set K_SKRAFTS_CONTROL to 02 (default should be 01). This is located at 0x4028 on the MSS54 and 0x802A on the MSS54HP
2) Set K_S_GANG_LL_ED to 0xFFFF (default should be 0x0032). This is located at 0x35AE on 1701/2101, 0x35DA on 2801, 0x5952 on 2001/2701, and 0x582E on 0301/0401 (CSL)
3) US cars: Set K_MD_MIN_VERH_KRAFTS to 0xA0. It is located at 0x67E0 on 2801 (MSS54). It is located at 0x88A2 on 2701 (MSS54HP). Default value is 0x80 on US cars (Euro cars are already at 0xA0).
Conclusion:
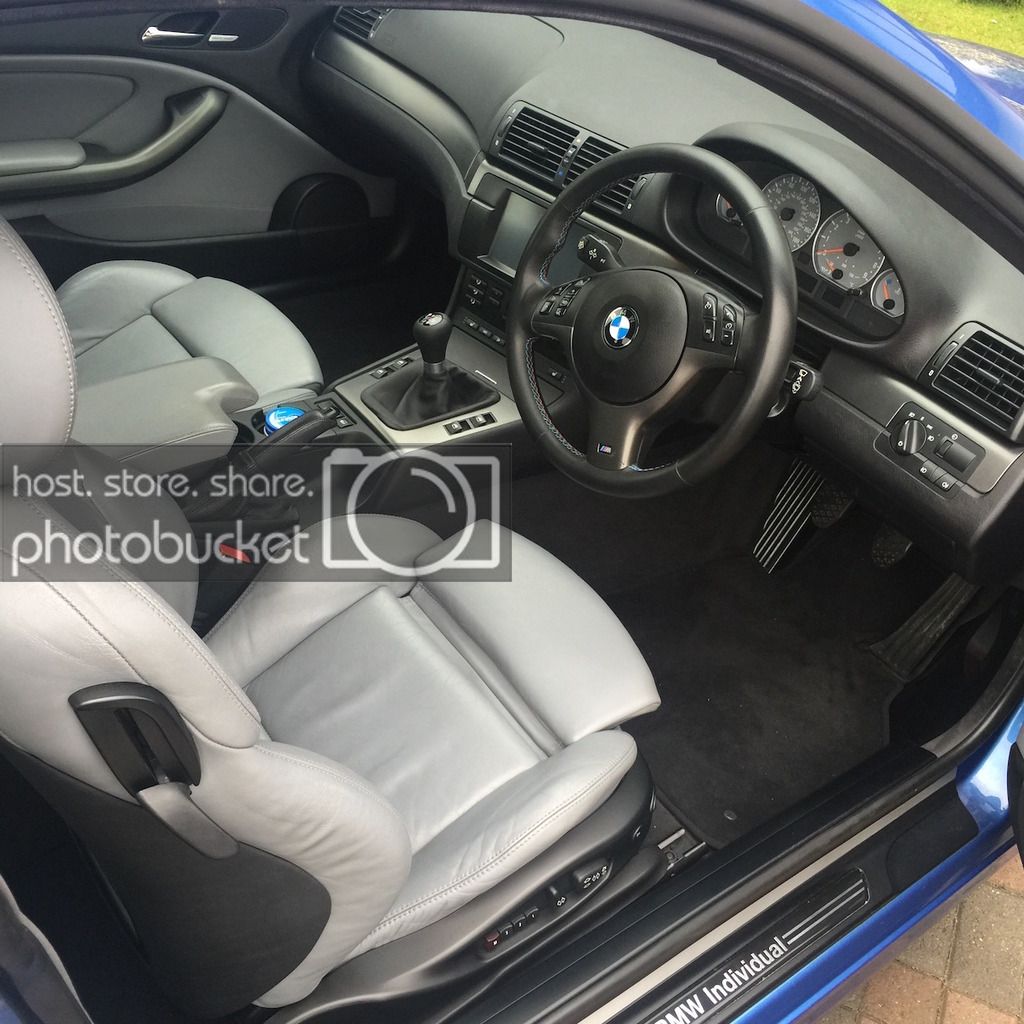
Now that all is said and done, I am totally in love with the M3 again. In my opinion, this is hands down the best modification anyone could make to an SMG car! It is a great feeling to have successfully gotten through a project like this, and it is fantastic having the piece of mind that comes with bailing on the SMG pump. The car now shifts absolutely flawlessly, as it should since every 6MT component from the shifter bushings to the clutch cylinders are brand spanking new. Remember, this can all be yours for less than the price of a new muffler


 Speedboat Moderator


Αρχικό μήνυμα απο ///Mitsos

https://forums.m3cutters.co.uk/threa...h-pics.150793/


 Απάντηση με παράθεση