|
|
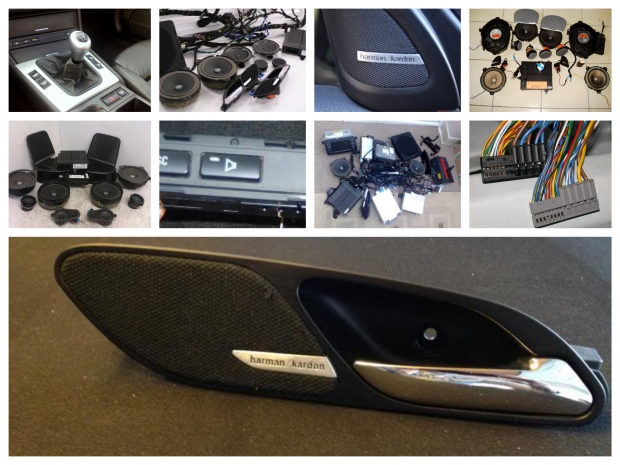
It is indeed possible to retrofit the optional Harman Kardon stereo system after the fact. It is not cost effective, however, to perform the retrofit if you have to buy all of the parts over the counter. This document assumes you have found someone selling a "take out" system or a someone with donor vehicle (the best option).
Since the wiring diagram is hard to come by (apparently even for the shop foreman at one of my local BMW dealers), I haven't yet figured out how integrate the "spatializer" button in the lower console or the speed sensitive volume adjustment. Neither of these features is important to me so I may never bother to figure them out. My car (a 6/2000 production 330i) does seem to have a connector in the dash for the "spatializer" button but I haven't confirmed this yet. I didn't remove the "spatializer" button from the donor car because the button bar seems to be one piece and my car has heated seats while the donor car did not.
This page outlines the process of performing the retrofit without going into detail regarding such things as door panel or speaker removal. It assumes some technical ability on your part.
If all you want to do is add the HK subs....
...you still need to follow these directions. The only part you can skip is replacing the 10 main speakers. You still need to replace the main HK amp and to do the bulk of the work mentioned below. Personally, I feel that you should do the whole job. Before I had a chance to install the subs, I drove around with just the 10 main speakers and the HK amp for two weeks. The increase in fidelity with the HK main speakers and amp alone is indeed worth the extra steps to replace the main system speakers. Furthermore, some of the HK speakers have different impedance than the original speakers and the crossover points (in the amp) are likely different on top of that (it's probably NOT a good idea to use the main HK amp with non-HK main speakers).
Disclaimer:
I was a mechanic in a past life and have quite a lot of experience. While I think this process is pretty easy, you need to read through the directions and evaluate it yourself to decide whether or not you can do it. The details presented here are believed to be correct but they are not not guaranteed to be correct. I am not responsible for any damage that you may do to your car or injury that happens to you as a result of following these directions. Proceed at your own risk.
Here's a list of some things that you will need:
- Be sure to disconnect the battery before performing any work because, believe it or not, every time a connection is broken, it's logged into the onboard computer. I saw this first hand while the shop foreman at one of my local shops had the big BMW computer hooked up to my car. Since I knew what every error was from (nothing that couldn't be explained), he cleared the errors for me. The errors are just logged and do not trigger any kind of a check light for the user to see. I would imagine (having been a tech) that this makes diagnosing electrical problems much easier than it was in the past.
- BMW fabric backed electrical tape, part number 61 13 6 902 588. This is apparently listed as "unavailable" but after calling BMWNA they said that is indeed available and to just have the dealer order it. I wanted to make sure that I had enough of this electrical tape for a long time so I ordered ten rolls (way too much). All you need for this job is one roll and you'll have most of it left over (even after wrapping the whole harness which you are about to make). The tape is not exactly like the stuff in our cars. The cloth backing isn't fuzzy and it looks more like friction tape without the gooey residue.
 - Expanding plastic rivets that hold the rear deck lid trim in place, part number 51 46 7 002 606. To remove these you end up pushing the pin in and usually loosing it. They're only a few cents each so order enough for your car as well as the donor car.
- Though you can save the screws that hold the subwoofers in place, removal of the nylon bushings that they screw into seems impossible. Order six of BMW part number 63 12 1 374 075. If you didn't get the screws, you'll need to order those as well.
- Some un-insulated butt connectors (Radio Shack 64-3036A), a ground eyelet, an eyelet for attaching to the battery, a high quality crimping tool, some heat shrink tubing and a heat gun. I prefer crimping to soldering for a few reasons. It's easier to do, cleaner and it's a better connection when done properly with enough force and a good tool. Get some plastic wire ties as well. When crimping, crimp the connectors as hard as you can. Align the dimple of your crimping tool to mash down directly onto the slit down the center of the connector. Don't forget to slide on a piece of shrink wrap before crimping the other end!
 - A 30amp in-line fuse holder. There are two "radio" fuses in the glove box. The 30amp fuse is presumably for the amp so I matched the value for the HK sub amp. Anyway, finding a fuse holder can be a little tricky. I originally wanted a fuse holder that takes the same kind of fuses that are used in the main fuse box but all of these were either too large or too small. There was a glass fuse holder that was just right but I don't like the spring loaded connectors that just touch the ends of the fuse (doesn't seem like a very secure connection to me). After several trips to two electronics stores and two auto parts stores, I ended up getting the Radio Shack number 270-1237 (see picture below). It takes mini blade fuses but fits the need quite well. I wrapped the two extra fuses with masking tape (doubling the end over so they could be easily unwrapped) and put them below the screw driver handle in the trunk lid tool kit.
- To match the original wiring the best you can, you'll need wire in various sizes and colors. Be sure to get "primary" wire specifically for automotive use. Even though I got the correct wire it wasn't quite as stranded as the OEM wire but to get that, you either need the whole harness from the donor vehicle or a new "audio harness" from BMW at ~ $350 plus the pain of installing it. Anyway, here's what you'll need
14 gauge brown for the ground wire
14 gauge red for the power lead
18 gauge white for the amp trigger lead
18 gauge green for the positive signal
18 gauge blue for the negative signal and if you have to wire the right sub speaker
20 gauge black for the "TAA" lead (don't know what this is for)
Since wire which is color coded with stripes is unavailable, you can use colored electrical tape and make your own candy cane-like stripe. I didn't bother going this far, though.
You'll end up with a lot of left over wire because you only need a little bit of each color. If you wanted to cheep out, you could get two rolls of wire, 14 gauge and 18 gauge and us it for everything. I chose not to and spent ~$15 for wire.
Here is what you'll need form the donor car:
- The two subwoofers which are in the trunk and screwed to the bottom of the rear deck lid. Be sure to save the screws. Remove three screws from each speaker then pull the speaker down in front (the side pointing to you [the back of the vehicle]) to pop out the plastic rivet. Be careful not to break the plastic tab on the back of the amp. The rear tab and the rivet hold the speaker in place so you can put the screws back in later (good forethought BMW).
- The Harman Kardon amplifier located behind the left rear quarter panel trim (in the trunk opposite the battery). This amp is slightly smaller and lighter than the standard Alpine amp and is labeled HK (the Alpine amp is labeled "/////Alpine" and has large cooling fins). Installing the amplifier alone is a bad idea as I'm sure that the crossover points are different. Furthermore, it has a high pass filter built into it and without the subwoofer amp and sups in place it will have much less bass than the stock non-HK system. The HK amp fits into the same bracket as the the Alpine and uses the same connector (with four wires missing). Here are two side by side pictures of the Alpine amp (left) and the HK amp (right):

 -
From the donor car, remove the following pins from the OEM amplifier connector (leaving enough wire to splice to in your car). Slide out the actual terminal blocks from the plastic carrier. You will see that the pin numbers are indeed stamped into the plastic connectors. Use a small paper clip to release the metal tab and carefully slide each of the terminals out. You will need these four:
#6 - green: subwoofer signal +
#7 - white: subwoofer amp trigger lead
#14 - blue with green stripe: subwoofer signal -
#19 - black with green (don't know what this one is actually for).

Separate the terminal blocks from the locking carrier. Release the locking tab by prying out the edge gently with your finger nail and the blocks will slide out. Don't worry about mixing them up; they only go back in one way. The heat shrink you see is my repair work to the butcher job performed by my local stereo shop (never again).

The terminals are numbered. and you need to remove the correct pins. Notice the numbers in the following picture. The numbers are different for every pin on both (black and gray) terminal blocks. Pin numbers 22-26 and 1-5 form a single row. Rows 27-34 and 6-13 are double rows. Turn the connectors over to see 35-42 and 14-21.

To release the pin, gently press in on the tab with a small paper clip or a dentist's pick.

While pressing in on the tab, slide the pin out. Notice that this is pin #6, the positive subwoofer signal lead (green wire).
 - Remove the front door panels. Remove one 5.25" mid-bass driver and one 2.5" mid-range driver. The HK speakers are all clearly labeled as such and mid-range and mid-bass drivers have metal baskets where as the non-HK speakers have plastic baskets. The tweeter bracket (on the sedan, anyway) has "HK" molded into the plastic.

If you have a coupe, the tweeter can also be removed at this point. If you have a sedan, you need to partially remove the black plastic trim that goes around the door frame and then de-solder the tweeter. Be sure to mark which tab is positive and which one is negative.
While the 5.25" mid-bass might be interchangeable between the coupe and sedan, the tweeter is not and it's likely that the 2.5" mid range is not interchangeable either because of the way they are secured to the door panel and side view mirror.
For the coupe, it may be easier to swap out the tweeter/mid range pods as an assembly, that way you get the Harman Kardon label as well. On the sedan, it's better to leave the door trim in place and not try to retain the HK label (tweeter grille is NOT separate). The reason for this is that there is a fine wire running through the trim and it appears that you would need to cut and splice it in order to get this part. If you think that you can't live without it, then get it from the donor car as the door trim will cost ~$150 for each side after the fact.
On the sedan, the 2.5" midrange driver can be removed from the interior colored pod. If the donor car has the same color interior as yours, swap the pod as an assembly. There are two reasons for this. First, the HK mid range speaker has a thin metal frame and doesn't fit securely in the pod. Secondly, you can't buy the color keyed pod separately. If you end up with just the speaker anyway, as I did, don't worry. Apply some thin foam tape around the inner circumference of the pod then push the HK speaker into place and install the pod back into the door panel. It fits securely and you can't tell the difference once installed. be careful, though, that you don't impede the movement of the midrange driver with the foam tape. - Remove the 2.5" midrange drivers from the rear doors. These just screw on to the back of the door panel. It is likely that the speakers for the coupe are different as well but I haven't confirmed this.
Remove the 5.25" rear deck lid speakers. These are drop in replacements and should be the same from front to rear and from sedan to coupe. If the donor car has the same color interior, swap the HK labeled speaker grilles as well. The HK labeled grilles aren't too expensive if you have to buy them as I did. They were ~$17 each from Pacific BMW. Be careful when removing the HK labeled grilles because you can break the solver label off. It might be easier to lift up the rear deck lid and pop out the tabs from the bottom. I broke a few of the plastic welds on mine but managed to repair them by melting them back together with a soldering iron.
Hot to remove the rear seat and deck lid:
- Remove the head rests (they pull out).
- Remove the rear seat bottom. It snaps into place so just pull it at the front edge. The clips are situated between where each passenger's legs would be.
- Remove rear seat back. There are two snaps holding these in. The snaps are near the top of the seat back. Once you pop the snaps by pulling forward, pull the seat up and then out.
- If you have a sedan, pull down on the door weather strip (attached to car body, not door) enough so that the two rear quarter trim pieces can be removed. These are the trim pieces that have lights built into them.
- Remove the plastic trim caps to expose the bolts on the child safety seat belt loops (in the middle of deck lid). Remove the bolts.
- Wash and dry your hands.
- Pop the rear quarter trim pieces out. Put your fingers in where the molding was and pop the panel away from the body (there are two plastic clips on each). Disconnect the map light plug and then slide the trim piece toward you.
- There are about 4 rivets along the forward edge of the deck lid trim panel. push in the pins until they fall completely out. you will probably loose the pins so it would be good to order some more clips.
- No need to disconnect the seat belts. simply slide the deck lid toward you and rest it against the area that is the seat back. You may want to cover it with a towel so that you don't get it dirty when you work back there.
- Remove the rear seat, the rear deck lid speakers and the rear deck lid trim. Carefully remove the wiring harness that goes to the rear speakers and the rear sub woofers. Snip the wires one at a time at the point where the harness pass by the left rear seatbelt mount. Carefully insulate the red wire with green stripe using electrical tape. This is the 12 volt power source for the amp. Do the same for the white amp trigger lead. Now tape all of the wires together and tuck that part of the harness back into place so as not to interfere with the seat belt and in such a way that it won't rattle. Be sure to retain the foam insulators that go around the wiring where it passes through the metal deck lid. There are two, one for each sub woofer.

Installation:
- Install all front and rear door speakers. You may want to order some door fasteners and have them ready for when you do the job and/or when you remove the parts from the donor vehicle. They break easily and sometimes the little foam o-rings get lost or damaged. Besides they're only $.22 each. There are two types in the doors:
51-41-8-224-768: white in color, these go around the rear edge and the bottom edge of the doors
51-41-8-224-781: gray in color, these go along the forward edge of the doors - This is the fun part. You need to make up your wiring harness. If you got the whole section of audio harness from the rear deck lid, this is a tad easier. Remove the cloth tape from section of harness that you have and remove the two lengths of wire that connect to the main rear speakers. Even if you just got the connectors, there's enough information here to make the sub woofer harness.
Take the sub woofer amp connector and spice lengths of wire to it but do not splice the other ends of the harness on yet. In the below picture, the lengths were measured from the back of the amp connector to the back of the connector at the other end. The three black circles indicate where you will be wrapping the harness with BMW electrical tape. It would be a good idea to add a few inches to the measurements below and then test fit the harness. Trim the excess once the harness is been routed. Remove the harness, wrap with tape and then re-install. After that, splice on the ends.
It might be hard to picture by just looking at the diagram below but there will be two branches coming out of the sub woofer amp connector. The main branch is 89 inches long and wrapped with tape from the sub woofer amp connector up to about 4 inches from the main amp connector. The terminals that you removed from the donor vehicle are then spliced on here and inserted into the appropriate holes in the main amp connector. At 69 inches, the brown ground wire should be left out of the electrical tape wrapping and then an eyelet should be crimped on at the end. The part that sticks out of the harness is 9.5 inches long. The low level signal wires (green and blue with green stripe) are twisted pair. Be sure to twist the the section that you splice in with the same number of twists per linear inch and in the same direction.
The next branch of the harness is for the right sub and the 12 volt power supply. The length between the sub woofer amp connector and the right side sub connector is 45 inches. The length of the power supply between the sub woofer amp connector and where you splice the in-line fuse on is 102 inches. Wrap the three wires together for about 18 to 20 inches from the back of the sub woofer amp connector.
 - Once you have double checked the harness for fitment, rout it along the factory harness. The factory harness is secured to the body in a few places. Wire tie the new harness to the factory harness at these points (I left the wire ties un-cut in the following pictures so that you could more easily see where these locations are). Tuck the harness behind the plastic tabs along the base of the rear window with the existing harness.

Route the power supply wire behind the right rear seat belt, along the side wall and through to the trunk with the main harness.

Route the new harness parallel to the existing audio harness through to the trunk.

Here's another picture of the left rear deck lid.

Here's where the ground wire exits the taped up portion of the new harness. Secure it to ground at the grounding point for the rest of the audio harness. Place the original ground onto the stud, then the new eyelet and then the nut.

Route the power wire along the main power supply (that really big red wire). There's a sharp edge (indicated with the blue arrow) as the harness snakes around the trunk bracing. Wire tie the power supply wire so that is not in contact with the metal. Splice the in-line fuse in place and then crimp an eyelet to the end and attach it to the battery. By the way, that little white plastic box sitting on the frame rail is the optional tilt sensor from the alarm kit.
 - Install the main system amp and any other equipment or brackets but leave the trim panel off. Make sure to route the wire harness the way it was before and that it isn't going to rub on any metal edges.
That's the CD changer on top and a plastic pocket below that (or the CD ROM if you have a NAV system). The shiny silver colored box is the control unit for the CPT8000 cell phone. The red arrow points to the main amplifier connector. The amp is difficult to see because it blends in with the black colored brackets. Even if you don't have the extra brackets from the NAV, CPT8000 or CD changer the stand alone amplifier is in about the same position.
 - Before installing the subs, you'll need to punch out the appropriate holes in the rear deck lid and install the nylon expanding nuts. Use a punch or chisel and a hammer to bend in the metal plugs at their weakest point. Once you have the edges bent in, you can wiggle out the metal with a pair of pliers. The edges are sharp, be careful. Remove the perforated plugs from the deck lid insulation and rubber mat between it and the metal as well.
There are three holes you need to knock out for each speaker; for both sides, the round hole is where the harness comes through (don't forget the foam insulators from the donor vehicle).
Insert the nylon expanding nuts into the square holes. It is possible to put the plugs in the wrong holes so hold the sub woofer in place to be sure you are using the correct holes because once you install the nuts, you can't get them out. When pushing the nuts in, use the handle of your screw driver or something similar. They are hard to push in and have a tendency to clamp down on the skin at the tip of your finger in the process.
The arrows indicate two large square holes and to round holes. Slide the rear tab of the plastic sub woofer into the square hole and pop the plastic rivet into the round hole. Now that the sub woofer is secured in place, install three screws for each sub. Be sure to poke the left side of the harness through the hole before securing the sub in place because the sub woofer amp blocks the hole enough to prevent the connector from being passed through.
Left side (notice that only 8 of the 10 pins in the amp connector are used):

Right side:
 - Don't put all of the trim back together yet! Check your connections, connect the negative battery terminal and then turn the radio. Ensure that all speakers are are functioning.
- Put your car's interior and trunk liners back together (I like leaving the stereo on for this part).
- Enjoy!
Brief review of the HK system:
While I have enjoyed high end aftermarket systems in a number of my cars, the HK system is indeed a good option and if I had to do it all over again, I would have ordered this form the factory.
I very much like the increased fidelity from the main amp and speakers. There is a more definite stereo image and the soundstage is open more expansive as well.
Some folks (perhaps the younger crowd) feel that there is not enough bass. While I would agree that there indeed is not enough bass to actually feel it in the seats, the lower frequencies are indeed reproduced and are audible. I listen to a wide variety of music, from acoustical jazz on audiophile labels to rock to bass heavy techno. This system is good enough for me.
Very Special Thanks to: Kaz325iT from bimmer.org for his assistance with the wiring schematic of the amplifiers.
For instructions on how to retrofit the OEM navigation system, go here.
|


 Απάντηση με παράθεση


 )
) )
) )
) ). Drove to work today with no door card or seats (apart from the drivers), must admit she did move a bit quicker!!