The Ultimate M62 Guide
Thursday, September 22, 2011 4:43 AM
EVILution (KGMs FrankenCav)
Lately Iʼve been seeing many of the same questions popping up here and other forums regarding the M62 supercharger; anything from installation, parts, upgrades, etc. After having many of the same questions a few months ago when I did my install, I decided to try and put together as much information as possible regarding this topic. This is by no means a “know all/end all” source of information, but Iʼm hoping my install experience and the research leading up to and during it can help some others.
Some of this information has been compiled from other various write ups among different forums, and some has been from my own experience:

To begin, for anyone unaware, the M62 (also referred to as the MP62), is a positive displacement (roots type) supercharger manufactured by Eaton for use on many applications. There are many variations of the M62, though only one will fit our application. This particular M62 was designed for use with the LSJ motor used in the 05-07 Cobalt SS/SC and 04-07 Saturn Ion Redline, as well as in a bolt on J-body kit released by GMPP.
The GMPP kit has been discontinued, but lucky for us, we can pull pretty much everything needed from an LSJ car. This style M62 can actually be used on any Ecotec motor, as the castings and accessory locations are the same between the various Ecotec models (this pertains to US 4 cylinder Ecos, as there are overseas versions of the Ecotec that are quite different).
The roots type supercharger is basically an air pump, which uses rotors to force a higher than normal volume of air into the manifold where it is pressurized then sent to the motorʼs combustion chambers. There is a wealth of knowledge to be found on the internet about how superchargers work, and you can start your search
here.
1. I found a great deal on a M62 from a Pontiac Bonneville, can I use that on my J-body Ecotec?
No, you cannot. Each version of the M62 is intended to fit a specific manifold, made for a specific motor. You need to use the M62 designed for the Ecotec.
Easy Solution: If you canʼt manage to find a complete kit, you can source your blower (and all other needed parts) from any LSJ equipped Cobalt or Redline.
2. The GMPP kits did not come with a heat exchanger system, do I need one? Will it work with my GMPP kit?
Yes and no. The GMPP kit was designed for use without intercooling, though it is highly recommended to add one. Will the supercharger work ok without one? Sure. Will it perform with the highest efficiency? Probably not.
Also, if you are running anything smaller than a stock pulley, I would definitely run some of cooling, whether it be a heat exchanger system, methanol-water injection, or in some cases both. We get lucky again, and rob a Cobalt or Redline of almost all the needed components for a cooling system. This will be covered in itʼs own section later.
3. I bought an entire supercharger kit from my buddyʼs Cobalt part out, but Iʼm told I canʼt use the throttle body. Is this true?
Correct, the LSJ uses an electronically controlled throttle body, and we use a cable driven throttle body. Go ahead and sell that LSJ tb for some extra cash. You will either need to get an adapter for your stock throttle body, or use a different throttle body entirely (also requiring an adapter, and I will cover both later on). The GMPP kit included a throttle body adapter, which you can often find used adapters floating around for sale on various forums. MD Enforcer also offered adapters in a GP a while back, so those can be found on the forums as well. Your other option is
Katech Performance, who is the original manufacturer of the adapters, and is once again making them.
Katech Performance
4. Is the M62 safe to run on a stock motor?
Absolutely, this is what GM had in mind when they designed the J-body kit. Now of course, the design was based around the supplied stock pulley. While smaller pulleys can be run (and successfully are everyday), keep in mind that our motors were not designed with boost in mind (our ringlands
HATE extra pressure FYI), so as you start to introduce more and more power to the motor, you will be creating additional stress that can cut down the motorʼs life span. Things like high boost levels, over revving, insufficient cooling, etc can all lead to a quick death for a motor.
I fully believe that will the support of a thorough and efficient tune, and some sensible driving, even a higher mileage motor can continue racking up the miles under the power of a M62.
5. Ok, I have everything installed and ready to go, but what about tuning?
There is no right or wrong answer when it comes to tuning, other than that you NEED some form of tuning after installing your supercharger. Our PCM does not understand boost in any sense, and cannot properly manage fueling in order to operate safely. There are many options; GM Reflash, HP Tuners, Trifecta Tuning, stand alone systems, and more. I will cover tuning a bit more in depth later in this write up.
6. T-MAP or MAP sensor? Whatʼs the difference? Which do I use?
Either can work, and is mostly depending on how you are tuning. The T-MAP is a 2.5 bar sensor, and is a must if you are running the GM reflash. You can also use it when custom tuning, though it is not necessary. Our stock 1 bar MAP can be used with software like HP Tuners. Keep in mind, the T-MAP is a combined MAP and IAT sensor in one unit, so if you choose the route of keeping the stock MAP sensory, you will still need to find a place for your existing IAT.
*TIP: I kept my stock MAP sensor, and ran a threaded IAT sensor instead of my stock. These are easily found on 4th gen F-bodies, as well as Quad 4 motors. This is plug and play with your existing IAT connector. I drilled and tapped the TMAP hole in the manifold to accommodate the threaded IAT, then branched my MAP into the vacuum lines used for the fuel pressure regulator and boost gauge.
Threaded IAT sensor (requires tapping and threading manifold)

 M62 PARTS LIST
While it is possible to find used (or even in some cases still in the box) GMPP kits floating around, youʼll more than likely need to piece together a kit on your own. Again, your parts can be sourced from any 05-07 Cobalt SS or 04-07 Saturn Ion Redline (both using the LSJ motor). Parts are constantly being sold in the classifieds on forums (jbo, ecotecforum, cobaltss, etc), eBay, Craigslist, and more. If you have some patience and shop smart, you can easily put together the bulk of the kit for a reasonable price, or even get lucky and catch a part out and get a packaged deal.
The following list is for strictly for the parts included in the
non-intercooled GMPP kit. I will cover add-ons such as the cooling system later on.
1. M62 Supercharger – GM Part #12584331
* Can easily be found used for around $300
2. Throttle Body Adapter – Katech Performance #KAT-A3309-R02
3. Lower Intake Manifold – GM Part #12584348
4. Lower Intake Manifold Brace – GM Part #12586632
5. Idler Pulley Assembly – GM Part #12584364
6. Tensioner Pulley Assembly – GM Part #12583180
7. Generator Relocation Bracket – GM Part #12584365
* shop around forums, you can usually find the tensioner and alternator relocation bracket being sold as a packaged deal
8. Supercharger to Manifold Gasket – GM Part #12584342
9. Manifold to Head Gasket – GM Part #12597855
10. Throttle body O-ring – GM Part #12575463 or AC Delco #217-1592
11. T-MAP 2.5 bar sensor – GM Part #90423637 or AC Delco #213-3907
12. T-MAP sensor harness - GM Part #88988320
13. Radiator Inlet Hose – GM Part #22718761
14. Accessory Belt – GM Part #12590815
* Not sure if the GMPP part is still available, but you can use a Cobalt SS/Redline belt, (itʼs a 6 rib belt), cut off one rib so it fits your stock pulleys.
* There is also a 10 rib Goodyear Gatorback belt available for like $20 from Autozone, cut in half and you have 2 belts for the price of one.
15. EVAP tube - GM Part #12584369
* For this, I just cut the hard plastic hose off of the quick connect ends, and reused one of the ends with some bulk vacuum hose.
16. Vacuum hose for fuel regulator - GM Part #12584337
* Or, just use bulk vacuum hose. 3/16” will do the trick
17. Brake Booster Hose – GM Part #10358940
* You can use your stock booster hose with some re-routing, though using the actual hose does give a cleaner look
18. GM Reflash (manal trans) – GM Part #12590820
19. GM Reflash (auto trans) – GM Part #12590819
If youʼre installing a cooling system, youʼll need the following:
1. Bosch Intercooler Pump – Ford Part #M-8501-L54
* I canʼt locate the GM Part #, but youʼd end up paying $300+ for a new unit from GM, and only $150 from Ford (they are the SAME Bosch pump). You can also get these from ZZP, OTTP, and many other online vendors for $150 or less.
2. IC Pump Rear Bracket – GM Part #12585150
3. IC Pump Front Bracket – GM Part #12586367
4. IC Pump Insulator Sleeve – GM Part #12594387
* If youʼre shopping for used parts, you should be able to find the pump, brackets, and sleeve sold all as one.
5. Pump Wiring Connecter – GM Part #89046833
* You can grab these from eBay and Amazon for $7, and I think most local auto part stores carry a pigtail that will work. Iʼll go over wiring the pump later in this write up. Also any LD9 or LT1 fuel injector pig tail will work.
If youʼre like me and sourced together all of your parts, you may be missing some parts, or perhaps youʼre missing every bolt. You could get all these from your local dealer or GMpartsdirect, but youʼre going to pay about 4x more than any bolt is worth. I bought all my hardware between Fastenal and Lowes for a fraction of a price.
Intake Manifold Bolts
The intake manifold is designed for using M8 studs, while our L61 head is tapped for M6. This creates a problem reusing our stock M6 studs in the head, as it gives the manifold a little wiggle room from all of the vibration, and can eventually lead to something like a stud sheared off in the head. The GMPP kit came with M6-M8 conversion studs, though I donʼt think you can get this through GM anymore (and even if you could, I donʼt recommend it…theyʼre petty light duty and have poorly cut threads). Tinkles turned me onto the thought of shoulder bolts, and this is probably the best/most cost effective route.
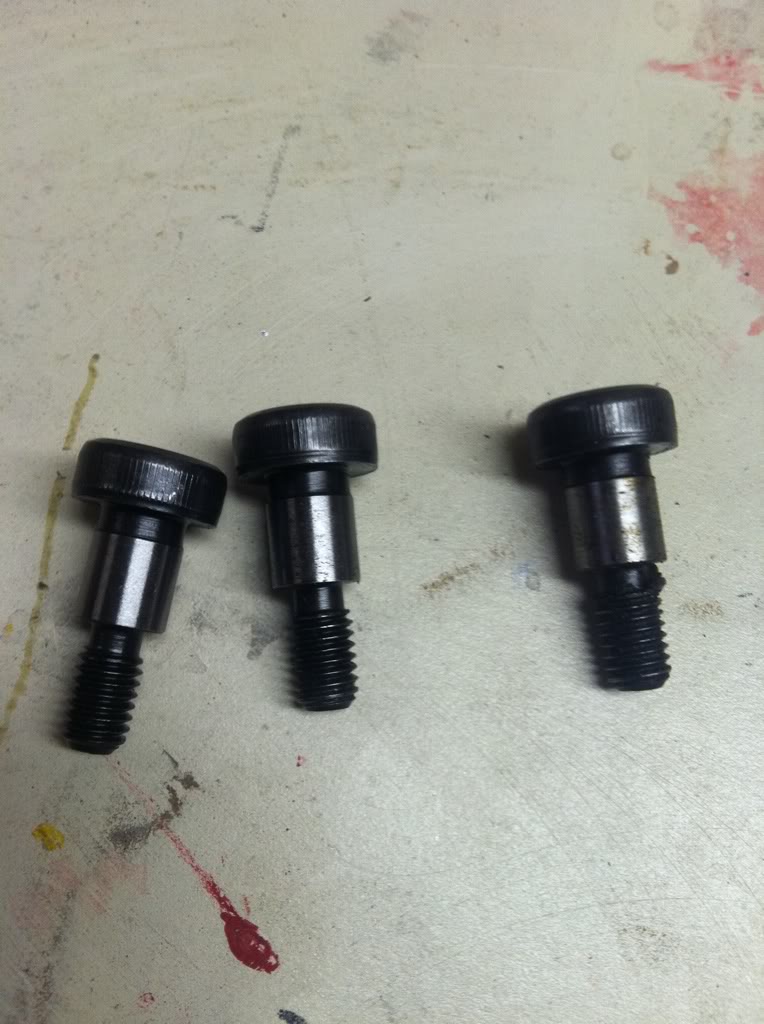
You can grab these from Fastenal, McMaster-Carr, and I think Lowes has select sizes. You will need 8mm diameter shoulder with M6 threads. If youʼre going to order from Fastenal, hereʼs your part numbers:
(2x) 60mm long shoulder – Fastenal Part #
0154419
- McMaster-Carr Part # 92981A215
(5x) 10mm long shoulder – Fastenal Part #
0154418
- McMaster-Carr Part # 92981A200
To the best of my knowledge, GM does not sell the kit's conversion studs separately, they were only part of the original GMPP kits. I've checked the parts numbers through both GMPartsDirect and 3 local dealerships, none of which could find the part numbers in their systems. However, if you are really wanting to try and track a set down, the part numbers are:
12590821 - short manifold stud (quantity needed: 5)
12590822 - long manifold stud (quantity needed: 2)
For the rest of your bolts, just grab some metric flange bolts from Lowes or your local hardware store. I recommend using blue thread locker on everything.
- Supercharger to manifold – m8 x 1.25 x 40mm (x4)
- Intake manifold brace to block – m8 x 1.25 x 50mm (x2)
- Intake manifold to manifold brace – m10 x 1.50 x 50mm (x1)
- Idler pulley to block – m10 x 1.50 x 75mm (x1) *can reuse stock bolt
- Idler pulley to alternator bracket – m8 x 1.25 x 25mm (x1)
- Alternator bracket – m8 x 1.25 x 130mm (x3)
- Tensioner to lower alt bracket – m8 x 1.25 x 35mm (x1)
- Tensioner to upper alt bracket – m8 x 1.25 x 40mm (x1) *metric hex socket bolt
- Supercharger bypass valve – m8 x 1.25 x 20mm (x2) *not needed if your blower comes with the valve attached
- T-MAP sensor to manifold – m6 x 1.0 x 25mm (x1)
…and if youʼre installing a cooling system:
- Rear IC pump bracket to manifold brace – m8 x 1.25 x 25mm (x2)
- Front IC pump bracket to rear pump bracket – m8 x 1.25 x 35mm (x2)
- Coolant filler neck bracket to supercharger – m6 x 1.0 x 15mm (x2)
- Coolant filler neck to filler neck bracket – m6 x 1.0 x 15mm (x2)
INSTALLATION
Installation of the kit is pretty straight forward, and can be easily accomplished at home with some basic tools. Set aside the better part of the day and grab a case of beer and you should be good to go. Iʼve included a link to
installation instructions from the GM Build Book. This includes step by step instructions, part numbers, and pictures. Iʼll also go over a few things I learned during my install.
Tips & Tricks
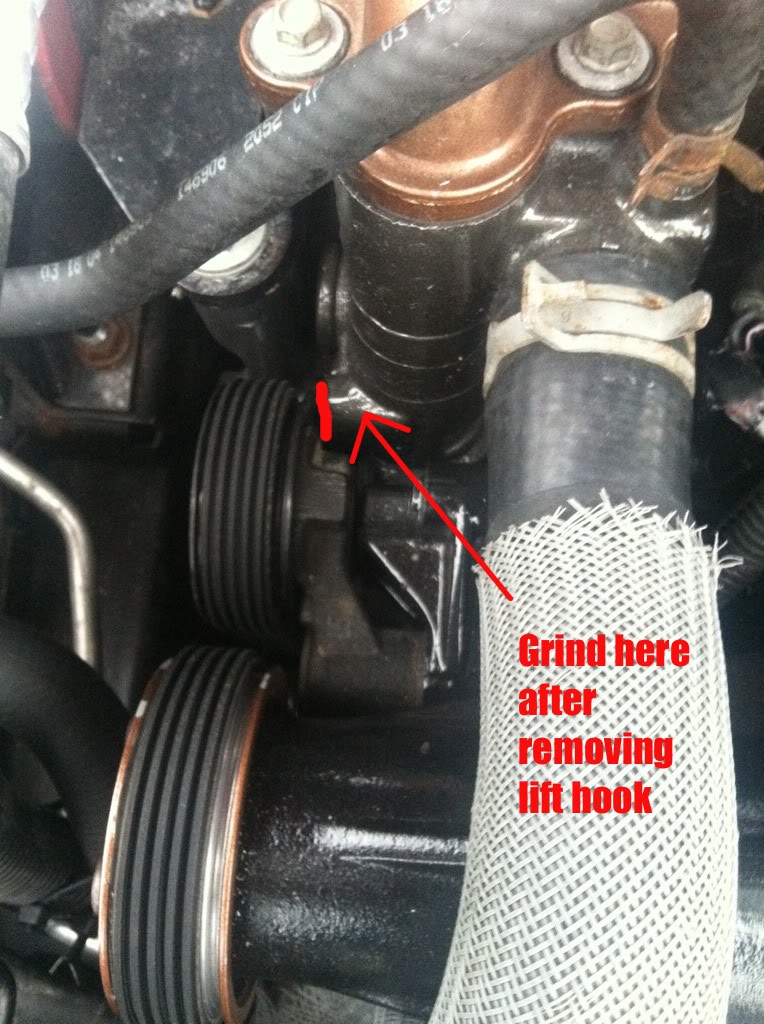
1. Making room for the tensioner assembly – Youʼre going to remove the lift hook from the head (front passenger side of head), and youʼll need to grind down the surface it mounted to in order to make enough clearance for the tensioner assembly. If you have an air grinder, this should take seconds to do. A dremel can also grind this down with ease, and if you have no access to any kind of rotary or power tools, cast aluminum is soft enough to make filing by hand relatively easy. You donʼt need to remove much, I think I removed about 1/8” and I have plenty of room now.
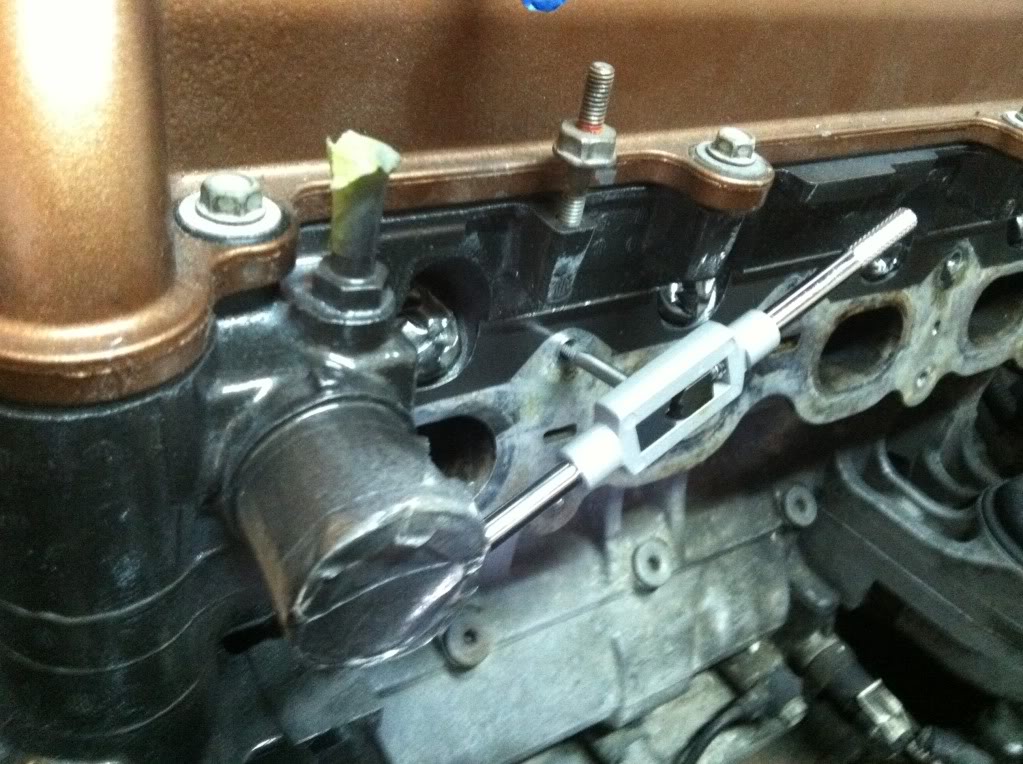
 2. Cleaning up the head for new manifold
 –
Once you have all the old equipment off and itʼs time to install the new intake manifold, I would take a few minutes to clean up the mating surface on the head. I recommend cleaning the threads before installing new manifold bolts. Last thing you want is to snag and strip a thread in the head. A M6x1.0 die will work great, and if you donʼt have any, you can pick up cheap tap and die sets at Harbor Freight for $10. I would also take some intake/carb cleaner and scrub the side of the head good to make sure the gasket makes a good seal.
 3. Trimming lower surge tank hose
 –
The instructions tell you to cut about 1” off the end of the lower coolant hose on the surge tank, I would also recommend using a few zip ties and pulling the hose closer to the radiator to give a little more clearance from the supercharger belt.
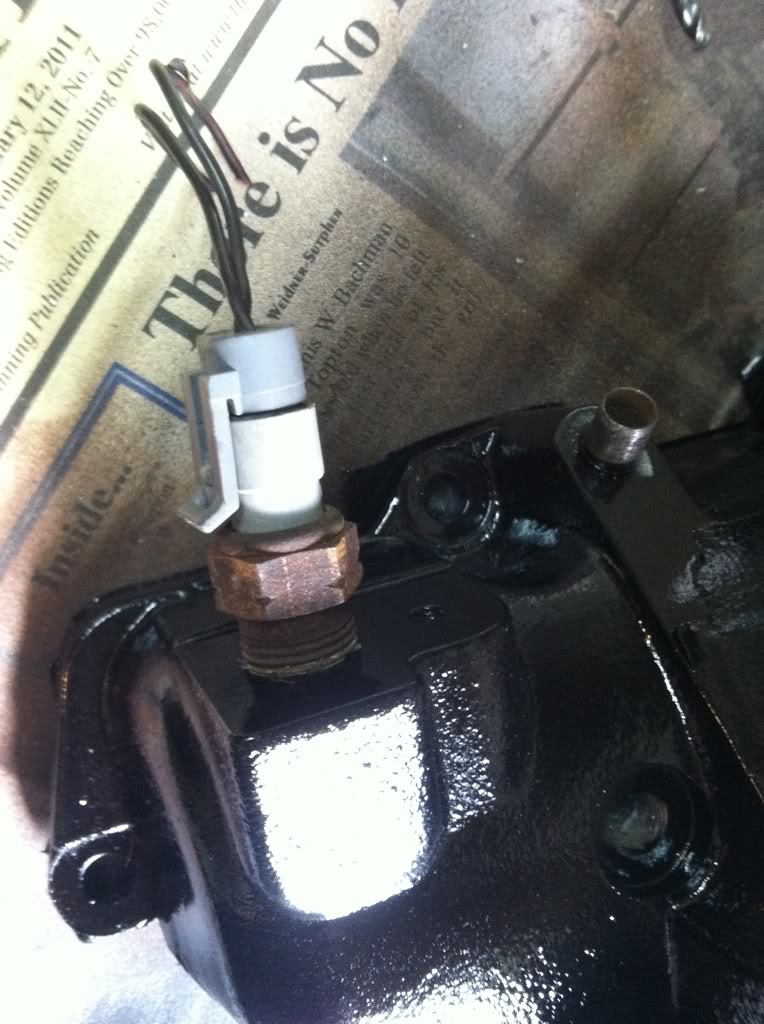
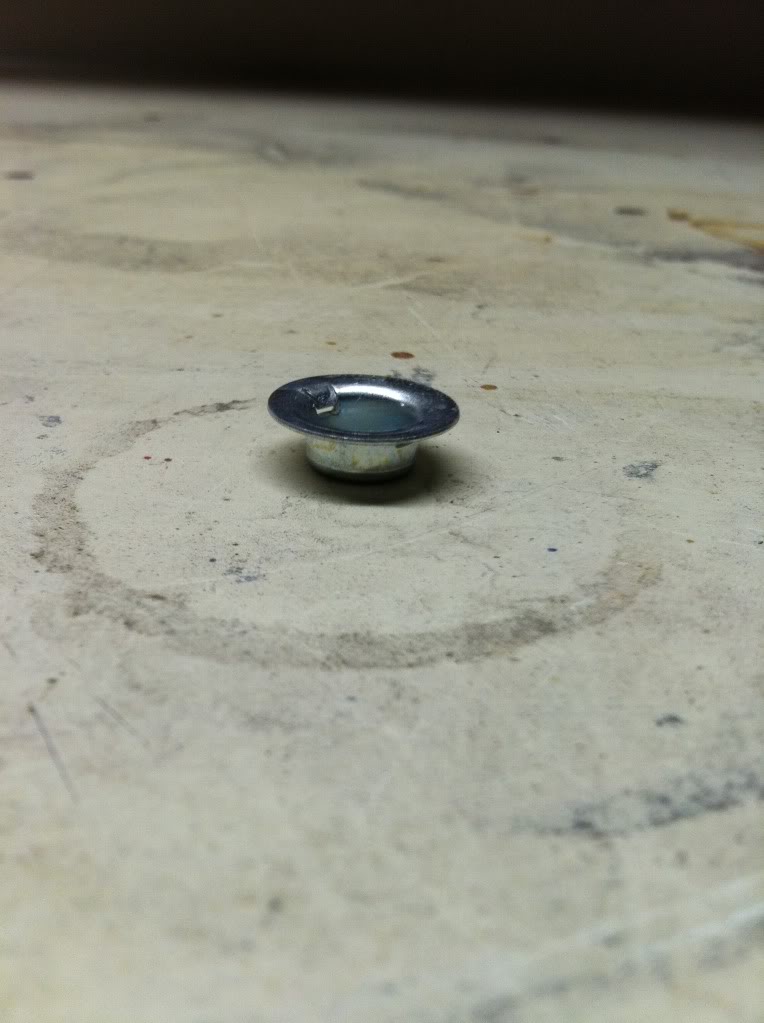
4. Plugging the pressure sensor hole –
If you are buying a used blower from an LSJ car, itʼll probably have a pressure sensor mounted on top. We do not use this on a J-body. The hole needs to be sealed (otherwise youʼll have a massive vacuum leak), some people just leave the unused sensor attached, and some plug it. I chose to plug the hole to help clean things up cosmetically; you can grab tap in 3/8” axle nut plugs for about $1 from the hardware store.
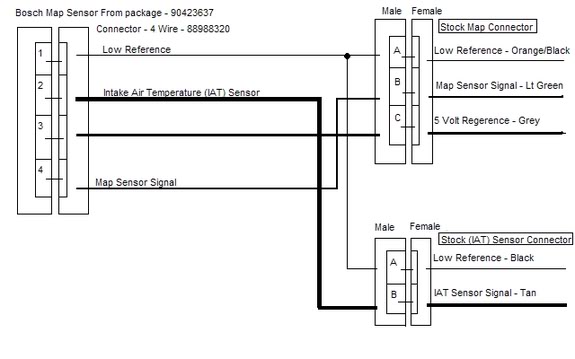
 5. Wiring the T-MAP sensor
 – This obviously does not apply if you are utilizing your stock MAP and IAT sensors.
 COOLING SYSTEM
Though the GMPP kits did not come with any cooling system, I would recommend it even on a stock pulley, and say itʼs mandatory for anything smaller than a stock pulley. Roots superchargers heatsoak quickly, and as the temps continue to rise, you are robbed of more and more power potential (all this generated heat just soaks directly into the head).
1. Wiring the IC Pump Harness – To my knowledge, there is no plug n play harness we can use from the Cobalt, itʼs part of the wiring harness. Youʼll want to run a harness with a relay and fusible link. Wal-Mart carries a Scosche fog light harness that works well with simple modification.
If using this (or similar) wiring harness, there will be a 12v and ground (most likely black and white) wires that are meant to plug into the fog light extension. Cut this off, and connect the IC pump pig tail. I suggest soldering all of your connections. On the opposite end, youʼll have a black (ground), red (constant 12v), and white (switchable source) wires.
Black (ground) - this is self explanatory, ground this to any solid grounding point.
Red (12v) - this needs to go to a constant hot source; straight off the battery, distribution block for an amp, etc
White (switch) – I would choose tapping into a source that is powered with a “key on” function, so the pump can be run without starting the car (helpful in filling the system or cooling between runs at the track). I chose the fuel pump wire in the engine bayʼs fuse box (there are 4 pink to choose from, all hot with key on), some people tap off a radio circuit, multifunction switch, etc.
2. Heat Exchanger – A popular choice for mild setups is the h/e from a Mustang Cobra S/C, you can easily find these for $50 and less. There is also a huge aftermarket when it comes to heat exchangers; ZZP, OTTP, Griffin, Fluidyne, and more. I recommend something with a dual pass core, as these will help lower overall temps, as well as aid in bringing your temps down quicker between consecutive pulls.
3. Manifold Endplate – The stock endplate is designed to bring the coolant in the bottom, pass through each core one at a time, then exit through the top. This is somewhat inefficient as each time the coolant makes itʼs way from one core to the next, itʼs being heated exponentially, and losing itʼs ability to cool the air passing through the manifold. The dual pass endplate is a popular option, and is a great option especially when used in conjunction with a dual core h/e, such as a ZZP S3. Iʼll go more in depth on this in the “Upgrades” section.
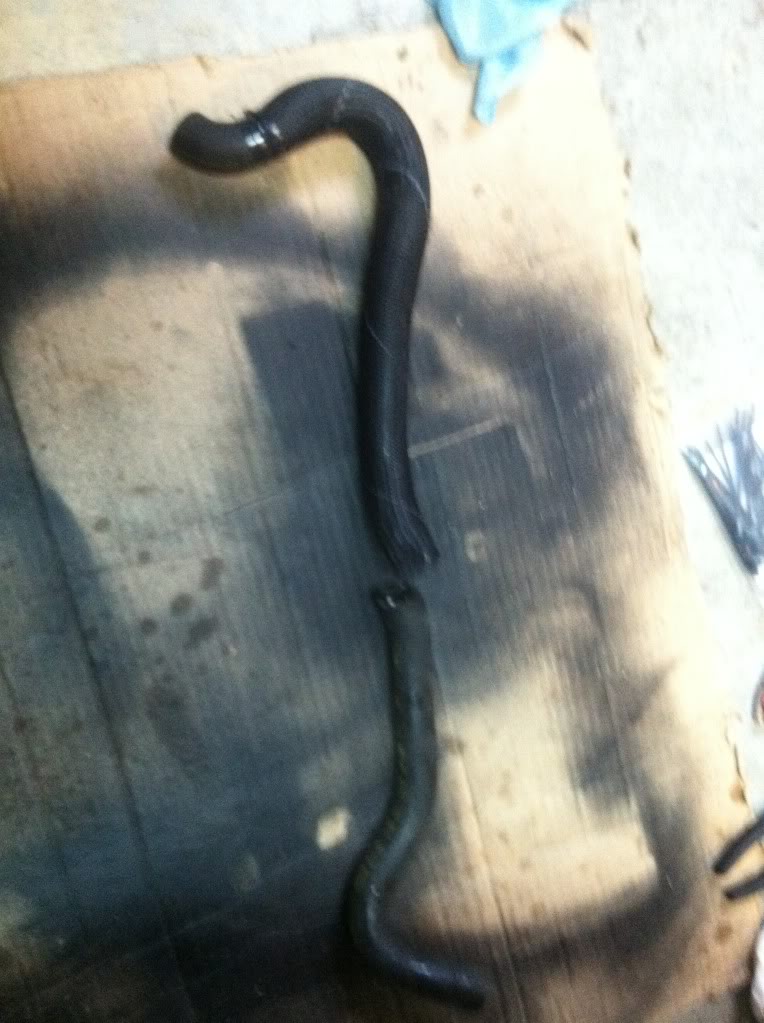
4. Heater Hose – Youʼre going to needs some bulk Ύ” heater hose, couplers, and it will be helpful if you can grab some preformed 90* elbows. I recommend using 90* elbows right off the endplate, as there is not much room and bulk hose will kink.
If youʼre using a heat exchanger that has the in/out on opposite ends (like the Cobra), I find itʼs hard to run bulk hose from the h/e between the radiator and support and to the pump without kinking it. If you grab the two heater hoses from any LD9 J-body, the are a prefect fit (they are a bit more “U” shaped on the ends than ours). Snip about 1” off the straight ends, then join with a coupler, so that the two make a sort of “S” shape. This wraps right around the radiator to the pump perfectly with no kinks or excess length.

 5. Filler neck or reservoir
 – I recommend scrapping the stock filler neck and using a reservior, the filler neck doesnʼt give much room for expansion and using a reservoir will overall allow a bit more fluid in the system. Try to make it the highest point in your system, this will help to keep air bled out. Air in the system not only diminishes cooling, but it is hard on the pump and will decrease itʼs lifespan.
6. Coolant Mix – You can run a 50/50 mix, though I would recommend using mostly water if your climate permits it. Distilled water is much more efficient at transferring heat than antifreeze. I run distilled water with a little Water Wetter additive…these are claimed to help reduced temps, I donʼt know if it holds true, but they do have corrosion inhibitors like in anti freeze. I will of course be switching to 50/50 for the winter time.
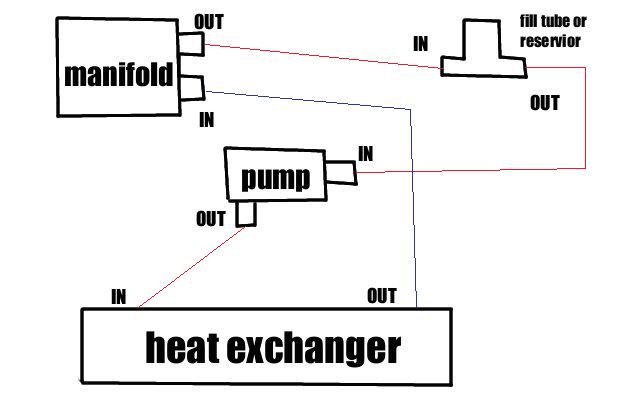
Plumbing when using a single pass endplate:
 FUELING
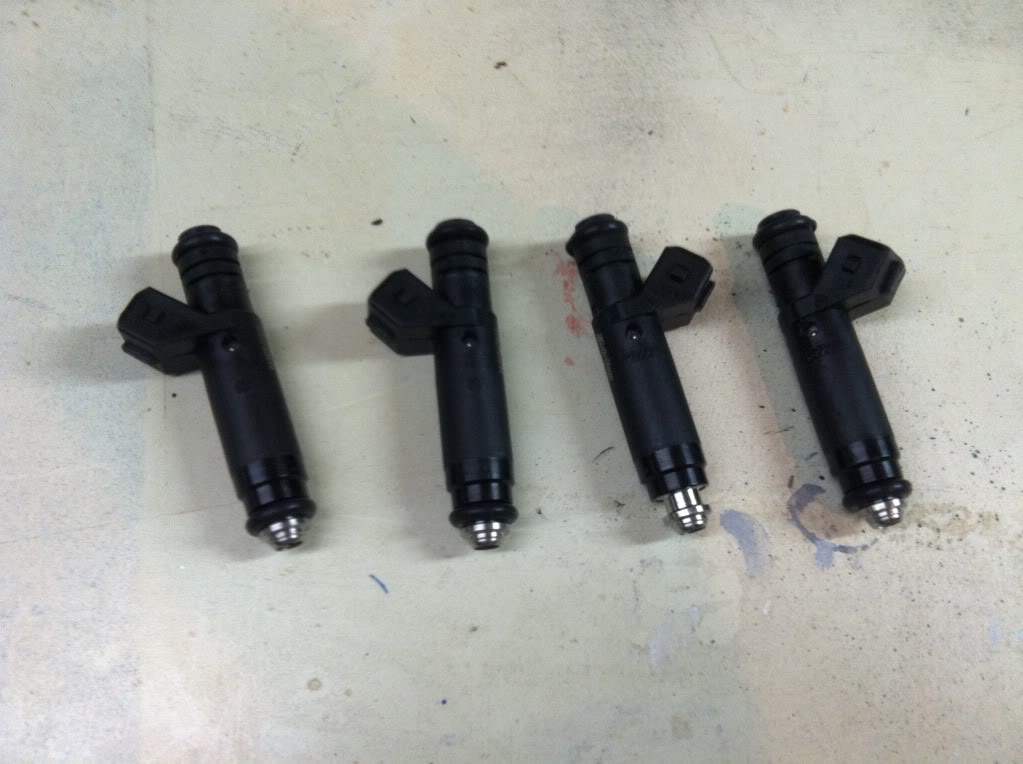
Upgrading your fuel injectors is a must. There are many options between compatible factory injectors, as well as a large aftermarket. Injector size will be determined by your overall power goals. Youʼll also want to choose an injector that is large enough that you wont exceed 80% of itʼs maximum duty cycle, but at the same time you donʼt want a ridiculously large injector as it will be difficult tuning. For example, if you need 47lb injectors, running 80lbers will be overkill.
RC Injectors has a handy calculator for determining your injectors size.
https://www.rceng.com/technical.aspx
For example, if you are planning on making 250hp, and stick to the rule of not exceeding 80% duty cycle, youʼd be looking for around 43lb/hr (454cc) injectors.
There are a lot of injectors we can borrow from other makes and models. Cobalt SS (36lb) and Saab 9-3T (32lb) injectors work for us (LSJ injectors are a direct swap for ʼ02 style fuel rails, 03-05 style will need a spacer), and Ford color top injectors are direct swaps as well. Red tops (36lb) and green tops (42lb) are commonly used, and can be found easily on eBay, forum classifieds, as well as junkyards (I personally donʼt like the idea of buying used injectors, unless they are flow tested first).
There are a ton of aftermarket injectors, I know Siemens-Deka pencil style injectors are a great fit. PJ posted a thread a while ago regarding physical dimensions for Ecotec compatible injectors, and the following info was pulled from that thread:
2002 L61 injectors/ LSJ injectors:
overall injector length: 2.871" -or- 72.9mm
center o-ring to center o-ring: 2.494" -or- 63.3mm
2003-2005 L61 injectors:
overall injector length: 3.124" -or- 79.3mm
center o-ring to center o-ring: 2.653" -or- 67.3mm
smallest aftermarket injector I'd use with a J-body 03-05 rail:
bosch (color) top injectors:
overall injector length: 3.041" -or- 77.2mm
center o-ring to center o-ring: 2.579" -or- 65.5mm
You may also need to address the injector clips (there are some direct plug in replacements). 02 J-bodies (and LSJs) use EV1 “fat body” injectors, and 03-05 use EV6 “pencil body” injectors. Itʼs a common misconception that EV1/EV6 refers to the size connector; it is actually referring to the body style of the injector. To the best of my knowledge, many aftermarket injectors use UsCar style clips, while on cars both the EV1 and EV6 use a Delphi/Multec style connector. I chose to just cut the clips from a Trans Am and solder them to my injector harness, as they were a perfect fit for my injectors. You can also buy clip adapters to make everything a plug and play affair. I recommend checking out
Connectors Fast
Hereʼs an example of Siemens-Deka pencil style injectors. I am running 60lb/hour:
 SPARK PLUGS
You may or may not decide to upgrade your spark plugs, however I recommend it. Itʼs a cheap peace of mind to have. Youʼre going to be cramming much higher IATʼs into the motor, heating up the combustion chambers, and a cooler plug will help prevent pre-ignition. This will be especially helpful if youʼre going to be increasing timing advance closer to a level of knocking.
People do run their stock plugs, I ran mine for a short time (re-gapped to 0.35”) til my NGKs were shipped. I didnʼt notice any problem, though I was also not pushing the car too hard at the time. I would no longer trust stock plugs now that weʼve added back in a lot of timing and Iʼm consistently giving the motor a workout.
One step colder plugs will work great for a m62 setup, and there are different options out there. Some people say copper tips are the best choice, some say Iridium, and so on. I recommend the NGK Iridium LTR6IX-11, they seem to be a popular choice on our platform. I believe NGKʼs new part # for these is 6509. Seems most local parts stores (at least around here) are out of stock from their suppliers, but these are easily found at places like Summit Racing, Jegs, and sparkplugs.com.
TUNING
There is no right or wrong answer for tuning, other than you
NEED to tune after installation. Our PCM does not understand or interpret boost, so it cannot manage fueling accordingly. Driving without a tune will do damage to your motor. There are different options out there, choosing which one is preference and depends on your needs.
1. GM Reflash – Many go this route for itʼs ease, though itʼs far from the most efficient. This is an “out of the box” tuning solution, so you get what you get. This is a locked tune from GM and cannot be modified. I hear mixed opinions, some say they run without issues, some say they do. I hear more than anything that it is full of issues (it quickly came to be known as the “GM Crapflash”); from randomly appearing idle and coasting issues requiring restarting to the car to fix, bogging, and so on. The reflash does tend to run your fueling pig rich, so some have found a 3.2 or 3.1” pulley actually runs a bit better than a stock pulley. One thing that scares me about the reflash is that it doesnʼt seem to monitor (or really even care) about knock.
2. Trifecta – Trifecta Tuning is a reputable source, and Vince (programmer) is surely a genius. Vince will design and write you a tune based on your needs, then send you a handheld containing the tune, which you will then download to your PCM, then return the handheld. I know several people running Trifecta and are more than happy, the only downside I see is not having the person writing you tune right there with you to make adjustment needed. I guess you can call this the happy medium of “out of the box” and custom.
3. HP Tuners – I would say by far HPT is the best option for tuning a J-body. Though I do recommend you find an experienced tuner, this isnʼt something that a person with no tuning experience can just open the box, and write a good tune. Youʼll need a good knowledge of tuning theory, fueling, as well as the software. We require tuning via Alpha-N, which is basically TPS vs RPM tuning (as we do not have boost referenced tuning). Fortunately, there are plenty of forum members who are experienced tuners, and are usually willing to help out those of us that donʼt have the HPT know how.
HPT offers a ride range of variables than can be adjustable, far beyond just fueling. This will allow you to really fine tune all the aspects of your tune to maximize the performance from your specific set of hardware. A good tune is also what can make or break the life of your motor.
There are also options like stand alones, which is a whole different ballgame, and in my opinion, not worth the money when running something like a m62.
**IMPORTANT!!**
If you choose to go with separate IAT and MAP sensors, you MUST, I cannot stress this enough, you MUST place these after the supercharger for accurate readings when tuning!! The best place for the IAT is right on the manifold where the T-MAP would be. You need a very accurate IAT reading, since temperature is so crucial to operation with superchargers. The MAP could also be tapped into the manifold, or run off a boost referenced line.
RECOMMENDED SUPPORTING MODIFICATIONS/ACCESSORIES
1. Wideband O2/Air Fuel Ratio – I very strongly suggest getting a wideband o2 sensor and AFR gauge. Maintaining a healthy AFR is important to any car, but especially a boosted one. Having access to an accurate AFR is also a key tool for your tuner.
I recommend the AEM UEGO wideband unit, seems to be the best bang for the buck, and unlike some competitors, this is a self calibrating unit. The Innovate LC-1 is also a popular unit, but this does require you to calibrate the sensor occasionally (which means removing the sensor from your exhaust to free air calibrate).
Whatever you get, stick to a reputable name brand. When it comes to wideband units, you really get what you pay for. I know some people ran cheaper options like Glowshift, and when switched to AEM it showed a whole point or two different). Youʼll also want to make sure to get something capable of outputting for data logging when tuning with HPT or similar software.
AEM Electronics
2. Exhaust upgrades – People do run on the stock exhaust, though something less restrictive will be a huge help. There are a ton of aftermarket options, and we luck out being able to use LSJ headers. I run the Pacesetter LSJ ceramic coated header and love it. The rest of my system is a 2.5” stainless steel system fabricated by a local shop. There are a ton of exhaust threads floating round on here, so I wonʼt really say much more.
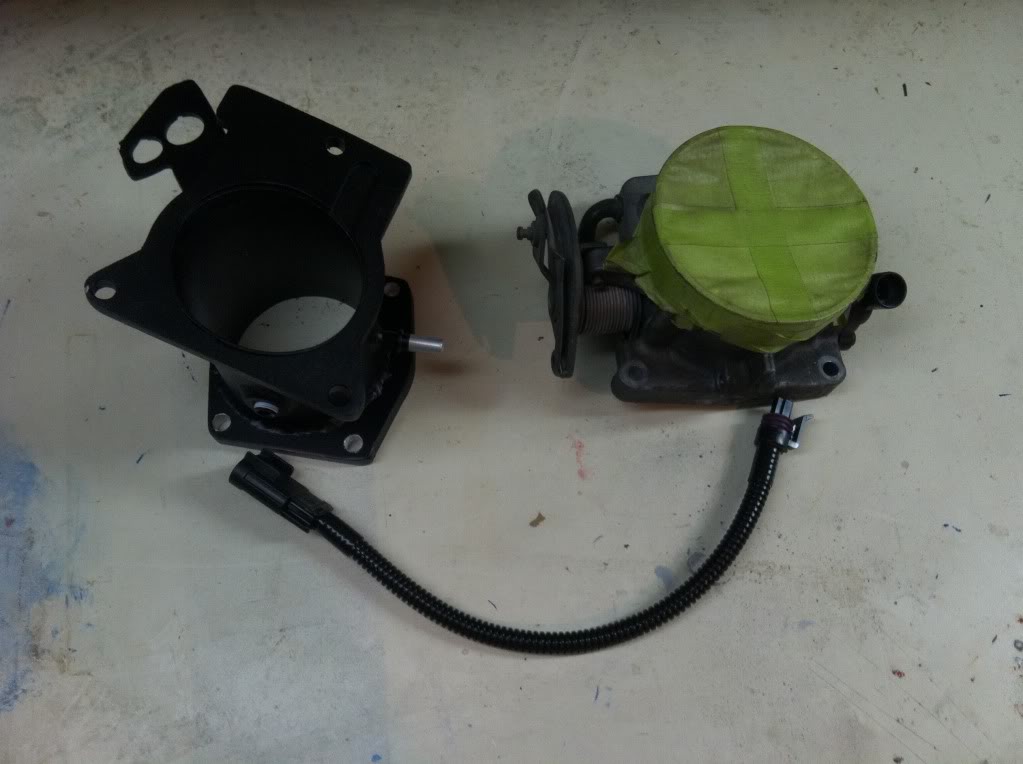
3. Throttle body – Our stock throttle body is pretty tiny for forced induction, so many people choose to upgrade. There are some aftermarket L61 bolt on options (I believe there are still some RSM units floating around), and many people adapt throttle bodies from other platforms. Many choose the LS1 throttle body, which is the route I went. There has also been talk of adapting LS2 and others as well. Youʼll need adapter plates to do so, when it comes to the LS1 you can get a plate style adapter from CBM (or machine one yourself), or Tinkles also had some made in a GP. I went with Tinkʼs adapter and love it.
LS1 TB with Tinkleʼs adapter and TPS harness:
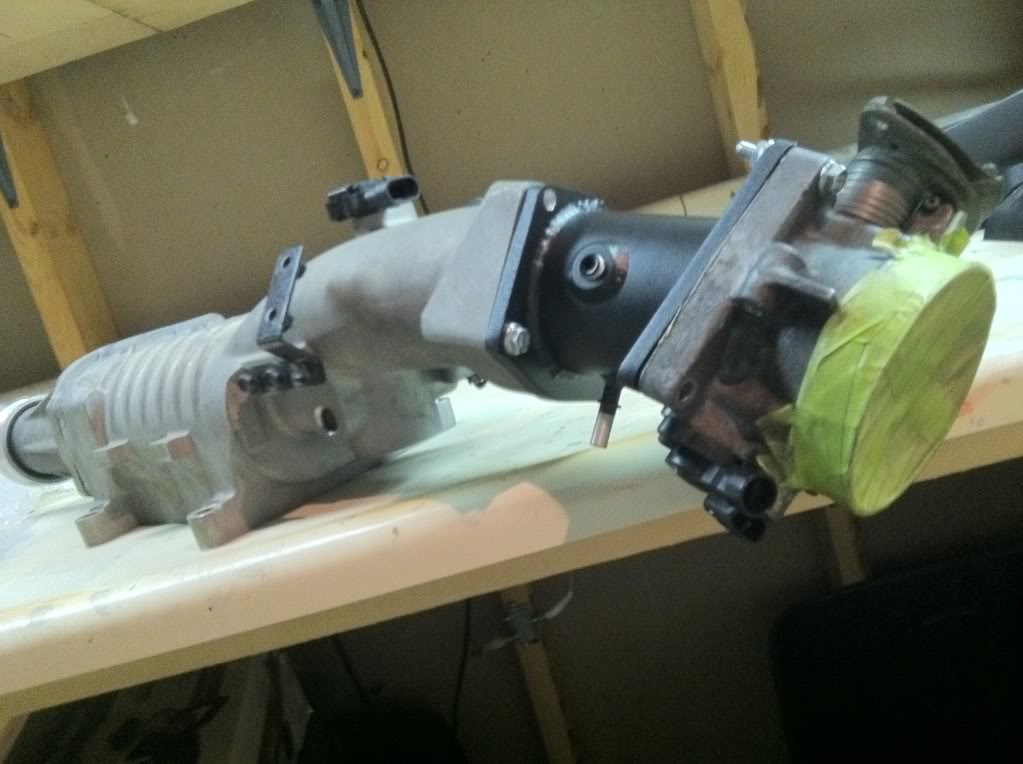
 TB and adapter mounted on blower:
 4. Fuel Pump
 – While not mandatory, upgrading your fuel pump right away wouldnʼt be a bad idea. With the extra demand placed on the stock pump (especially running a smaller pulley), you can expect to reduce the pumpʼs lifespan a bit.
Racetronix is a popular choice in our community, and if you choose this route, pick up their W-body pump and harness for a direct bolt on affair.
Racetronix W-body pump; part # FPA-007
W-body harness; part # FPWH-025
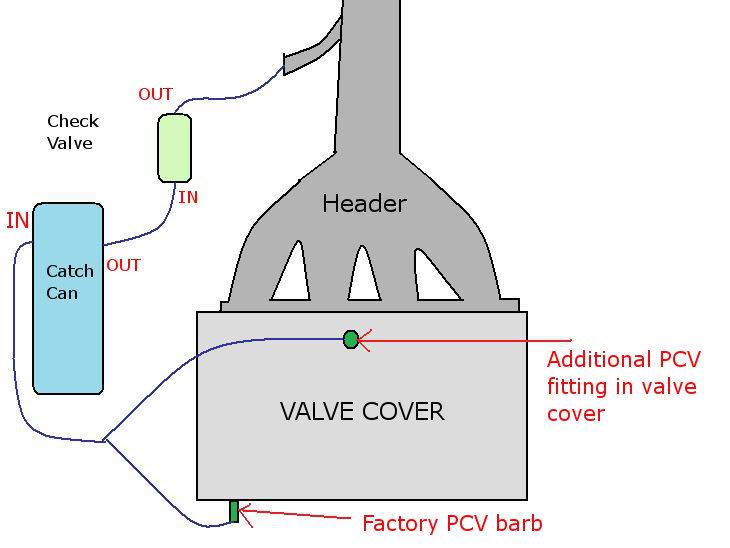
5. Crankcase Ventilation – You will need to address the PCV system, as our stock system is strictly operated by vacuum (not to mention the new intake manifold blocks the PCV port in the head). This means anytime you create positive pressure (boost), the internal PCV system stops working and your begin pressurizing the crankcase with trapped exhaust gases. This can lead to blown seals, head gaskets, robbed performance, as well as an overall strain on the motor.
A catch can system is great way to address this. You would run the vent barb on the valve cover to a catch can, then from the catch can you run through a check valve and to a vacuum source (easiest source being your throttle body adapter). The check valve will ensure you donʼt pull any of the exhaust fumes back into the intake tract, and running back the intakeʼs vacuum will ensure that you always have vacuum operating the PCV.
A while back, SweetnessGT made a great write up for LD9/Ecotec PCV modification. I suggest
reading it.
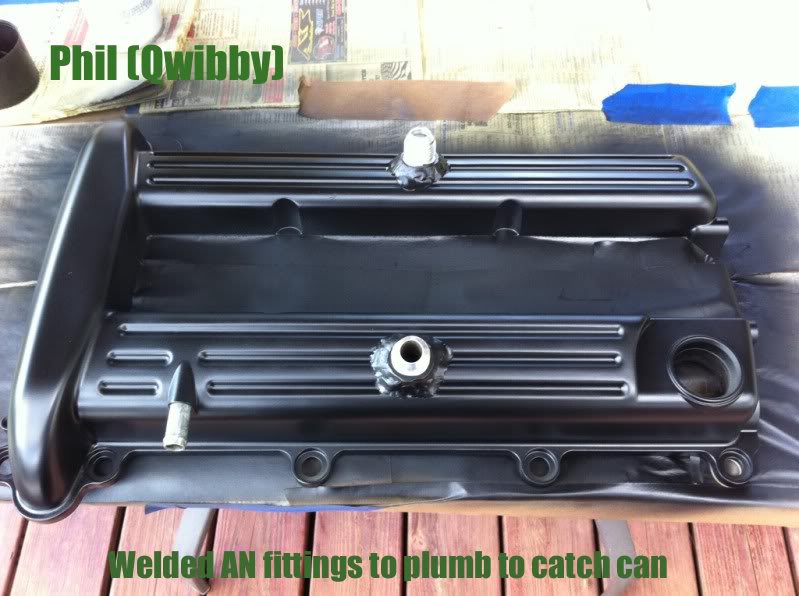
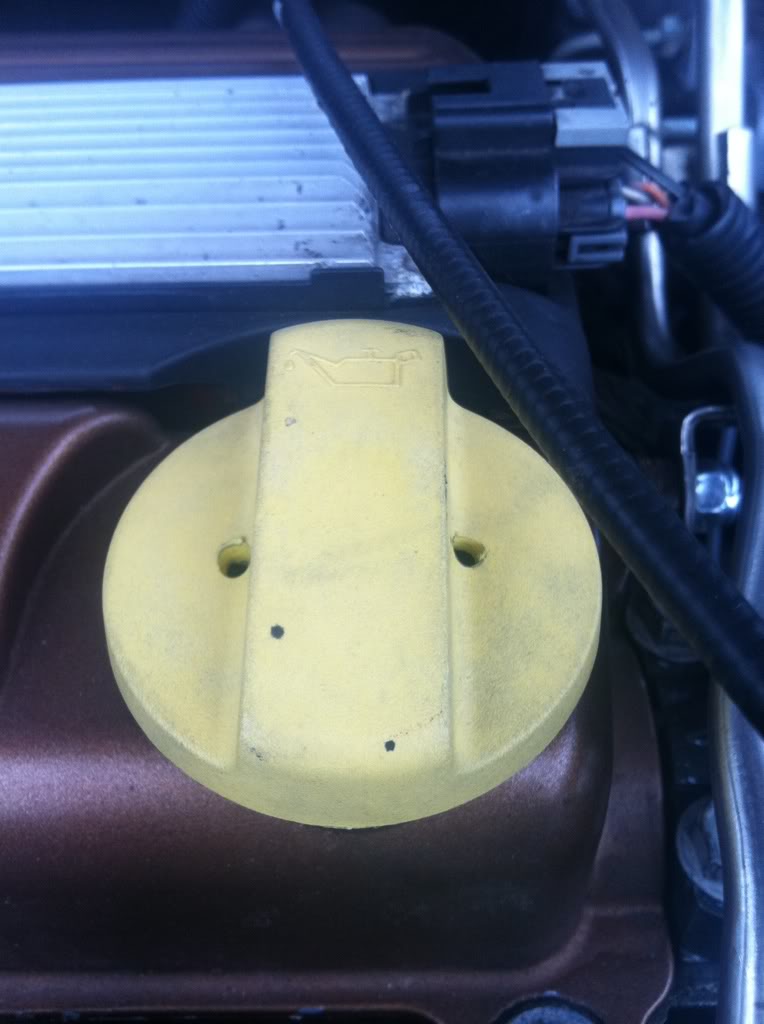
You may also choose to add extra vents to the valve cover (as I am) to tee into the catch can feed. This is as simple as drilling and welding a fitting the valve cover. You could also drill the oil fill cap for additional venting. Metco also sells an adapter that replaces the oil cap with a 12AN fitting, to plumb to the catch can.
There are a lot of catch cans on the market, I suggest using a baffled can, itʼll do a much better job catching the fumes.
You could also get into electric vacuum pumps like used on larger race applications, though I for our purpose, I canʼt see them being worth the large expense.
Commonly asked question; Can I just vent to atmosphere? NO. The Ecotecʼs PCV system is designed to be run by vacuum, and will only function that way.
Some examples of additional PCV:
Philʼs (Qwibby) valve cover with additional fittings welded in. These will get plumbed to the catch can.
Icemikeʼs set up, using the existing PCV barb, as well as tapping the oil cap with a fitting:
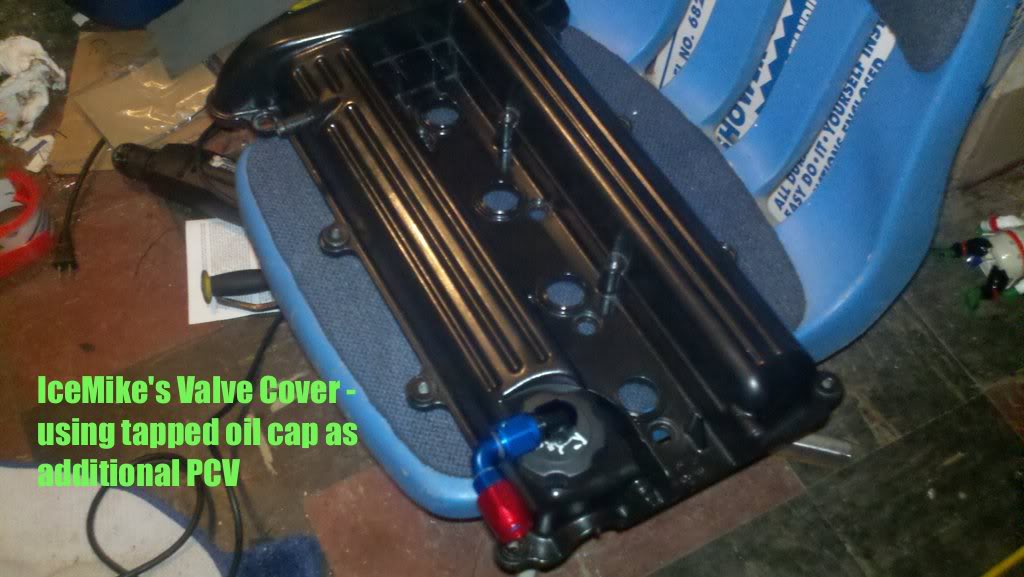
Venting the crankcase to the exhaust is just another option. Iʼm not 100% sure, but I feel the Cobalt SS/SC may use an additional vent into the exhaust. To better explain…the reason we plumb our catch can into the intake tract is so there is always vacuum (again, our internal PCV system is designed to work only by vacuum, once you hit boost, vacuum stops and the system can no longer “breathe”), but even with baffled catch cans and check valves, Iʼve still noticed a bit of oil residue around the throttle body. I donʼt want to be sucking that through the blowerʼs rotors, and through the manifold where it could stick to the cores.
In a normal n/a setup, itʼs ok to run the return pcv line right into the manifold, as any unused gases and residue will just be sucked right back into the combustion chambers and incinerated.
So, if we evacuate right into the exhaust line, you can burn up the unused gases without fear of returning them through the blower and manifold. Not saying this is better or the right way to do it, just another alternative to look at.
My initial setup was running the stock VC barb to a catch can (pulling vacuum from throttle body adapter), and venting a spare oil cap. My new system will vent from the valve cover into a baffled catch can, through a one way check valve, then into the exhaust…kind of a wastegate for superchargers for lack of better terms. Iʼm not sure yet if Iʼm going to just weld a fitting to my downpipe and run a braided line, or actually bend a small stainless steel line, welded to the downpipe, that will come up to the firewall with a fitting to run a line to.
Drilled Oil Cap:
 AVAILABLE UPGRADES
Just like everything in the world of modifying cars, there are endless options for how to do your install. The LSJ/M62 has a pretty impressive aftermarket that we can utilize. There are also options for customizing much of the equipment. This is where you can get creative and make your m62 kit unique.
1. Cooling system – A good cooling system is a must not only for getting the best performance from your supercharger, but also maintaining safe temps in the motor. Thereʼs a large aftermarket when it comes to cooling.
Dual Pass Heat Exchanger – This is a replacement endplate with 1 inlet and 2 outlet, and changes the flow pattern of the cores. This combined with a quality heat exchanger can make a solid cooling system. ZZP, OTTP, and GM Racing all make versions of the dual pass.
Plumbing when using a dual pass endplate:
 ZZP Single Pass Manifold
 – This is a full replacement intake manifold, my understanding is that all 4 cores are faced the same direction so the water is only making 1 pass straight through.
Heat Exchanger – While the Cobra h/e is a popular choice, there are much greater options. There are single and dual pass cores, dual obviously being the most efficient. The ZZP S3 is a very popular choice, as well as the OTTP Stage 1 (just slightly smaller than ZZPʼs). CX Racing makes similar units, though I am unsure of their quality. Fluidyne is a very reputable name in the Mustang crowd, and they make some pretty ridiculous heat exchangers. Fair warning, most of the h/eʼs are HUGE, and may take some modding to fit behind a J-bodyʼs bumper.
Pump – The stock pump seems perfectly acceptable, as it pumps 4-6gph, and the recommended rate for an application like ours is 5gph. If you do choose to upgrade, Mezaire makes several options.
Methanol/Water Injection – Meth injection is an effective way to minimize detonation. There are a ton of kits on the market, which are honestly all about the same. There is a wide selection of nozzles sizes, activation switches, and tank sizes, so youʼll have to chose what best suits your needs. Iʼm not going to really get into how it works, as there is a wealth of information all over the internet. Some reputable brands to check out are AEM, Alcohol Injection Systems, Devilʼs Own, and Snow Performance.
2. Supercharger Port and Polish – You can opt to have the blower port and polished, similar to how you would have a head done. This is something you donʼt want to attempt on your own; removing too much material or removing it unevenly can have ill effects, and reassembly the casing is something that takes great precision. Pick a shop that is known for working on superchargers. First place that comes to mind is
Stiegemeier, they are known for their high quality work, quick turn around time, and competitive pricing.
3. LSJ Alternator – This is a simple upgrade for us, as it just bolts in place of the stock alternator. This will give you some extra amps, as well as the pulley will be spinning the correct direction (the L61 alternator has to spin backwards with the blower)
4. Adjustable Tensioner – This becomes useful when dropping to small sized pulleys, to take up the slack in the belt. The OEM tensioner can only compensate so much, and even with a short belt cannot always give enough tension. There is also the problem of small pulleys having less surface area to contact the belt, which cause slipping, and this tensioner can help that.
5. Adjustable Fuel Pressure Regulator – This again is something not needed by all, and youʼre overall goals will determine if you need one. It seems most builds are fine with stock regulator (or even a stock LT1 reglator). I am far from an expert when it comes to fueling systems, so rather than mislead anyone, Iʼll say there is a ton of information here and other forums regarding fueling hardware, do some research then decide from there if you need to upgrade the FPR. If you do, Aeromotive is a popular choice and respected brand.
6. Phenolic Spacers – The major drawback to roots type superchargers is the immense amount of heatsoak youʼll be battling, especially when you start running smaller pulleys. The problem comes from a hot aluminum blower, butted right against a really hot aluminum manifold, which transfers most of itʼs heat right onto the head. Heatsoak drives up your IATs and kills the efficiency.
There are two types mainly used; one spaces the blower off the manifold, and the second spaces the manifold off the head (keep in mind when using the manifold/head spacer, you will need longer bolts to secure the manifold to the head). I believe there is also a spacer for throttle bodies, though I have no experience on itʼs effctiveness.
JUCNBST has a good review written for the O.E.M. blower/manifold spacer, and in my opinion it yielded pretty impressive results. Cruising IATs (out of boost) were consistently about 10* cooler, and when the used an infrared gun on the surface of the manifold and blower, there was a significant drop in temperature. I imagine the head/manifold spacer makes even more of a difference, and the two combined should really aid in keeping things cool. To my knowledge ZZP and O.E.M. both make the spacers, and Iʼm sure there are other vendors too.
OEM Phenolic Spacers
https://www.overkillengineeringmotorsports.com/ioncobalthhrg6.html
ZZP Phenolic Intake Manifold Spacer
https://zzperformance.com/cobalt_ion/products1.php?id=1123&catid=188
These are of course the basics, but when it comes to customizing your setup, there could be limitless options and combinations. Some stop with bolt ons, but there is always beyond. Custom fuel lines may be added, modifications to the intake system, various catch can types and options, etc. Hopefully the information proved in the write up covers the basics and a bit more for newcomers, and gives you an idea where to start when sourcing, installing, and gaining the most from your supercharger setup.
And finally, some vendors to start your search not only for supercharger specific parts, but supporting mods as well:
ZZ Performance
OTTP
Frozen Boost
Smoothflow Pulleys
AllEcotec.com
Turbo Tech Racing
OEM
RD Fabs


 Απάντηση με παράθεση